How to Do Hanging Indent On Google Docs

2024-04-18 11:56:27 • Filed to: Google Tips and Tricks • Proven solutions
Google Docs has been recognized as the contemporary version of word processing platforms with recognition throughout the official sector. When it comes to handling documents, hanging indents might not be a common formatting procedure, yet its practical application is quite broad and useful. However, with the word processing platforms in the market, this feature is still ambiguous in implementation. This article provides a detailed guide on how to do hanging indent on Google Docs efficiently.
How to Do Hanging Indent On Google Docs
Google Docs provides a very proficient structure in managing your documents. For implementing hanging indents, Google Docs offers you expressive tools that can be accurately used for indenting your documents. Hanging indents are usually required for documents that include bibliographies and comprise of citations and cited documents. To understand the simple guide on how to hanging indent on Google Docs, you need to follow the steps below.
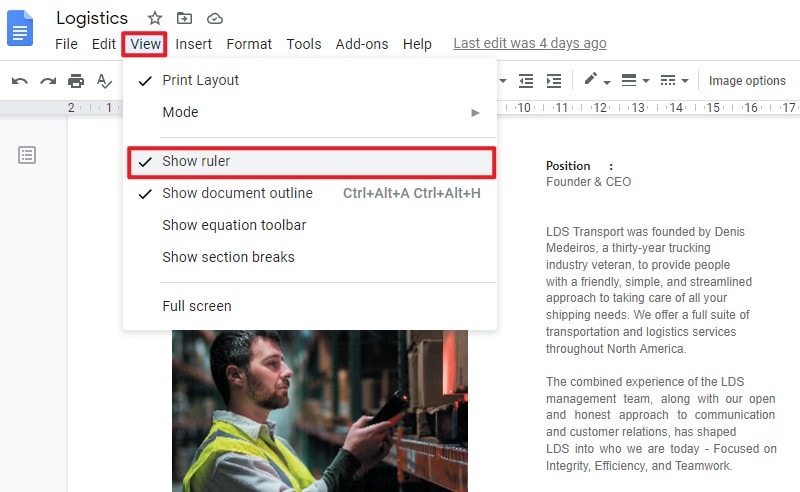
Step 1. Display the Ruler
Initially, it is necessary to add the ruler to the documents for managing the indentations. Tap on the "View" section to check the "Show Ruler" option.
Step 2. Select Text and Approach Scale
Following this, you need to select the text that you wish to indent and access the ruler right below the sub-menu. You will observe the left indent (blue triangle) and left margin control (blue rectangle) on the ruler.
Step 3. Drag to Indent
Drag the indent control to the right onto the position where you wish to position your hanging indent. The margin control follows the indent control, and the complete text gets indented. It is to be kept in notice that the margin control is returned to its place where it was present before.

A Powerful PDF Software for You
As you get to know more about how to make a hanging indent on Google Docs, there is another file format that is quite common among official documentations. PDF files are referred to as the standard of communication in various offices since the format offers a very simple and efficient reading experience as compared to any other file format, which usually makes it quite strenuous for the audience to read and analyze the information present in between. However, when it comes to editing such files, there are quite a lot of issues that associate with the file management of PDF files. This article introduces you to a PDF editor, Wondershare PDFelement - PDF Editor, that would allow you to manage the PDF files with ease.


PDFelement attenuates a very effective set of editing tools along with a quality-assured converting platform that would sustain the original quality of your PDF file after conversion. This PDF editor is not only about editing and converting PDFs, where it extends to farther grounds with abilities to manage PDF files efficiently. It offers annotation tools that help users review and comment across PDF files without having it converted into an editable format.
Following this, PDFelement also helps you add digital signatures, which makes it easier for users to ratify documents. It also offers a very strong protection interface that helps you in protecting your PDF files with passwords and redacting the information for protecting it from illegal access. PDFelement is a perfect option when it comes to selecting a PDF editor.
How to Align Text in PDF Form
PDFelement, as stated, is a PDF editor that offers unique tools and features to work with. As you get to know the simple method of how to add hanging indent in Google Docs, you should be set aware of the simple and effective feature of text alignment offered in PDFelement. The following guide explains the steps that are required to align any text in a PDF.
Step 1. Import PDF File
After downloading and installing the platform, you need to select the option of “Open File” from the home window of the platform to browse the PDF file from your local directory.

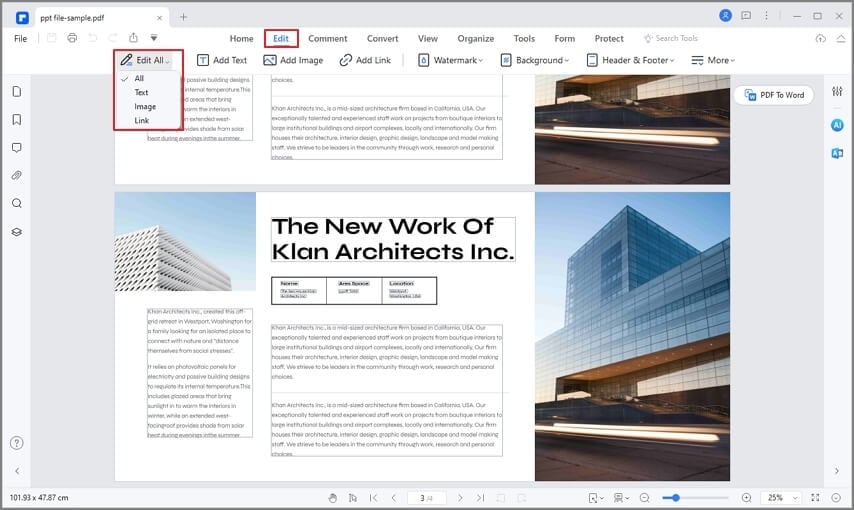
Step 2. Move into Editing Mode
To edit your PDF, it is necessary to select the “Edit” tab to open a sub-menu for editing and indenting your document.
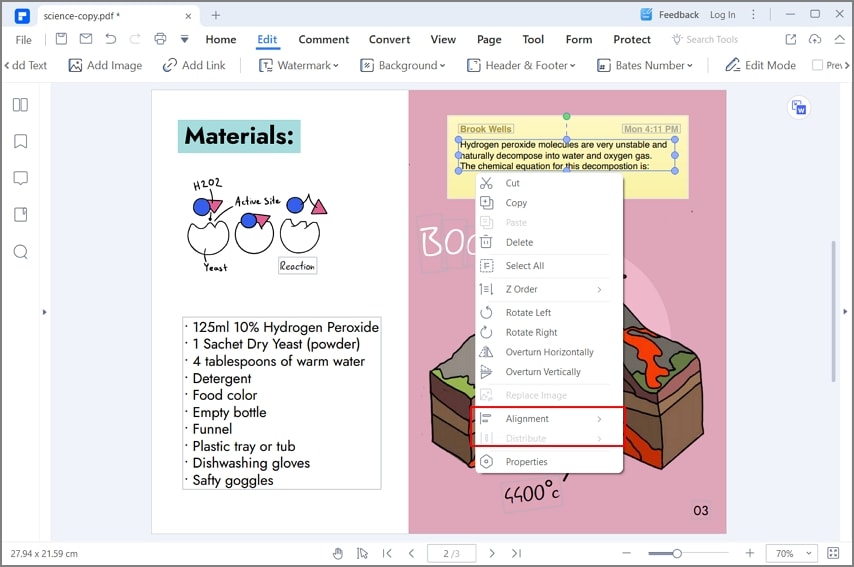
Step 3. Align Text
With the document in editing mode, you can proceed towards moving images, frames, and text in your document to align it properly. You can execute it by dragging it across with the mouse, use arrow keys, or utilize the "Alignment" options by right-clicking the text in the platform.
Free Download or Buy PDFelement right now!
Free Download or Buy PDFelement right now!
Buy PDFelement right now!
Buy PDFelement right now!
Elise Williams
chief Editor