
A tiny detail can make all the difference in graphic design and printing. When you add bleed to the Illustrator program, it can make or break your project. Similarly, adding crop marks in illustrator software is essential for ensuring accurate trimming of the final printed products such as brochures, posters, and business cards. But why do you need to add bleed in the first place?
The answer lies in the printing process. The edges of your designs could look sloppy without Illustrator bleed lines. In this article, you will learn the significance of bleed and how to add it to Illustrator software. In addition, you will learn how to add bleed and crop marks using a PDF editor for seamless printing. All right, let us get started!
In this article
Part 1. What Does Bleed/Crop Mark Mean?
Bleed is a term you have probably heard before if you have worked on a print project. What exactly does bleed in the Illustrator program mean? Further ahead is the definition of bleed lines and crop marks used in printing different business and promotional materials.
Adobe Illustrator Bleed Lines
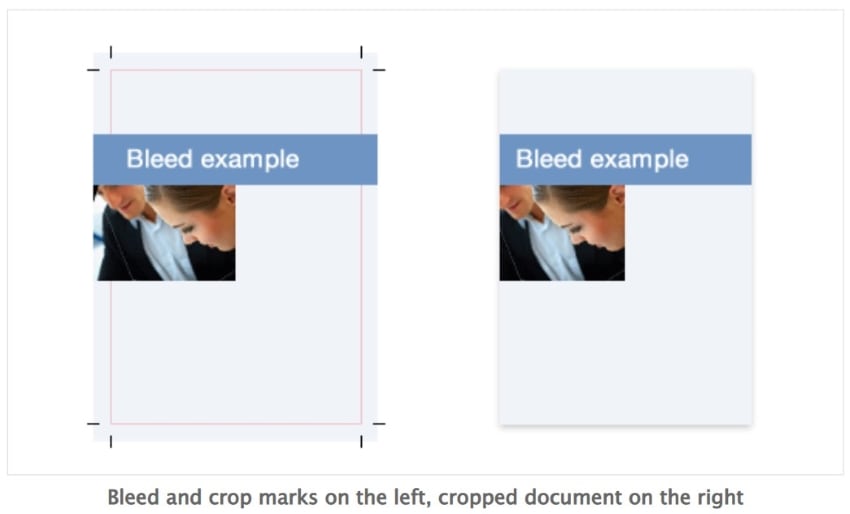
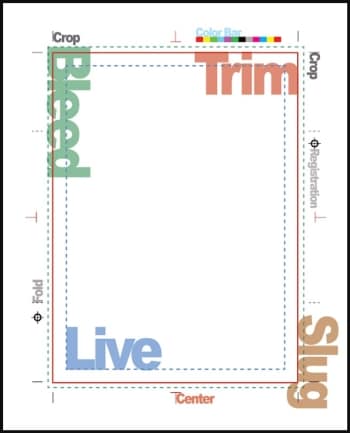
The term bleed in the graphic design and printing industry refers to the part of a layout that lies beyond the crop area, trim mark, and printing bounding box. You can think of it as the space in your document where your artwork extends its original size. You use it when your artwork or design components must extend past the trim boundaries.
For instance, you will need to use Adobe Illustrator software to create bleed areas on slightly larger documents if you want photos running down the edges of a brochure. By doing this, the designs will still align with the printed side, granted that there are errors during cropping.
There are two main categories of adobe illustrator bleed. Depending on the goal of your paper, you may need to use a specific style of bleed.
Partial Bleed Vs. Full Bleed in Illustrator
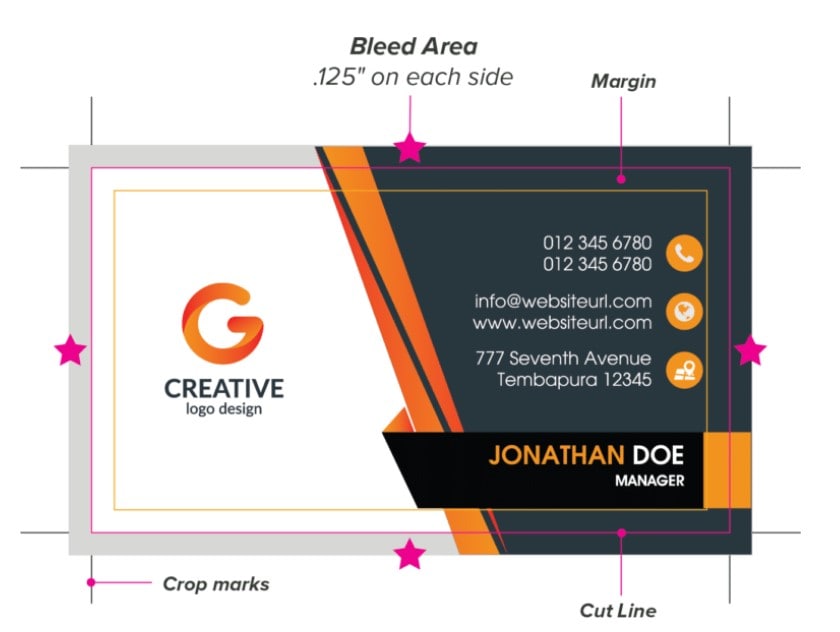
Partial bleed refers to a few elements of your layout going beyond the crop marks of your document, usually with only one to three edges touched. Business cards, for example, can have partial bleed margins when there is just an image in the corner.
Meanwhile, full bleed refers to every element in your layout beyond its actual frame. It is when design elements extend to all four sides like a colored backdrop. You can use it for promotional materials such as posters and flyers.
You must apply a bleed area if any object on your content layout touches the edge of the document. The key is to position the element to extend it over the crop or trim marks. Read on to find out how crop marks in designs work.
Crop Marks in Illustrator
Illustrator crop marks tell your printer where to cut your document. They are outside the trim region at each corner of a page and serve as cutting guides.
Part 2. How To Add Bleed/Crop Marks With Adobe Illustrator?
Now that you know what bleed means for printing, it is time you learn how to use Adobe Illustrator software to add them to your layout. The built-in options in Illustrator software also let you add crop marks, so you can quickly include them.
How To Add Bleed in Illustrator for Your Layout
To help you make sure your design files are flawless and print-ready, here is how to apply bleed and crop marks in the Illustrator program. Let us get the ball rolling.
Option 1: Add Bleed in Illustrator to New Document
If you are creating designs for printing, adding bleed to new Adobe Illustrator documents is a must. Here is how you can ensure that your designs have the necessary margins and look professional.
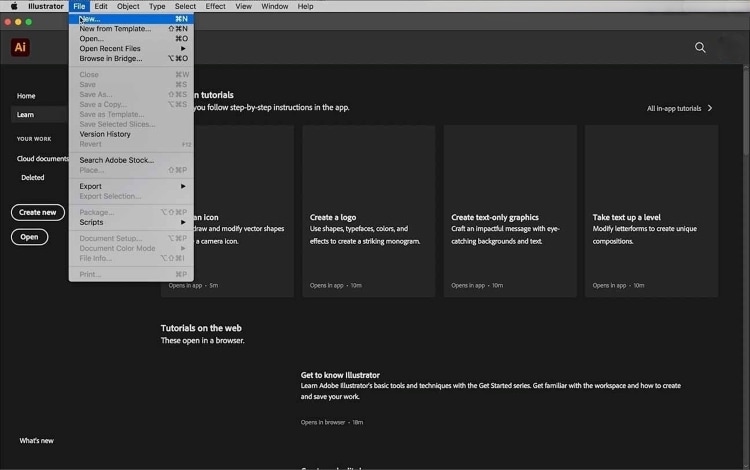
Step1
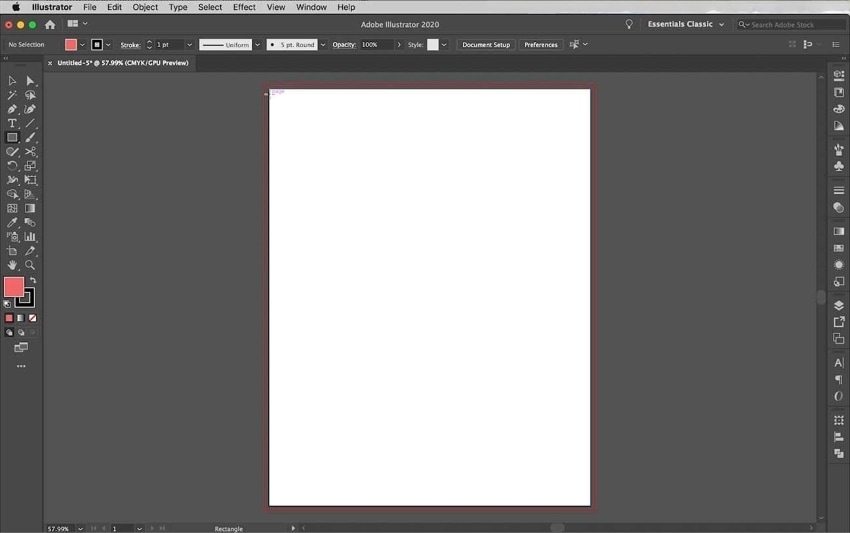
Open Adobe Illustrator. Click File>New. Then the New Document dialogue box will show.
Step2
Under Print, select Blank Document Presets. Next, set Width and Height dimensions, and choose a unit of measurement from the drop-down menu below the Preset Details selection.
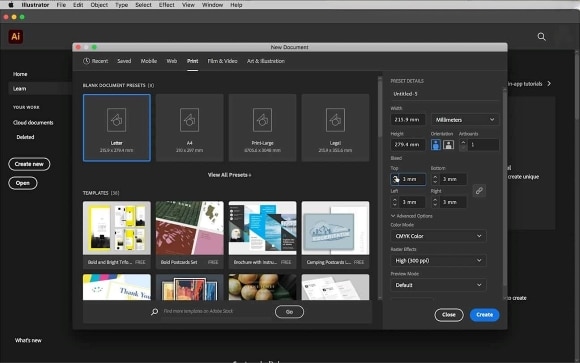
Step3
To increment or decrement the Bleed value, click the up-and-down control below the Top spin box. Do this until you set it to 0.125 inches or 3mm.
Step4
Lastly, click Create.
Option 2: Add Bleed in Illustrator to an Existing Document
Are you tired of designs that look unfinished or cut off at the edges? Adding bleed to your existing Adobe Illustrator documents can help solve that problem. Follow these steps to ensure your designs are print-ready.
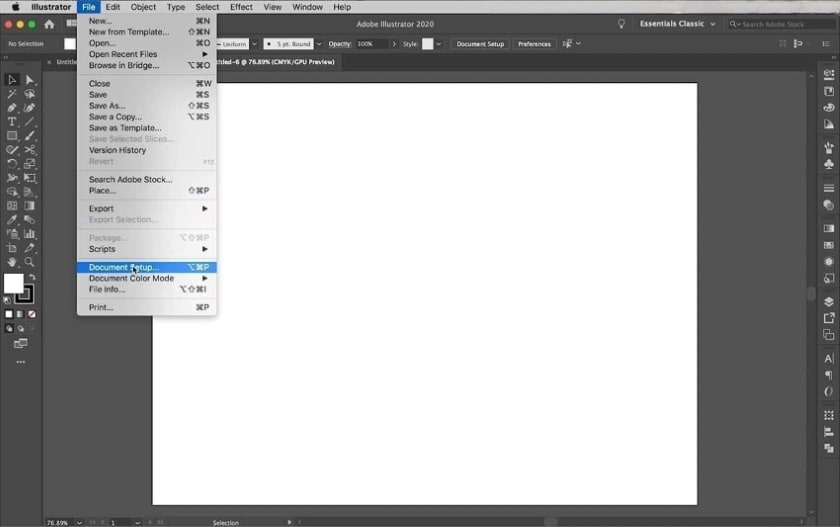
Step1
Go to File> Document setup in the top navigation menu if you already have an opened document.
Step2
Document Setup dialogue box will appear. Under General, click the up-and-down controls in the Bleed options. Click the link button to apply the bleed on all four sides concurrently.
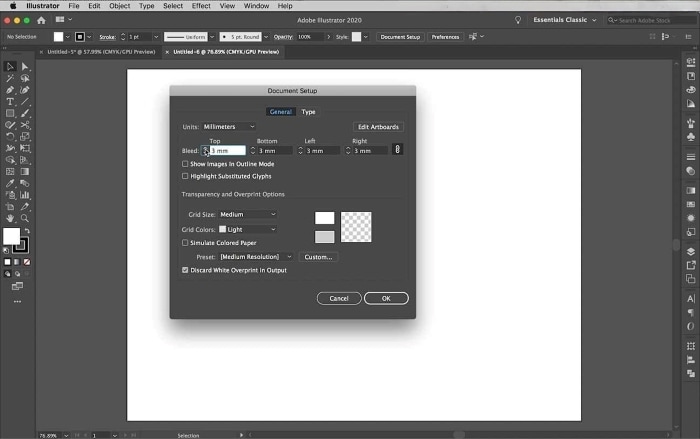
Step3
Click OK once you have set up all the necessary information in the Document Setup dialogue box.
Option 3: Save As PDF With Illustrator Bleed Lines
Don't let your design layout fall short - make sure it has the necessary bleed and crop marks before you export and print. Follow these easy steps to ensure your designs stand out.
Step1
Choose File > Print on the top navigation pane.
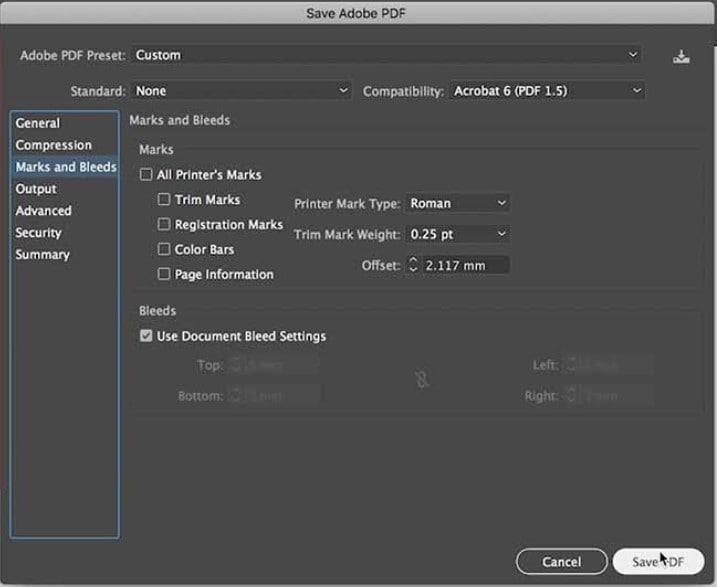
Step2
On the Save Adobe PDF dialogue box, select Marks and Bleeds.
Step3
Next, choose one of these:
- The Top, Left, Bottom, and Right values you enter will determine where the bleed marks appear. Click the link symbol to make all the values uniform.
- You can use the bleed values specified in the New Document dialog box. To do this, select Use Document Bleed Settings.
Step4
After things are all set up, click Save PDF.
Part 3. Wondershare PDFelement – Professional PDF Editor to Add Bleed/Crop Marks from PDF
Adding crop marks in Illustrator software plus bleed areas will help your printed material look professional while setting up your document for printing. Indeed, you can use graphic design software to do the task.
But a PDF editor can still add bleeds and crop marks if you overlooked setting the bleed lines in Illustrator software before exporting. To find a PDF editor that matches your unique demands, consider characteristics like the simplicity of use, price, and editing capabilities when choosing one.
Wondershare has a PDF editor called PDFelement. The program lets you add bleed and crop marks to PDF files in seconds. Upload your PDF, and with its intuitive interface, you can easily add bleed lines and crop marks to unlimited files for an affordable price.


 G2 Rating: 4.5/5 |
 100% Secure
Have trouble with illustrator bleed lines or forgetting to add crop marks to your PDF? Wondershare PDFelement can help. Preparing your PDF document for printing is easy with the following steps.
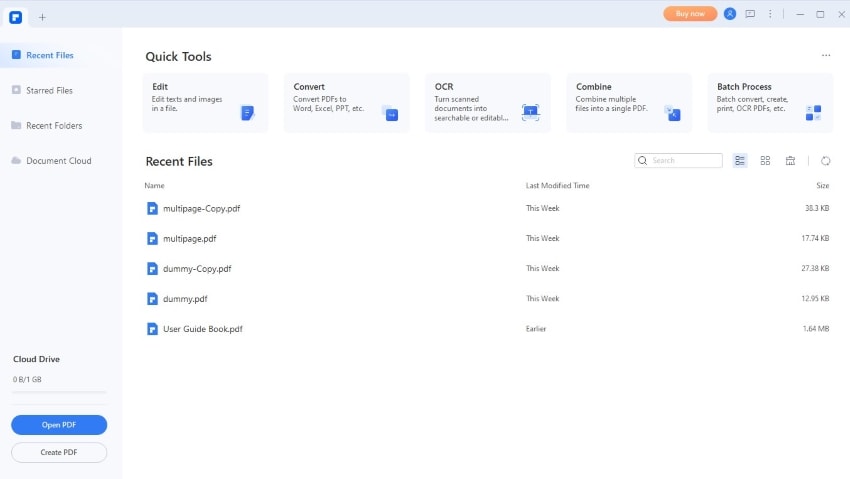
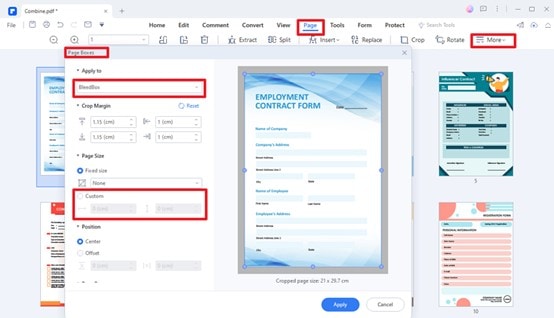
Step1
Download and launch Wondershare PDFelement. Then, click Open PDF to import your file layout.
Step2
Click Page from the top menu bar. Next, click More, then choose Page Boxes.
G2 Rating: 4.5/5 |100% Secure
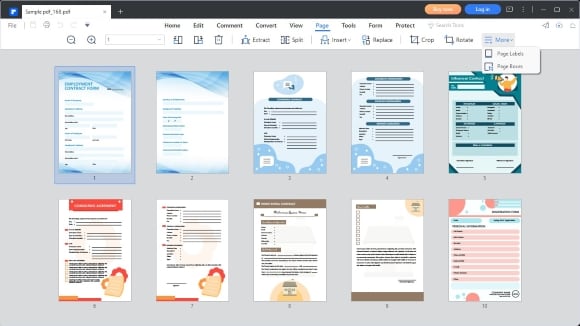
Step3
The Page Boxes window will pop up. Here, select BleedBox from the drop-down menu under the Apply to selection.
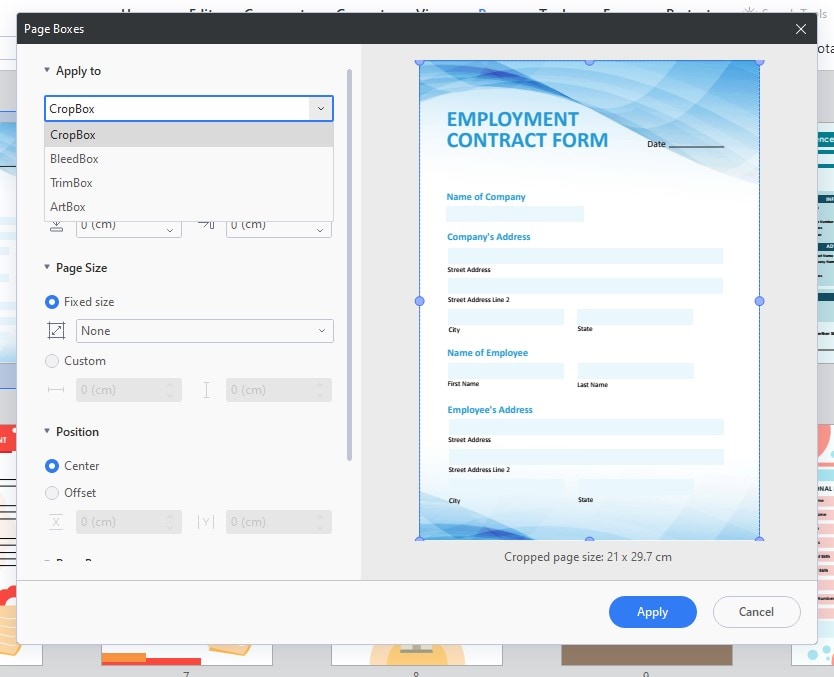
Step4
Click Apply to make the necessary changes in your document.
G2 Rating: 4.5/5 |100% Secure
Part 4. Reasons To Use Wondershare PDFelement To Add Bleed Marks in Files
Wondershare PDFelement has multiple sets of features for a PDF editor that you would enjoy using for creating, managing, and editing PDF files. One of these features includes its capability to add bleed marks to PDF files. Use this PDF editor if you have trouble including Illustrator bleed lines on your layout. There are several reasons why PDFelement is the ideal tool for adding bleed marks to PDF files.
- Cross-compatibility. PDFelement words across multiple devices so you can edit your PDF files anytime you need it. You can use it on a desktop (Windows 11 and below / macOS 10.14 to macOS 13) and your mobile phones (Android 5.0 and above / iOS 13 and above).
G2 Rating: 4.5/5 |100% Secure

- Intuitive interface. Adding bleed marks to your PDF files is a breeze with the user-friendly and intuitive interface of PDFelement. So even if you have not used PDF editing tools before, you can quickly add bleed marks to your documents.
- Batch processing. You may handle many PDF files at once with PDFelement. You can edit PDF files in multiple ways, including converting them to editable formats (Word, PNG, JPG, Excel, and more) without changing the formatting.
Conclusion
Understanding the importance of the bleed area in printing is crucial for achieving a polished and professional final product. Incorporate a bleed illustrator into your design to make sure you don't have unsightly white borders. Set up your document right with bleeds and crop marks in mind to avoid delays during prepress. You can confidently create stunning printed materials by following these tips.
For those looking for a reliable and easy-to-use PDF editor, Wondershare PDFelement is an excellent choice. It is a flexible application with features that make editing PDFs seem effortless. Printing design tasks require bleed and crop markings on PDF files, one of its best features.
This capability makes Wondershare PDFelement a top choice for anybody wishing to edit PDFs, along with its user-friendly interface and efficient editing tools. Give Wondershare PDFelement a try if you want an easy and efficient way to add bleed to your documents.


