
Table of Contents
A scanned document usually looks like a normal page, but to Microsoft Word it may be nothing more than a picture. That is why you can click around the page and still not select a single word. To edit the text, you first need OCR, short for optical character recognition. OCR reads the letters in the scanned image and turns them into editable text that Word can handle.
So if you are asking “how to edit a scanned document in Word,” the real answer depends on what you have: a JPG or PNG image, a scanned PDF, or a document that was already converted badly. Word can help in some cases, OneNote can extract text from images, and a PDF OCR tool such as PDFelement is often the better route when the scan is inside a PDF and you want to preserve layout.
This guide walks through the practical options, starting with the tools many people already have.


 G2 Rating: 4.5/5 |
 100% Secure
Can You Edit a Scanned Document in Word?
Yes, but not in the same way you edit a regular DOCX file. A scan is usually image-based. Word cannot rewrite text that exists only as pixels until OCR has converted those pixels into real characters.
If someone sends you a contract, invoice, form, report, or old printed letter as a scan, it may arrive in one of these forms:
An image file, such as JPG, PNG, or TIFF.
A scanned PDF, where every page is an image inside a PDF wrapper.
A Word document that contains scanned page images pasted into it.
A PDF that already has OCR text hidden behind the scanned image.
The best method depends on the file type. If the scan is an image, OneNote is a convenient way to copy the text into Word. If the scan is a PDF, Word may convert it, but the result varies. If the document has multiple pages, tables, forms, stamps, or mixed languages, a dedicated OCR workflow is usually more reliable.
What OCR actually does
OCR does not “edit the scan” directly. It creates editable text from the scan. After OCR, you can correct typos, change wording, apply Word styles, adjust spacing, and save the file as DOCX.
OCR accuracy depends heavily on the scan quality. A crisp 300 dpi scan with straight pages and clear contrast usually converts well. A blurry phone photo, skewed page, low-light image, or document with handwriting can produce errors that you need to fix manually.
Quick choice: which method should you use?
If you want the fastest path, use this rule of thumb:
| Your file type | Best option | Why |
|---|---|---|
| JPG/PNG scan | OneNote OCR, then paste into Word | Simple for one-page images |
| Scanned PDF | PDFelement OCR or Word PDF conversion | Better suited to PDF workflows |
| Multi-page scanned PDF | PDFelement OCR, then export to Word | More control over OCR and conversion |
| Occasional free browser workflow | Google Drive OCR | Useful when you do not have desktop OCR tools |
| Scan already inside a Word file | Extract image or use OneNote/PDFelement OCR | Word cannot edit image text directly |
G2 Rating: 4.5/5 |100% Secure
Method 1: Use OneNote to Copy Text from a Scanned Image into Word
OneNote is one of the easiest built-in Microsoft options for anyone wondering, “how can I edit scanned documents in Word if my scan is just an image?” The workflow is simple: insert the scanned image into OneNote, use its OCR feature to copy text from the picture, then paste the text into Word.
This method is best for short documents, receipts, letters, meeting notes, printed handouts, or one-page scans. It is less ideal for complex layouts because OneNote often extracts the text without perfectly preserving columns, tables, headers, and spacing.
Step 1: Create a new OneNote page
Open OneNote and create a new notebook page. You do not need a complicated setup; a blank page is enough.

If you use OneNote for Windows, the exact menu labels may differ slightly depending on your version. Microsoft has changed OneNote naming and app versions over time, but the basic OCR workflow remains similar.
Step 2: Insert the scanned image
Click Insert and choose Picture or Pictures, then select the scanned file from your computer. The image will appear on the OneNote page.

For best results, use the cleanest scan you have. If the image is sideways, rotate it before running OCR. OCR tools can sometimes handle rotation, but they are more accurate when the page is upright.
Step 3: Copy text from the picture
Right-click the image in OneNote and choose Copy Text from Picture. OneNote will read the scan and place the extracted text on your clipboard.

If the option does not appear immediately, wait a few moments and right-click again. OneNote sometimes needs time to process the image, especially if the file is large.
Step 4: Paste the text into Word
Open Microsoft Word and create a blank document. Right-click in the document and paste the copied text. You can use Keep Source Formatting if available, but with OCR text from an image, you will often need to reformat the document manually.

Now you can edit the scanned document in Word like ordinary text. Read through the result carefully. OCR may confuse characters such as “0” and “O,” “1” and “l,” or “rn” and “m.” Names, numbers, addresses, and legal clauses deserve extra attention because a small OCR error can change the meaning.
When OneNote is the right choice
OneNote works well when the priority is getting text out quickly. For example, if you need to reuse a paragraph from a printed memo or copy text from a scanned class handout, it is fast and free if you already have Microsoft 365 or OneNote installed.
It is not the best method if your goal is to keep the page looking exactly like the scan. You may get the words, but not the same layout. For that, start with a PDF OCR and conversion workflow instead.
Method 2: Open a Scanned PDF in Word and Convert It to Editable Text
Many scanned documents arrive as PDFs, not image files. If you ask, “can I edit a scanned document in Word?” and your file is a PDF, Microsoft Word may be able to convert it. The key word is “may.” Word can open PDFs and convert them into editable Word documents, but scanned PDFs still require OCR.
According to Microsoft’s own guidance on opening PDFs in Word, Word works best with PDFs that are mostly text. Scanned pages, heavy graphics, and complex layouts can convert less cleanly.
How to open a scanned PDF in Word
Open Microsoft Word first. Then choose File > Open, browse to your PDF, and select it. Word will show a message explaining that it will convert the PDF into an editable Word document. Confirm and wait for the conversion to finish.
If the PDF already contains recognized text, Word may produce a usable document. If the PDF is purely scanned image content and Word cannot perform OCR successfully in your version or setup, the result may be an image on the page rather than editable text.
Once the file opens, click in the text area. If you can place the cursor between letters and type, the conversion worked. If clicking only selects a full page image, the scan has not been converted into editable text.
What to expect from Word’s PDF conversion
Word’s PDF conversion is convenient, but it is not a perfect layout-preservation tool. It may change page breaks, columns, footers, tables, text boxes, and line spacing. This is especially common with contracts, brochures, invoices, resumes, academic papers, and forms.
For a simple scanned letter, that may not matter. You can correct the text and rebuild the formatting quickly. For a document where layout matters, treat Word’s conversion as a starting point rather than a finished version.
A practical workflow is to keep the original PDF open beside the converted Word document. Compare the two as you edit. Pay attention to:
Dates, prices, account numbers, and email addresses.
Tables where rows or columns may shift.
Headers, footers, footnotes, and page numbers.
Special characters, accents, symbols, and signatures.
Paragraph order in multi-column documents.
This method is good when you need a quick conversion and the document is not too complex. If you need stronger control over OCR language, page range, or final Word export, use a dedicated OCR tool.
Method 3: Convert a Scanned PDF to Editable Word with PDFelement OCR
If your scan is a PDF and you need a cleaner scanned Word document to editable Word workflow, PDFelement is a practical option. It is especially useful when Word opens the PDF as images, when the document has multiple pages, or when you want to run OCR before exporting to DOCX.
The pain point is common: you receive a scanned PDF, need to update names or wording, and then send back a polished document. Opening the file directly in Word may break the layout or fail to recognize text. PDFelement lets you handle the PDF stage first: open the scan, run OCR, review the recognized text, and then either edit the PDF or convert it to Word.

G2 Rating: 4.5/5 |100% Secure
Step 1: Open the scanned PDF
Launch PDFelement and open the scanned PDF. You can usually use Open File or drag the PDF into the program window. If you have a scanned image rather than a PDF, you can convert or open it as a PDF first, depending on your workflow.
Once the file opens, check whether the text is selectable. If it is not, OCR is needed.
Step 2: Run OCR on the document
Choose the OCR feature and select the correct recognition language. This matters more than many users expect. A document in English with names, numbers, and standard fonts is straightforward. A document with Spanish accents, German characters, or multiple languages needs the right OCR language setting to reduce errors.
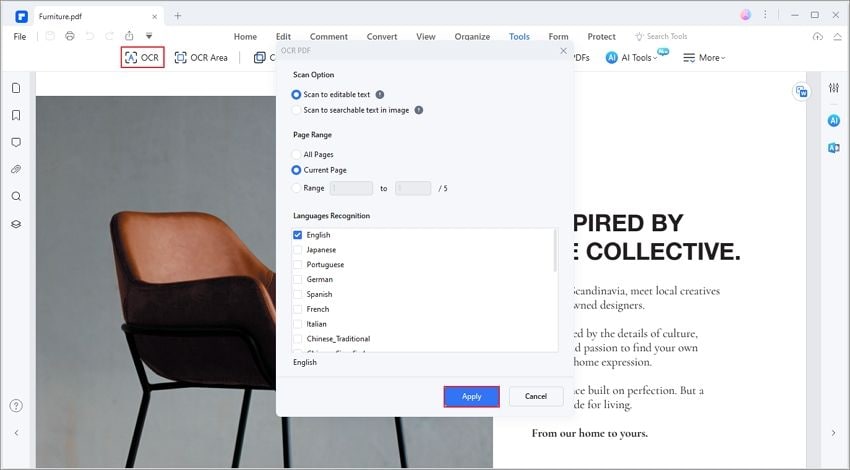
Depending on your goal, choose an OCR mode that creates editable text. Some OCR tools also offer searchable-image modes, which keep the page image and add invisible searchable text. That is useful for archiving, but if you want to edit in Word, you need editable output or Word export.
Step 3: Edit the recognized PDF or export it to Word
After OCR finishes, you can review the document inside PDFelement. If you only need to correct a few words, editing the PDF directly may be faster than converting the file to Word.

If your goal is Word editing, export or convert the OCR-processed PDF to a Word document. Open the resulting DOCX in Microsoft Word, check the formatting, and make your edits.
This route is useful for scanned contracts, application forms, reports, and multi-page documents where you do not want to retype everything. It also fits broader PDF tasks after editing, such as adding comments, signing, compressing the final PDF, combining pages, or preparing a clean PDF copy to send. Rather than treating OCR as a one-off text extraction step, PDFelement lets you manage the document from scan to editable file to final PDF.
When PDFelement makes more sense than Word alone
Use PDFelement instead of Word’s built-in PDF conversion when the scan is long, layout-sensitive, or part of a PDF-heavy workflow. Word is a writing and editing tool first. PDFelement is better suited to preparing the scanned PDF before Word gets involved.
That distinction matters. If Word receives a messy conversion, you spend time fixing broken paragraphs and strange spacing. If OCR and conversion are handled carefully first, Word becomes the editing environment rather than the repair shop.
Method 4: Use Google Drive OCR When You Need a Free Browser Option
Google Drive can also extract text from scanned images and PDFs. This is useful if you do not have OneNote available or you need a quick browser-based method. It works through Google Docs, which performs OCR when opening certain image or PDF files.
Upload the scanned file to Google Drive, right-click it, choose Open with > Google Docs, and wait for Google to process it. The new Google Docs file will usually show the original image at the top and extracted text underneath. You can then edit the text in Google Docs or download it as a Word file through File > Download > Microsoft Word (.docx).
Google’s method is convenient, but it has trade-offs. Formatting may be rough, and privacy may be a concern for sensitive documents. Avoid uploading confidential contracts, medical records, financial statements, IDs, or internal business documents unless your organization allows that workflow.
Google Drive OCR is best for quick, low-risk documents where text extraction matters more than layout. For more details on file handling, Google provides general help for working with files in Google Drive.
How to Improve OCR Accuracy Before Editing in Word
A lot of frustration with scanned documents starts before Word or OCR software ever sees the file. If the scan is poor, every method becomes harder. You may still get editable text, but you will spend more time fixing errors.
Start with the clearest possible source. If you can rescan the document, use a flatbed scanner or a scanning app with edge detection. Keep the page flat, avoid shadows, and make sure the text is not cut off near the margins. For printed text, a resolution around 300 dpi is a common baseline for OCR. Higher resolution can help with small text, but very large files may slow down processing.
If you only have a phone photo, crop out the desk or background before running OCR. Straighten the page and improve contrast if the app allows it. A slightly boring, high-contrast image is better for OCR than a dramatic photo with shadows and perspective distortion.
Clean up the Word document after OCR
After you convert the scan, do not assume the new Word file is finished. OCR gives you a draft. The final quality depends on review.
Start by running Word’s spelling and grammar checks, but do not rely on them completely. OCR errors often produce real words in the wrong place. For example, “form” and “from” are both valid words, so a spell checker may not flag the error.
Use Find and Replace carefully for repeated OCR problems. If the scan consistently turns “fi” ligatures into odd characters, or reads a company name incorrectly, a targeted replacement can save time. Just review each replacement rather than replacing all blindly.
For layout, it is often faster to simplify first. Remove strange line breaks, then rebuild headings, paragraphs, lists, and tables using Word’s normal formatting tools. If the OCR result has a line break at the end of every scanned line, use Word’s paragraph marks view to see what happened. You can then clean up the structure before applying styles.
Preserve the original scan until editing is complete
Keep a copy of the original scanned file. This gives you something to compare against if a sentence looks wrong or a number seems suspicious. For legal, academic, financial, or compliance documents, the original scan may also be the record copy.
If you need to send the edited file as a PDF after working in Word, save the DOCX first, then export a PDF copy. That way you have both the editable version and the shareable final version.
G2 Rating: 4.5/5 |100% Secure
Common Problems When Editing Scanned Documents in Word
Even with a good OCR tool, scanned documents can behave unpredictably. Here are the issues readers most often run into and what to do about them.
Word opens the scan, but I cannot select the text
This usually means the document is still an image. If the file is a Word document containing a scanned page image, Word sees it as a picture. Use OneNote OCR, PDFelement OCR, or another OCR tool to extract editable text first.
If the file is a PDF, try running OCR before opening it in Word. Once OCR has created real text, export it to DOCX or copy the text into Word.
The formatting looks different after conversion
This is normal. PDF and Word handle layout differently, and scans add another layer of complexity. Word documents are reflowable, meaning text moves depending on margins, fonts, and page settings. Scanned PDFs are fixed-layout images. Converting one into the other often requires compromises.
For simple documents, fix the formatting manually. For complex documents, consider whether you actually need Word. If you only need to change a few words, OCR and edit the PDF directly in a PDF editor instead.
Tables are messy or broken
Tables are difficult for OCR because the software must recognize both text and structure. If a table converts poorly, you may get better results by recreating the table in Word and pasting the recognized text into the right cells.
For financial figures, inventory lists, or forms, verify every number against the original scan. OCR can misread decimal points, commas, and thin table lines.
The text has random characters
Random characters usually come from low scan quality, unusual fonts, background noise, stamps, or the wrong OCR language. Try rescanning at better quality if possible. If not, crop the page, improve contrast, and rerun OCR.
For multilingual documents, make sure the OCR language matches the document. This is especially important for accented characters and non-English alphabets.
People Also Ask
-
Can I edit a scanned document in Word without OCR?
Not if the text exists only as an image. Word can crop, resize, or move the scanned image, but it cannot edit the words inside that image as text. You need OCR first. After OCR, you can edit the recognized text in Word. -
How can I edit scanned documents in Word for free?
For image scans, try OneNote’s Copy Text from Picture feature and paste the result into Word. For some PDFs, you can try opening the PDF directly in Word. Google Drive OCR is another free browser-based option for non-sensitive files. The trade-off is that formatting may need manual cleanup. -
Why does Word show my scanned document as a picture?
Because the file is image-based. A scanner or phone camera captures the page visually, not as editable text. Word can display the page, but it does not automatically know which pixels are letters unless OCR is applied. -
How do I convert a scanned Word document to editable Word?
If the Word file contains scanned page images, extract the text with OCR. You can right-click the image in OneNote and choose Copy Text from Picture, then paste it into Word. If the scanned pages are in a PDF, run OCR with a PDF tool such as PDFelement and export the result to DOCX. -
Can Word edit a scanned PDF directly?
Word can open PDFs and convert them, but results vary. It works better with text-based PDFs than with scanned PDFs. If the PDF is a scan and Word opens it as images, use OCR first. -
How do I keep the same formatting as the scanned document?
Perfect formatting is difficult because OCR converts a fixed image into editable text. For layout-sensitive documents, use a dedicated OCR and PDF conversion tool, then review the Word file against the original scan. If you only need minor changes, editing the OCR-processed PDF directly may preserve the appearance better than converting to Word. -
Can OCR recognize handwriting?
Sometimes, but handwriting recognition is much less reliable than printed text OCR. Neat block letters may work, while cursive or messy handwriting often requires manual typing. Always proofread handwriting OCR carefully. -
What is the best method for a multi-page scanned PDF?
Use a dedicated OCR workflow. Open the scanned PDF in PDFelement, run OCR with the correct language settings, review the recognized text, and export to Word if you need DOCX editing. This is usually more efficient than copying pages one by one through OneNote. -
Why are some words wrong after OCR?
OCR guesses characters based on shapes. Blurry scans, skewed pages, small fonts, stains, stamps, and unusual typefaces can all cause mistakes. Common errors include mixing up “0” and “O,” “1” and “l,” or reading punctuation incorrectly. -
Should I edit the document in Word or in a PDF editor?
Use Word if you need to rewrite, restructure, or heavily format the document. Use a PDF editor if you only need to correct small text areas, annotate, sign, organize pages, or return the document as a PDF. For scanned PDFs, running OCR before choosing the editing tool gives you the most flexibility.

