How to Move Your Photos Library to an External Drive on macOS 10.15
This article has detailed information about how to move your photos library to save space on macOS 10.15 using easy steps. An external drive provides better backup.
 100% Secure |
 Home > macOS Tips and Tricks > How to Move Your Photos Library to an External Drive on macOS 10.15
An external drive provides more space to store documents, files, photos and music, among other things. Therefore, you can transfer your Mac photo library to an external drive on macOS 10.15 and create space for other work in your computer.
Whether you take pictures with your camera, compact or iPhone, you are likely to store the most valuable photos in your Mac. If doing this is a hobby, your Mac storage will fill fast and you may experience some space problems.
The best action to resolve this is to move Apple photos for OS 10.15 library to an external drive. This process is easy and enables you to continue keeping the photos safe.
This article has detailed information about how to move your photos library to save space on macOS 10.15 using easy steps. An external drive provides better backup.
How to Transfer Your Photos Library to an External Drive on macOS 10.15
Before you move your photos library to save space on macOS 10.15, ensure that your external drive is formatted for Mac OS Extended (Journaled). So access the “Disk Utility” and confirm its format. Reformat it if necessary.
1. It is impossible to transfer your Mac photo library to an external drive on macOS 10.15 when it is active. So, if you have opened any photos, start the process to manage your photos library to an external drive on macOS 10.15 by closing them first.
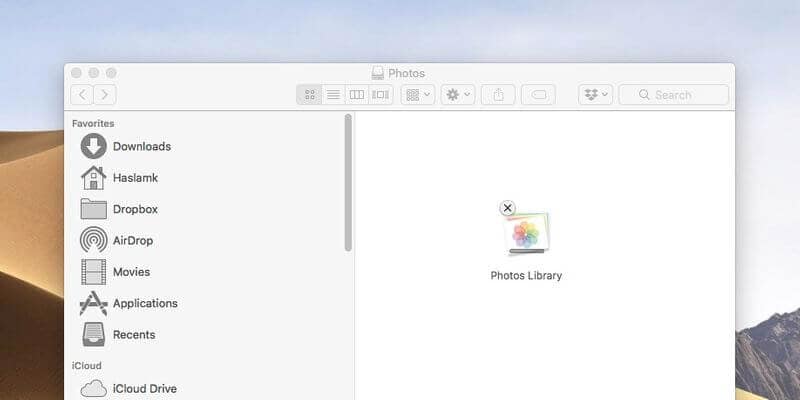
2. Trace your Mac’s Photos library, which is in the Picture folder.
- Open a Finder window
- Select your Mac “Home” folder; it is an icon resembling a house
- Then click on “Pictures”
3. As soon as the Pictures folder opens, you will find the Photos Library. It will be represented by an icon such as the one below.
4. If you would like to have a closer look at the contents before you move Apple photos for OS 10.15 library to an external drive, you can right-click. From the options, select “Show Package Contents” and view the master folders that have your photos.
5. Right-clicking on the Photos Library package and choosing “Get Info” can also give you information on the size of your library. Making this confirmation as you move your photos library to save space on macOS 10.15 is important because it informs you on the space needed in the external drive to accommodate the Photos Library.
It also enables you to plan for the future, if you wish to manage your photos library to an external drive on macOS 10.15 again.
6. To transfer your Mac photo library to an external drive on macOS 10.15, you can drag and drop it.
7. Be patient as it copies. The time taken in this transfer is dependent on the speed of connection and the size of your library.
8. When the process to move Apple photos for OS 10.15 library to an external drive is complete, hold the “Option/Alt” key and launch Photos.
9. Select “Other Library,” then navigate to the new external drive location.
10. In case you find a message stating that there some items should be downloaded from iCloud Photo Library, simply click on “Delete Incomplete Items.” This will allow you to download these items from iCloud on a later date.
11. With Photos still open, select “Preferences” choose “General” and then go to “Use as System Photo Library.” This procedure enables Photos to work with iCloud Photo Library in case you use it. So, it is quite necessary.
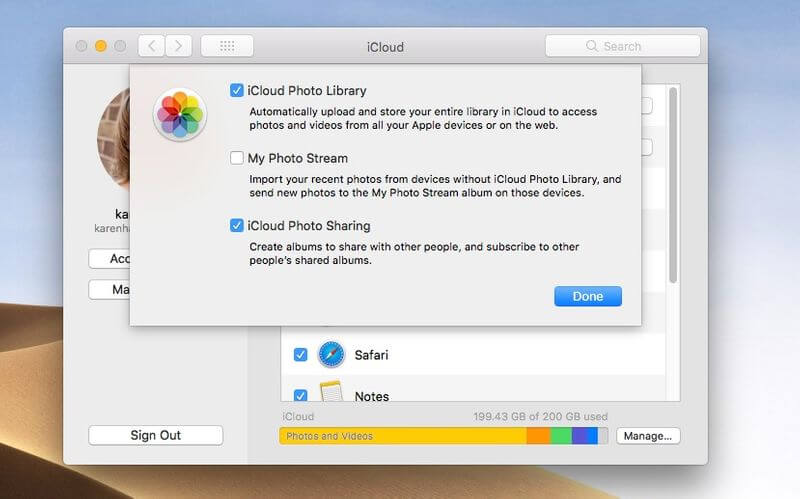
12. The next step is turning iCloud Photo Library back on. So;
- Go to “System Preferences”
- Choose “iCloud”
- Select “Photos”
- Access “Options”
- Select “iCloud Photo Library” to turn it on again.
13. Ensure that your drive is still plugged in for this final step, or connected via Wi-Fi. Confirm that all the photos moved are there and that everything is working as required.
14. Then proceed to deleting the Photo library from your Mac.
Best PDF Editor for macOS 10.15
PDFelement for Mac is an application that does more than just create, edit, convert and manipulate PDF documents. It is tailored to function according to the current technological matters. Therefore, it provides packages that come with various features that are meant to satisfy your needs, whether you are a student or corporate individual.
PDFelement for Mac is created to produce the best PDF documents while using the least space. Therefore, it conducts PDF optimization for your Mac computer. This is a function that ensures your documents are in the least size possible, without interfering with its contents.
The editor reduces the PDF document sizes by compressing the files and removing the unwanted and least important items in the PDF files. While doing so, saving and transferring of the files to local folders becomes easy.
Additionally, it offers security through redaction, a function that ensures sensitive data is never accessed.
These capabilities are a guarantee that PDFelement for Mac is advantageous. The optimization function ensures that you can save space to be occupied by other files, especially if you are yet to purchase an external drive.
As this PDF editor gives you quality work, it ensures the corporate secrets are hidden and locked out from harmful competition forever.
Free Download or Buy PDFelement right now!
Free Download or Buy PDFelement right now!
Buy PDFelement right now!
Buy PDFelement right now!
Related Articles
- How to Find Any Password on a Mac
- How to Empty Trash on macOS 10.15
- How to Setup a Wifi Hotspot on macOS 10.15


Audrey Goodwin
chief Editor
Comment(s)