
In this article
- Part 1. Quick Answer
- Part 2. What You Need Before You Convert Scan to PDF
- Part 3. Method 1 - Windows 11 Built-in Apps
- Part 4. Method 2 - PDFelement: Create PDF from Scanner
- Part 5. Method 3 - Scan with Your Phone and Edit PDF on Windows
- Part 6. Comparison Between the Different Methods of Scan to PDF Windows 11
- Part 7. Step-by-Step Mini-Guides (Copy-ready)
- Part 8. How to Make Scans Look Better
Part 1. Quick Answer
The Windows Scan application or “Windows Fax and Scan” are available as the free built-in options which can be trusted to scan to PDF Windows 11. One can use these tools to turn paper-based documents into electronic files, which can be easily scanned to PDF Windows 11 without installing third-party applications.

Nevertheless, they generate simple image-based PDFs that cannot be searched. PDFelement is the appropriate choice to have a faster and professional workflow. It is not only able to scan everything on the spot, but it uses the OCR (Optical Character Recognition) to fully search and edit PDFs. This would greatly simplify the process of managing, editing, and sharing scanned documents.
Part 2. What You Need Before You Convert Scan to PDF
To scan Windows 11, it is always good to prepare the essentials to prevent errors and make it easier. The following is what you should have prepared before scanning them:
- Scanner or MFP Connection: It is important to make sure that your printer, scanner, or multifunction printer (MFP) is connected to your PC either through USB or Wi-Fi.
- Latest Drivers: The new drivers must be the latest drivers and must be installed on the latest version to not be detected or have compatibility problems.
- Optional Scanner App: You may scan your files with a Windows Scan app or a mobile scanning app (provided that you want flexibility).
- Preparation with Paper: Pull out all the staples, creases, and get your pages to correlate so that you can avoid the crooked jamming of your paper and scanning.
- File Naming: Be simple in file naming, e.g., name an invoice in a way that shows its contents, e.g. Invoice_March2025 so that it is easy to sort files and locate them.
- Systematic Folders: Have a dedicated folder, like Scanned PDFs, where you store all your papers in one place to access them when you are repeating certain tasks.


 G2 Rating: 4.5/5 |
 100% Secure
Part 3. Method 1 - Windows 11 Built-in Apps (Free Method)
The first method to scan as PDF Windows 11 is done through the built-in methods, which are free of cost. In this section will be looking into the two different ways of using either the Windows Scan or the Windows Fax and Scan app. These apps are ideal for occasional scanning tasks that do not require advanced features. Read below to look into the steps you need to follow for each technique:
Using the “Windows Scan” app (Store)
Windows Scan is a utility application that is available on the Microsoft Store and is easy to use and manage. It enables you to scan documents swiftly and store them as PDFs, without any technical actions. Read into the steps below to get a better understanding of how to carry out the scan to PDF on Windows 11 free process:
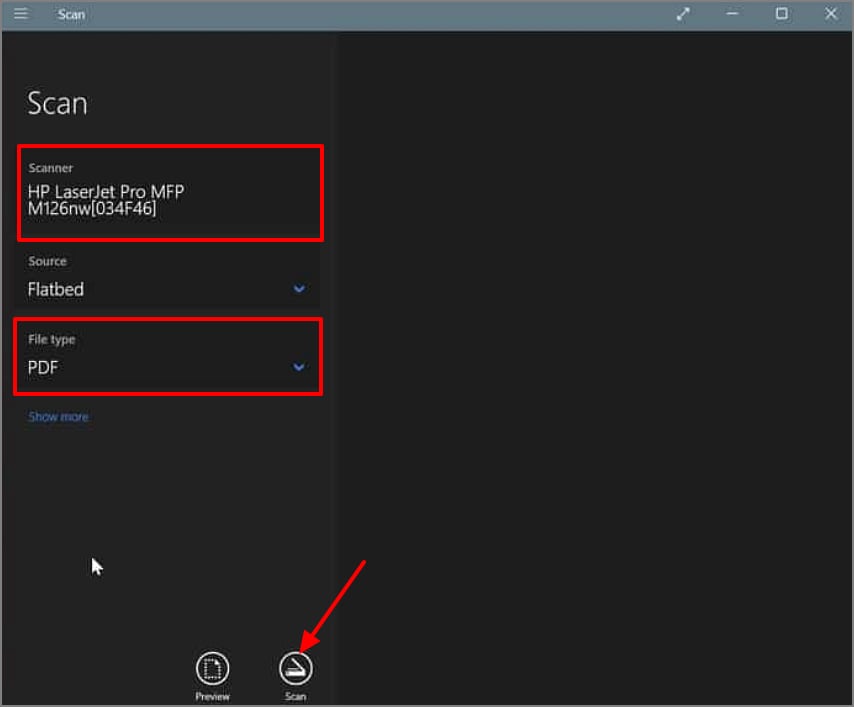
Instructions. Launch the application, from the “Scanner” tab, choose the connected scanner of your choice. Next, from the “File Type” section, pick the “PDF” option and hit the “Scan” button to start the process.
Using legacy “Windows Fax and Scan”
Windows Fax and Scan is an older built-in utility that is still available on Windows 10 and 11. It does not save directly to PDF, but you can scan and then select the “Print to PDF” option to create a PDF file. Jump into the steps below to figure out the best way to scan to PDF on Windows 10 or 11:
Step 1
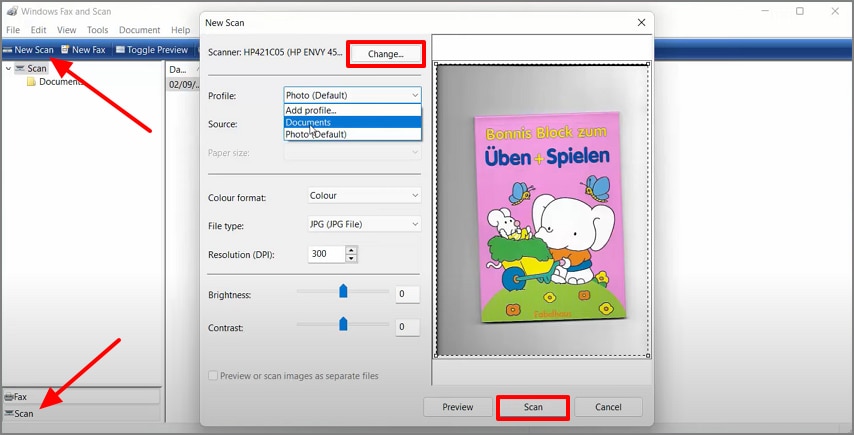
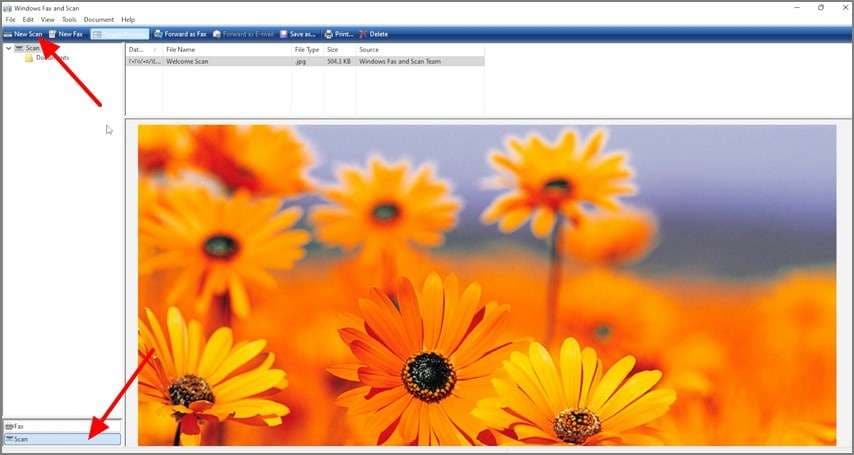
Get access to the Windows Fax and Scan application and click on the “Scan” button at the bottom left corner. Then, click on the “New Scan” option and choose the connected scanner using the “Change” button in the pop-up window. Once the scanner detects the content, hit the “Scan” button to start the process.
Step 2
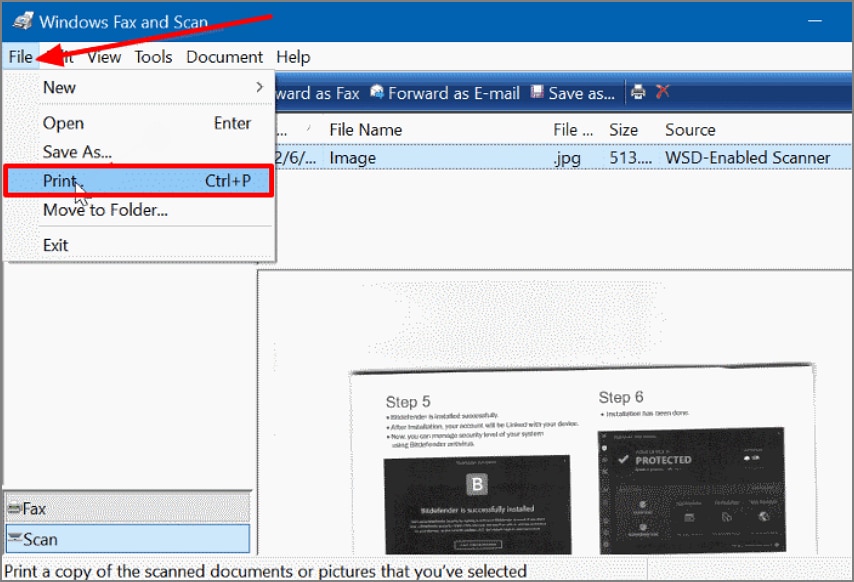
Upon the completion of the scan, click on the “File” tab at the top left corner and pick “Print” from the list.
Step 3
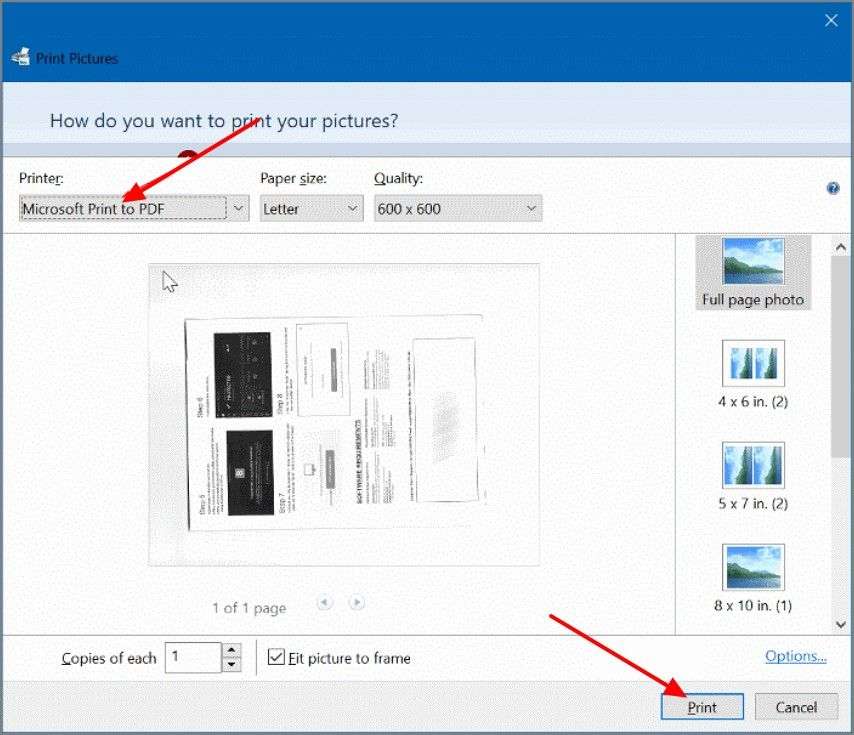
Finally, from the dialog box, pick the “Microsoft Print to PDF” option from the “Printer” section and hit the “Print” button.
G2 Rating: 4.5/5 |100% Secure
Part 4. Method 2 - PDFelement: Create PDF from Scanner
Since the above methods aren't as effective for scanning purposes, we have introduced a PDF scanner for Windows 11. PDFelement allows you to create a PDF directly from the scanner. Moreover, its integrated OCR technology enables you to edit the scanned PDF document, giving you more control over the content. PDFelement lets you utilize its AI features to interact, translate, or summarize the PDF to understand it better.
One-Click “Create PDF from Scanner”
Here are the steps you need to take in order to create a PDF from a scanner using PDFelement:
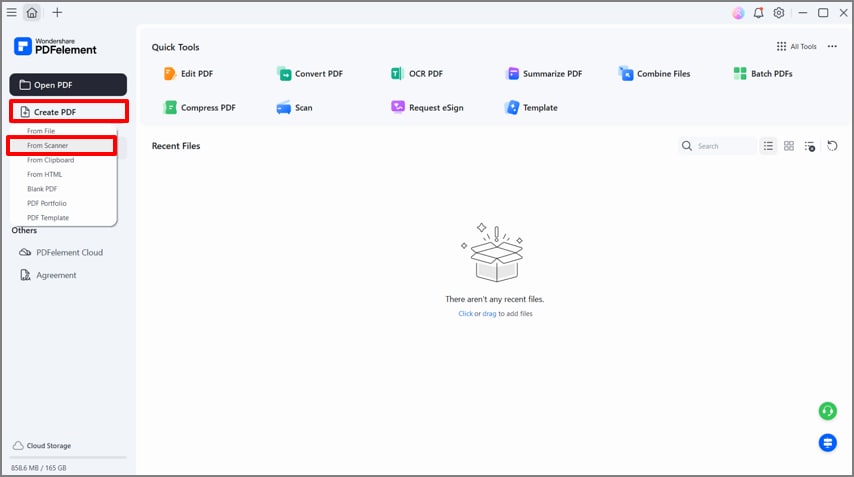
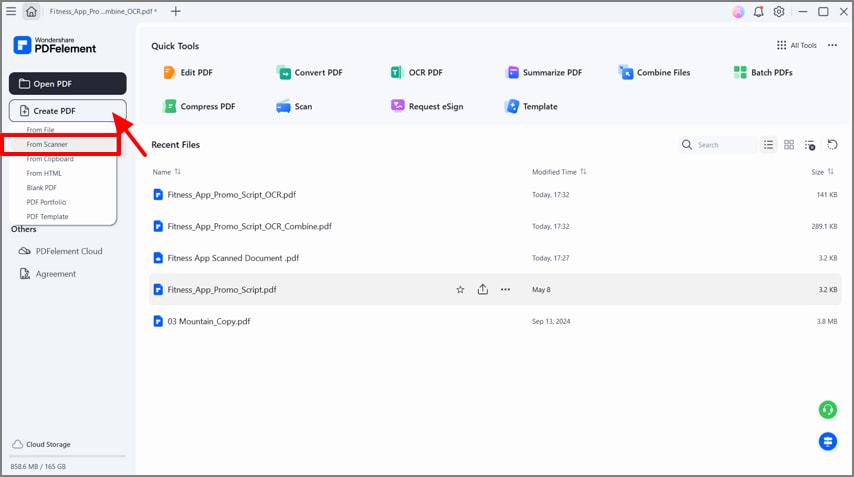
Step 1Access PDFelement and Locate Create PDF From Scanner
Start the process by accessing PDFelement on your device. Then, click on the “Create PDF” button and pick the “Fram Scanner” option to move on to the next step.
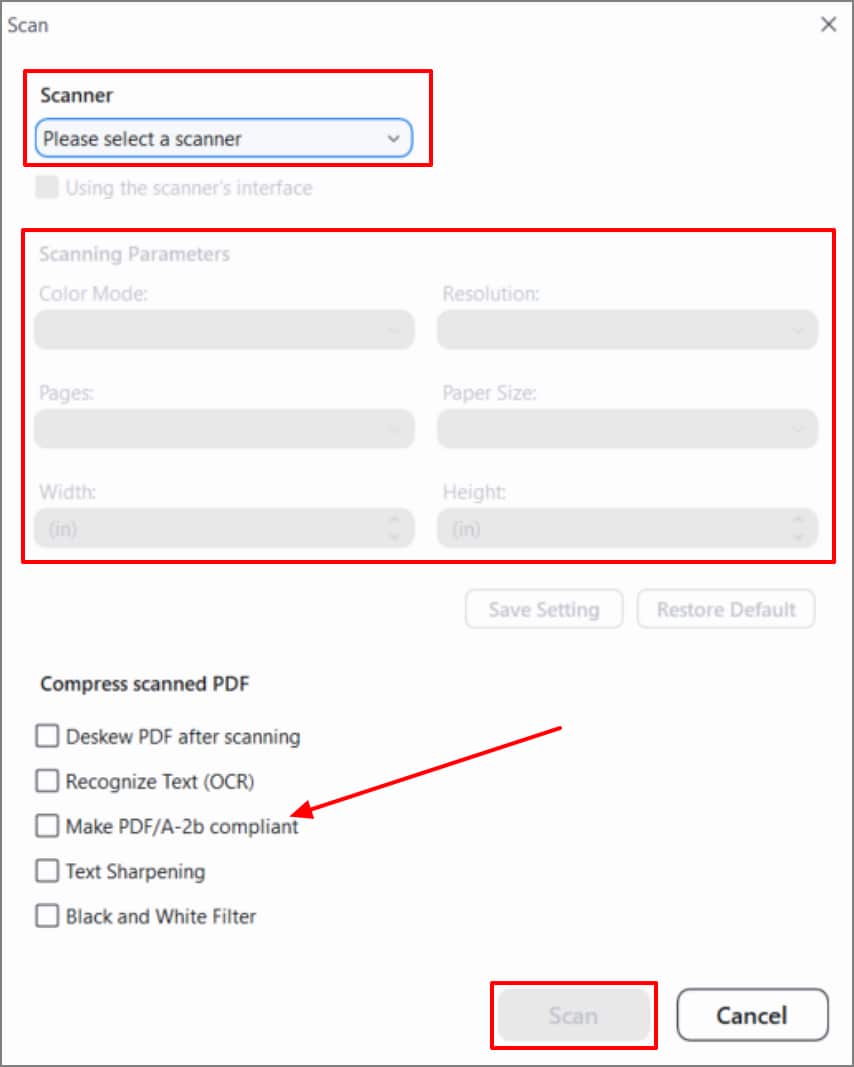
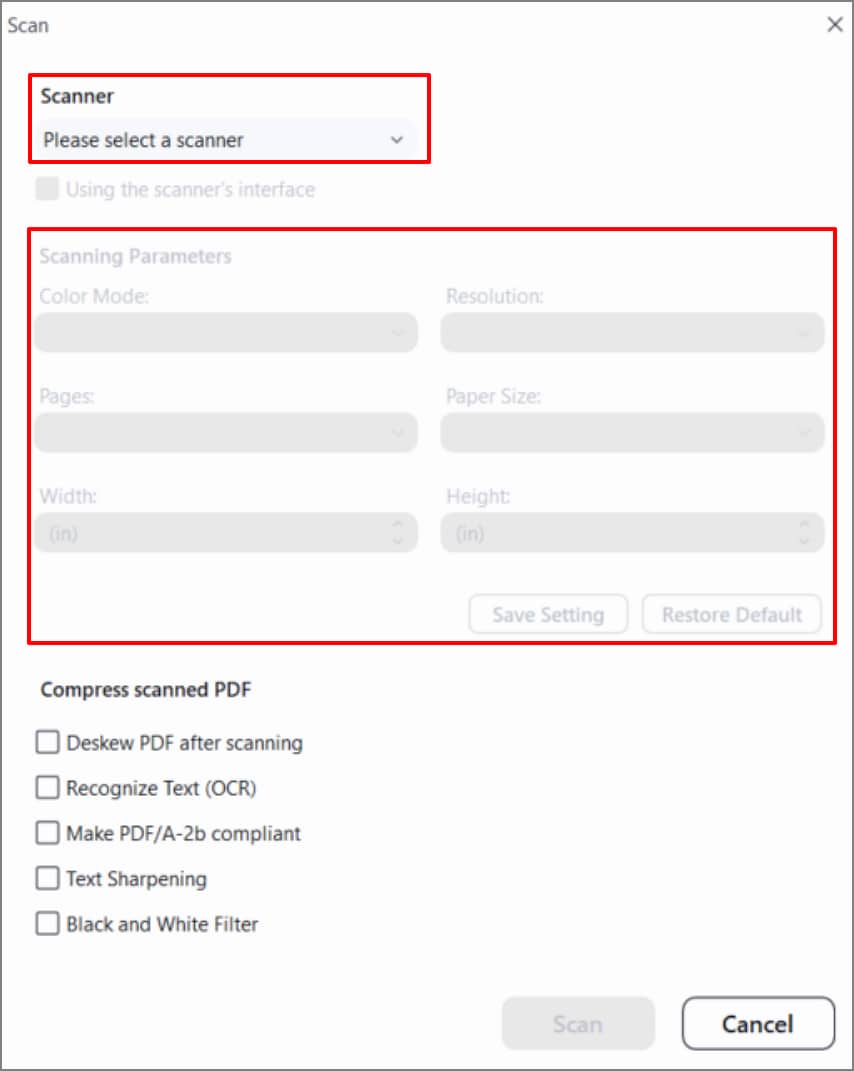
Step 2From the Scan dialog box
From the Scan dialog box, pick the “Scanner” that you have connected. Under the “Scanning Parameteres,” select the properties as per your requirements. If the document you are scanning is large, tick the check boxes of the “Compress Scanned PDF” options to start the “Scan” process.
Note: Users can automatically combine multiple scanned pages into a single PDF. With the help of the “Organize Pages” feature, you get the ability to arrange the pages as per your requirements. It also lets you delete any unnecessary pages from the PDF file to make sure all the pages are relevant to the topic.
Make it Searchable With OCR
Once the scan is complete, it will open up the PDF on the editing interface, where you can apply the OCR for further adjustments. Read into the steps below to get a better understanding of how to make a PDF searchable:
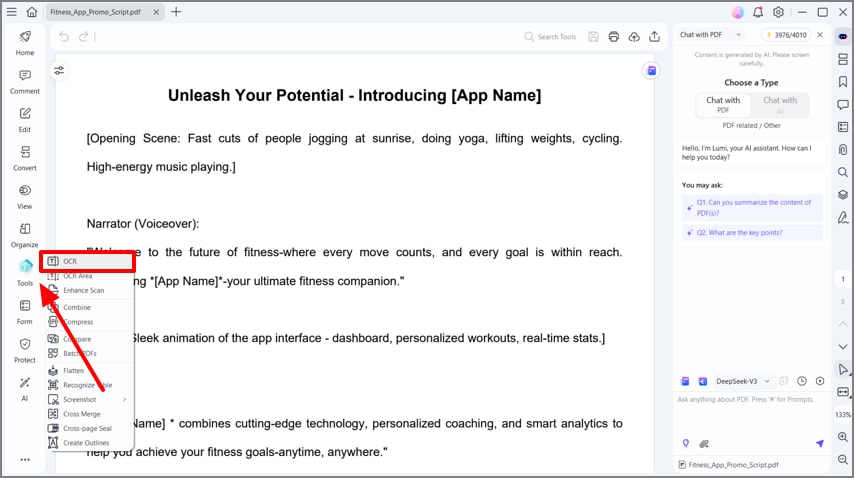
Step 1Shift to the Editing Interface and Apply OCR
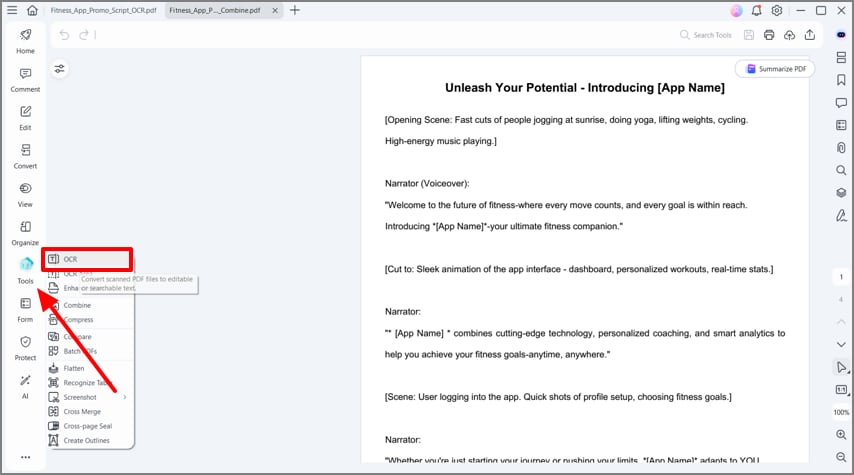
Once the PDF is scanned, you are shifted to the editing interface. Here, click the “Tools” button in the left sidebar. Then, pick the “OCR” button to move to the next step.
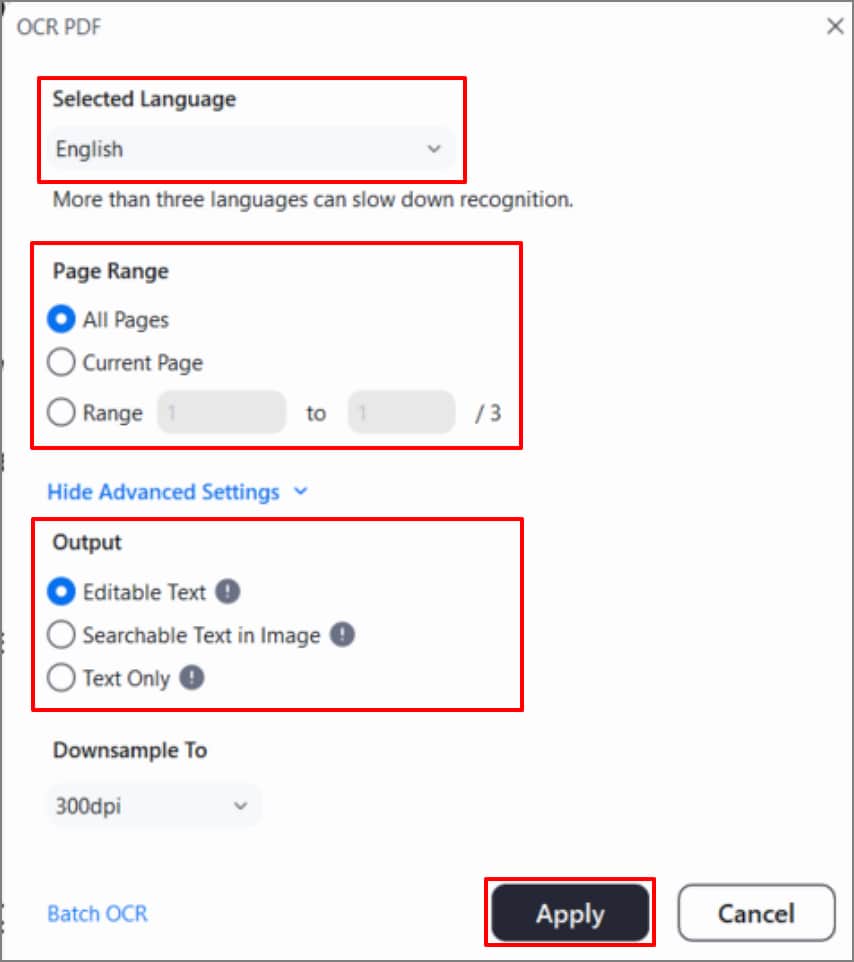
Step 2Alter OCR Properties and Hit Apply OCR
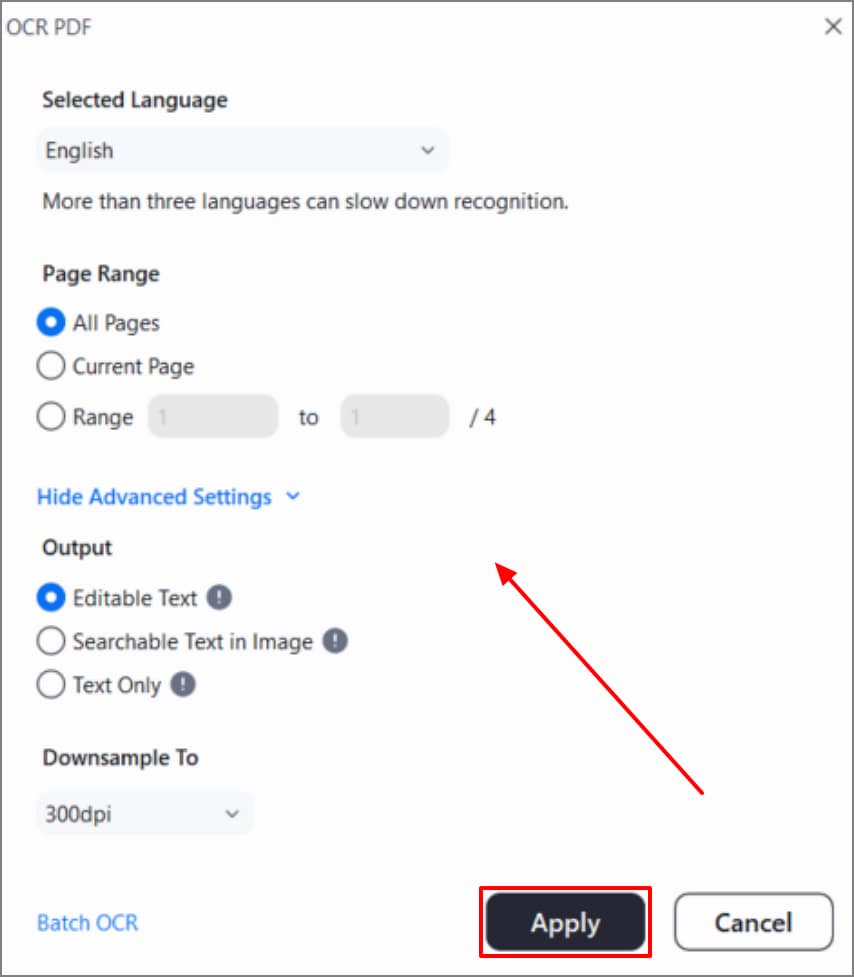
Set the “Selected Language” from the OCR dialog box. Adjust the “Page Range” as per your requirements. Moving on, select “Editable Text” under the “Output” option to finally hit the “Apply” button.
Note: Users benefit from the ability to copy and paste the scanned text. They also have the opportunity to edit the text and annotate it for later on during the scan to PDF Windows process.
Batch/Repeat Workflows
After you have scanned and OCR an image, it is easy to repeat the process and save it each time. You can enable resolution, color, and file naming presets, so that you get the same results each time. It can also be saved to cloud storage or a local drive, and has fast rename conventions to arrange.
G2 Rating: 4.5/5 |100% Secure
Part 5. Method 3 - Scan with Your Phone and Edit PDF on Windows
If you are travelling and looking for a way to scan documents using your mobile phone, look into the steps below:
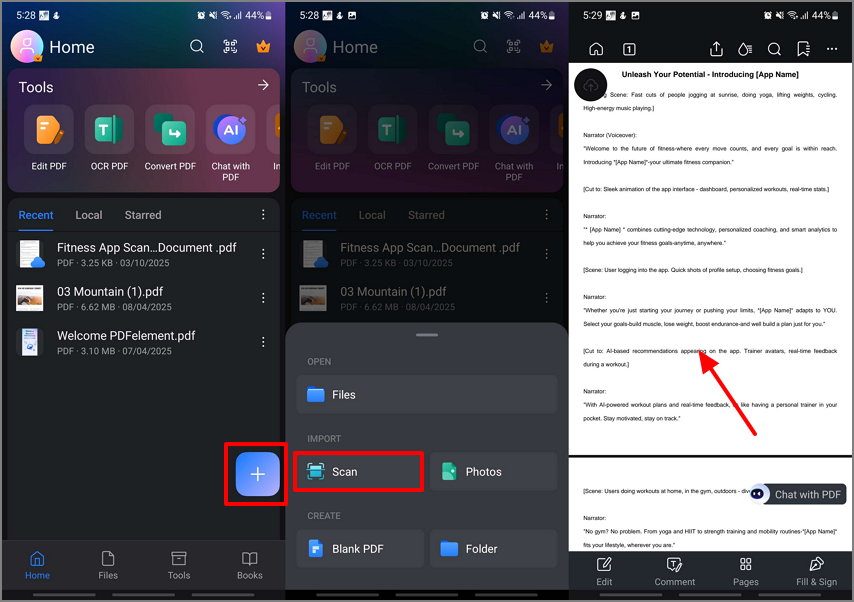
Step 1Scan Document Using PDFelement Scanner
Launch the PDFelement app, click on the “+” icon, and pick the “Scan” button to access the camera. Then scan the documents and preview the file. Upload it on to PDFelement Cloud and shit to your desktop device.
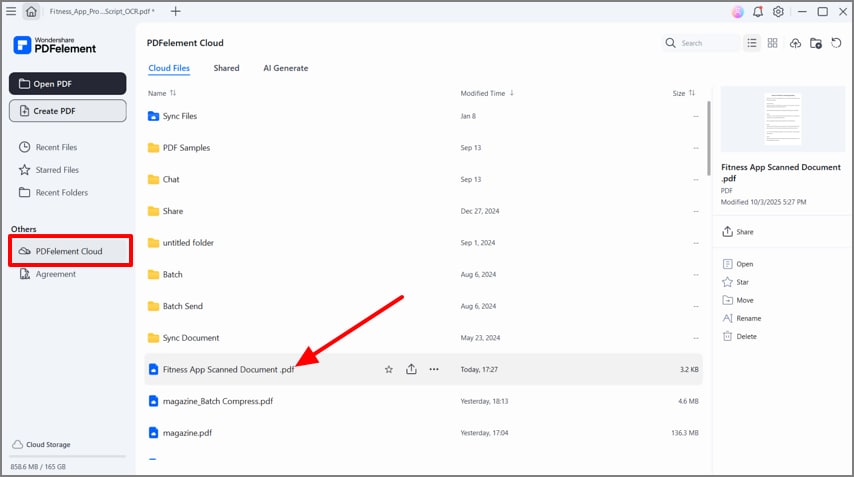
Step 2Open up the Scanned PDF From PDFelement Cloud
Once you launch PDFelement on your PC, click on the “PDFelement Cloud” option to open up the file you scanned from your mobile.
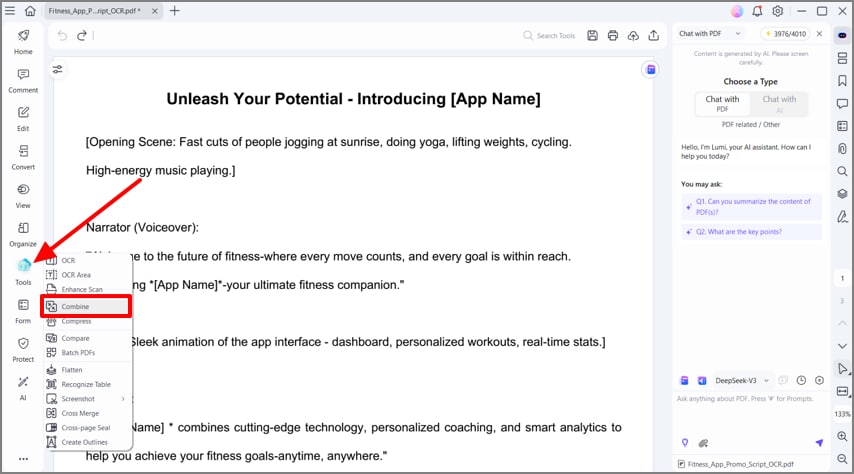
Step 3Access the PDFelement Combine Tool
Next, click on the “Tools” tab at the editing interface to pick the "Combine" option from the list.
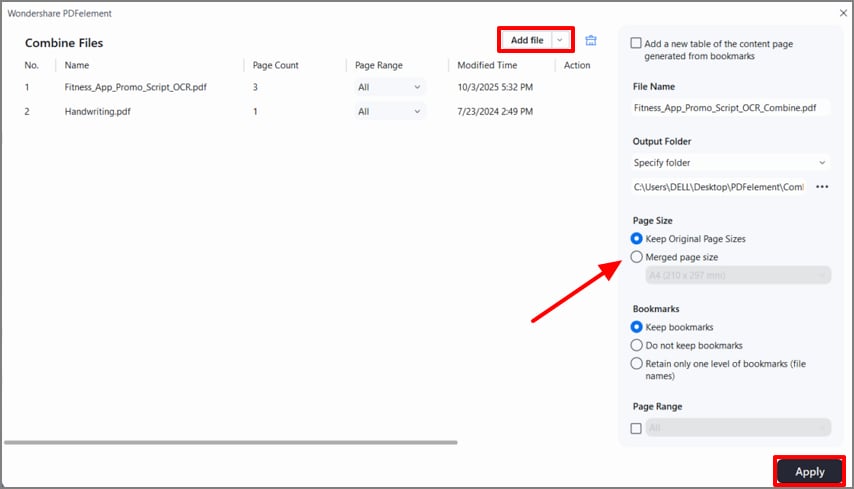
Step 4Add the Files to the Interface and Hit Apply
From the Combine Files extended menu, click on “Add Files” and insert the images you want to insert into the scanned PDF. Adjust the properties and hit the “Apply” button to start the combining process.
Step 5Locate the OCR Tool From PDFelement
Now, from the “Tools” tab select the “OCR” option and move to the next step.
Step 6Adjust OCR Properties and Apply on the Document
From the pop-up window of OCR PDF, set its properties and hit the “Apply " button.
Step 7Edit the Document and Save the Scanned Document as a PDF
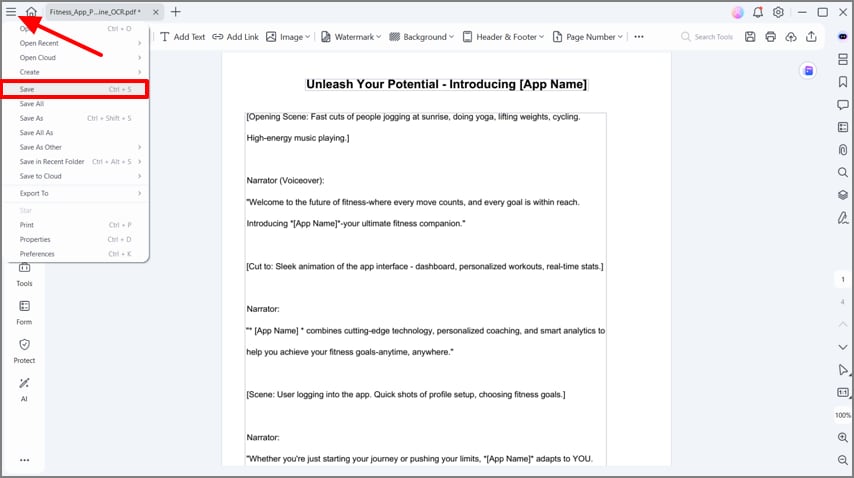
Once OCR is applied, edit the document or apply annotations to it. Finally, hit the “Three Horizontal Lines” to pick the “Save” button and save the document as a PDF.
Note: The best moment to use this quick scan to PDF using your mobile device is while travelling.
Part 6. Comparative Table on the Different Methods of Scan to PDF Windows 11
Windows 11 offers 2 options for scan to PDF Windows 11 for free, although the correct option depends on the frequency of scanning and the features available. Neither Windows Scan nor Windows Fax and Scan require payments; however, they are limited in a number of ways.
Windows Scan is easy and fast, yet it lacks advanced features such as searchable text and does not offer advanced controls. Fax and Scan is a bit more versatile, yet it is old-fashioned, with the addition of extra operations to save files as PDFs.
These free in-built scanners will suffice if you only need to scan occasionally. But when you need high quality PDF files that are searchable, editable and easy to manipulate, then PDFelement is the best solution.
| Method | Cost | Multipage to One PDF | OCR | Ease of Use | Best For |
| Windows Scan (Win 11) | Free | Basic Support | No | Simple | Quick one-offs |
| Windows Fax and Scan | Free | Moderate, extra steps needed | No | Legacy UI | Older devices / basic scans |
| PDFelement | Free trial - Paid | Robust, thumbnail page control | Yes, multilingual OCR | Fastest | Searchable, professional PDFs |
G2 Rating: 4.5/5 |100% Secure
Part 7. Step-by-Step Mini-Guides (Copy-Ready)
To sum up the entire scan as a PDF for Windows 11 guide, here is a quick step-by-step guide for each method:
Scan Multiple Pages to One PDF (Windows 11, Free) – Windows Scan App
Windows Scan is an application that enables you to make one point of view of a bunch of pages. Follow the steps below to get a better idea of the best way to scan multiple pages for free:
Step 1
Open the Start menu, enter "Windows Scan" in the search box, and then open the application. On the first screen, you will be asked to select your scanner in the drop-down list under the “Scan” section to pick the “New Scan” option.
Step 2
Choose the “Resolution” as per your requirements and hit the “Scan” button to start the process.

Step 3
Put the first page in the scanner and press the scan button. When you have additional pages, press the “Add Page” button and then continue scanning. After all the pages have been scanned, access them and click on the “Print” option to choose the “Print As PDF” option.

Scan to a Searchable PDF (Windows 11/10) – PDFelement
Follow the guide below to understand how PDFelement provides the opportunity to scan directly to a PDF and search and edit using OCR:
Step 1
Open PDFelement and select the “Create PDF” to pick the “From Scanner” option.
Step 2
Choose a “Scanner” on the list and customize the parameters, e.g., "Color Mode" and "Resolution.
Step 3
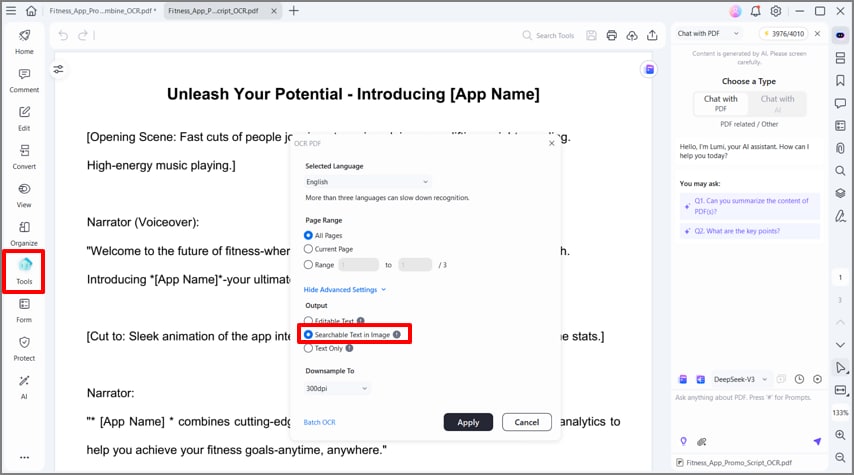
Select the “OCR” from the “Tools” tab to enable the PDF output as “Searchable Text in Image” option.
Step 4
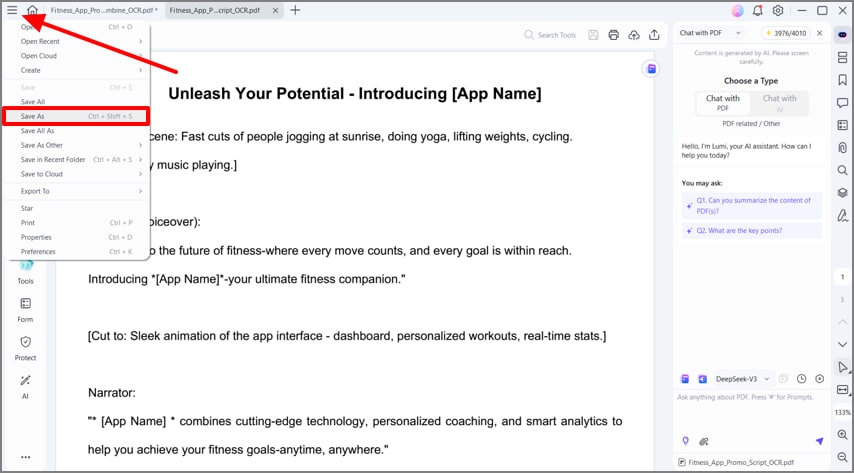
Upon completion, save the searchable PDF by clicking on “Three Horizontal Lines” > “Save As” option.
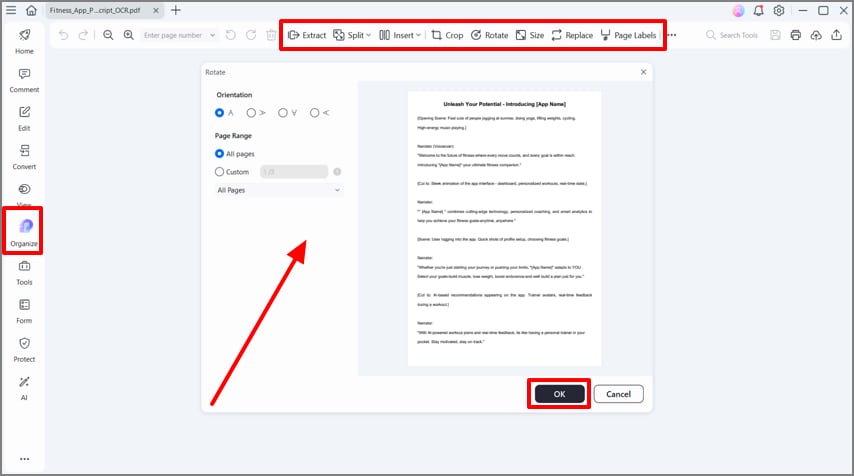
Fix Upside-Down or Skewed Pages and Re-Order – PDFelement
Follow the steps below, and you can easily correct your scanned pages when they are crooked, inverted, or out of sequence:
Instructions, Access PDFelement and jump to the “Organize” option from the left side bar. Use the top tool bar to edit the page orientation and properties. Once you are satisfied click on the “OK” button save the changes.
Part 8. How to Make Scans Look Better
Small modifications can also be used to significantly improve the quality and readability of your PDFs, even after scanning. The following are some of the tips that have been proven to enhance your scan pdf Windows 11 experience:
- Select the Correct Resolution: In the case of text documents, 300 dpi is typically adequate to reproduce clear, readable text. For photos or images, set it to 600dpi so that details are saved without pixelation.
- Choose Color or Grayscale Wisely: Scanning in color is always advisable when there are charts, logos, or photographs on the document. With plain text, grayscale is usually superior in that it will create smaller files and still be legible.
- De-Skew Crooked Pages: When your pages are a little bent, it can cause the scanned output to appear unprofessional. Auto-straighten pages with software applications such as the deskew tool in PDFelement.
- Unwanted Margins in the Crop: The content may be distracted by an additional white space or dark borders of the scanner. The fact that the margins are cropped makes the document look clean and more polished.
- Eliminate Background Noise: Sometimes an unwanted mark may arise in a scan due to dust, shadows, or paper texture. To achieve a smoother finish, noise removal tools are used to remove these flaws.
- Enhance with PDFelement: PDFelement, all in one location, has deskew, crop, and cleanup in a single location. Once it is cleaned, you can run OCR to make them searchable and editable so as to get maximum use.
How to Use PDFelement for Advanced Scanning
While built-in Windows tools are basic, Wondershare PDFelement offers a professional alternative for those who need to scan directly to searchable PDFs. Its built-in OCR (Optical Character Recognition) technology can recognize text in scanned images, allowing you to edit the content immediately after scanning. Simply open PDFelement, go to Create > From Scanner, and select your device to begin a high-quality scan-to-PDF workflow.
Part 9. Troubleshooting Scan to PDF Issues
Here are some of the troubleshooting scans to PDF tips you need to keep in mind once you perform this process:
Scanner Not Detected
In Windows 11, if your scanner is not recognized. The first step is to check your USB cable or wireless connection to ensure it is configured correctly. Check or reinstall the scanner driver, as old drivers are often the source of detection problems. You can also reboot the Windows Image Acquisition (WIA) service or TWAIN service, which is necessary for scanning activities.
PDF to Large
Scanned PDFs are also huge at times, and hence hard to share or store. Reduce the scanning resolution (DPI) to decrease the size or compress it with an in-built compression option. When it comes to text-based documents, monochrome scanning rather than color scanning will also reduce file size.
Can’t Select Text on Scanned PDF
When your scanned PDF behaves like a picture and you cannot highlight or search text, it has not undergone OCR. Running OCR (Optical Character Recognition) will turn the scanned image into searchable and editable text. When doing the OCR PDF on Windows, make sure that you select the appropriate language pack to enhance accuracy.
Mixed Orientation Pages
Scanned documents usually have both portrait and landscape-oriented pages, which may appear to be disheveled. Spin the problematic pages prior to PDF-saving, with the Windows scan application or any other viewer. In the case of bigger documents, PDFelement provides a batch rotate feature that can save time and maintain the consistency of the files.
Missing Pages in Multi-Page Scans
If you cannot view the pages of your multi-page PDF, ensure that the multi-page mode or scan to PDF feature is enabled in your scanning software. In some instances, the default mode will store every page as a new file. To make sure that the pages that have been scanned are embedded in one single document, you can utilize the option of adding to an existing PDF in PDFelement.
Conclusion
In conclusion, this article has shown us that scanning to PDF on Windows 11 doesn’t have to be complicated. Free built-in tools, such as Windows Scan and Windows Fax and Scan, work well for simple, one-off needs. But if you want the fastest and most professional results, PDFelement is the more intelligent choice.
It allows you to scan multiple pages into one PDF, run OCR for searchable text, and even compress or password-protect your files. With its added features, PDFelement transforms scanned documents from simple images into powerful, editable PDFs, which is perfect for students, professionals, or anyone who wants an organized digital workflow.
FAQs
-
1. How do I scan to PDF on Windows 11 for free?
You can use built-in apps like Windows Scan or Windows Fax and Scan, both of which are free. Simply connect your scanner, open the app, and choose PDF as the output format. This gives you a straightforward way to scan to PDF on Windows 11 without installing extra software. -
2. How to scan multiple pages into one PDF?
The Windows Scan app allows you to add multiple pages if your scanner supports an automatic feeder. You can keep scanning until all pages are captured and then save them as a single PDF. PDFelement makes this process even faster by letting you merge multiple-page scans into one file seamlessly. -
3. What’s OCR, and why should I use it?
OCR (Optical Character Recognition) converts scanned images of text into editable and searchable content. Without OCR, your scanned PDF is just a picture—you can’t highlight, copy, or search words. Using OCR in tools like PDFelement makes your documents far more useful and professional. -
4. Is there a way to make scanned PDFs smaller?
Yes, you can compress scanned PDFs to reduce their file size. Windows tools may not provide advanced compression, but PDFelement lets you shrink files without major quality loss. This is especially helpful when emailing or storing large multi-page scans. -
5. Can I edit text in a scanned PDF?
Yes, but only if the file has been processed with OCR. Once OCR is applied, the text becomes editable, letting you make corrections or updates directly. PDFelement includes a built-in OCR engine that turns scanned pages into fully editable PDFs. -
6. Does this work on Windows 10?
Yes, all the methods mentioned here also work on Windows 10. The built-in Scan app and Windows Fax and Scan are available, and PDFelement is compatible with both Windows 10 and 11. So no matter which version you use, you can scan to PDF easily. -
7. How do I password-protect a scanned PDF?
Once you’ve scanned your document to a PDF, you can secure it with a password. PDFelement includes a Protect feature that allows you to add encryption right after scanning. This ensures sensitive documents remain private and accessible only to authorized users.

