
For many years, graphic designers, photographers, and painters have used Photoshop, a sophisticated graphics editing program, for photo editing. Aside from that, you can also use it to prepare design materials for printing, like business cards, flyers, and brochures. It lets you add bleeds to Photoshop, crop marks, and other essential printing marks directly in your layout.
These marks are essential in guiding printers on where to trim your documents and preventing unsightly white margins when printed. These also account for finish deviations, so your product looks polished because, without proper margins, images and text may appear cut off or unfinished.
Read this if you struggle to add bleed in Photoshop and other printing marks like crop marks. At the end of this article, you will learn about these printing marks in Photoshop and even explore more ways, such as using a PDF editor, to make the process easier. So, let's dive in and learn how to add bleed in Photoshop.

In this article
Part 1. Understanding Crop Marks and Bleed in Photoshop
Before knowing how to add bleed and crop marks in Photoshop, you need to understand the meaning of these essential printing marks. Discover here why you should use bleed in Photoshop to create stunning designs.
Crop Marks
The crop marks or trim marks are lines printed in each of the materials page's four corners and serve as a guide. It is where the sheet will be cut after printing to obtain the intended size. They also provide a reference point for aligning multiple pages of a document.
Each print job that needs to be cropped to size, regardless of whether the document includes bleed, needs crop marks. They are also particularly useful when your printing designs require bleed areas where the design extends past the edge of the paper. Read on to learn about bleed in photoshop and how it impacts printing.

Bleed in Photoshop
The graphics, color, and other design aspects in your layout might occasionally need to extend to the edge of the page. Bleed in photoshop refers to extending the design features by a few extra millimeters beyond the crop marks to ensure a floorless finish during trimming.
A commercial printing press cannot print to the edge of a sheet of paper. Printing companies use bigger sheets of paper to print several files before being reduced to size.
So it is necessary to print slightly above the edge of each side and add bleed in Photoshop since it is hard to cut perfectly to the edge of your design. By doing this, the pattern will print right to the edge.
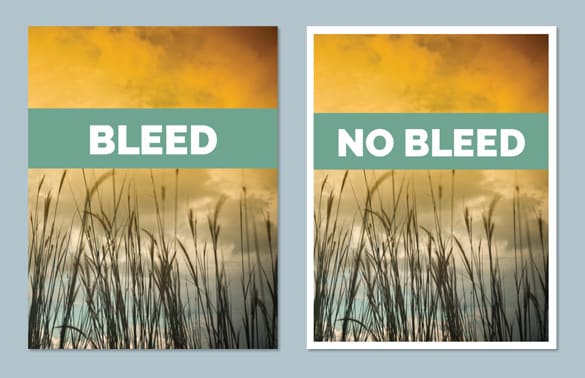
A Photoshop layout file without bleed will have a white border around the edges. It also risks cutting off design elements. Layout files with a bleed guarantee that the design has an extra border area, giving you more flexibility when printing and cutting.
With this knowledge, you may adjust your designs to incorporate enough bleed in photoshop. See to it that you keep vital elements within the safe zone to prevent them from being cut off during trimming. Here are some illustrations to show how you may change your designs to include bleed and obtain the required effects.
- Extend background. You can extend the background to be wider to meet the bleed margin. Verify that your bleed area is a seamless continuation of the final print. Otherwise, after cutting, any print movement will be seen.
- Extend elements. To meet the bleed area, try extending your design images toward the edge of the paper. It is not enough to only add bleed in photoshop; double-check that the elements touch the side.
- Increase picture size. Another option to add bleed to your design is to scale up your photos to reach the edges of the paper.

Part 2. How To Add Bleed and Crop or Trim Mark in Photoshop?
Having a better understanding of crop marks and bleed areas in Photoshop, let's move on. This section will guide you on adding bleed and crop marks in Photoshop designs to ensure a professional print job.
How To Create Bleed in Photoshop
Although you primarily use Photoshop for photo editing, there is a workaround you can do to create bleed-in documents using it. Follow these steps:
Step1
Launch Adobe Photoshop on your desktop. Then go to File > New on the upper left navigation menu.
Step2
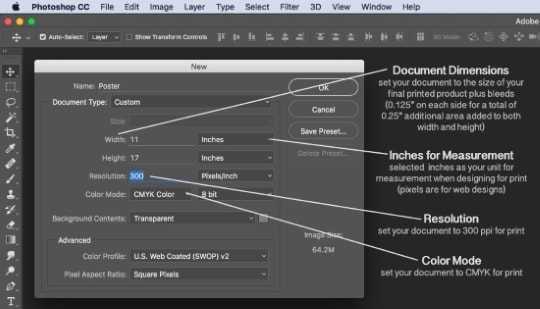
Choose inches as your measurement unit and CMYK as your Color Mode in the New dialog box. The print Resolution should be 300 ppi.
Step3
Click OK after the necessary actions on the New document dialogue box.
Step4
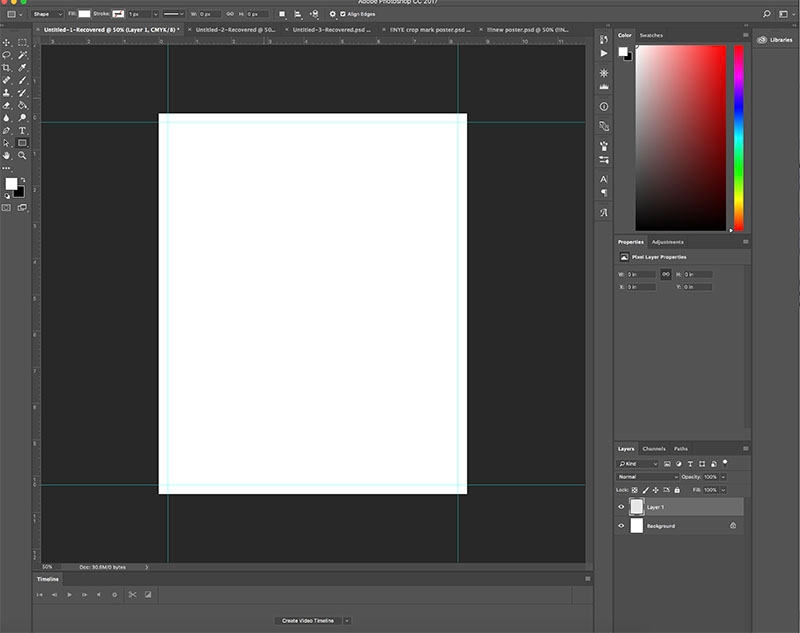
Go to View > Rulers at the top navigation pane to mark your document's edges using guides.
Step5
Click the ruler line and drag it toward the edge of the document. Do this on every side of your paper.
Step6
Go to Image > Canvas size to adjust the document size.
Step7
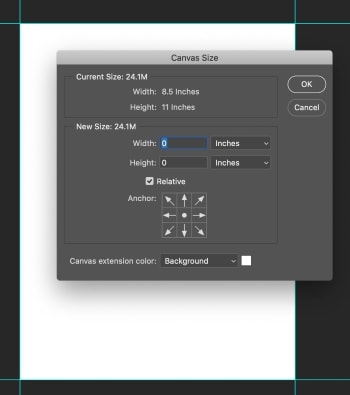
On the Canvas Size dialogue box, tick the Relative checkbox to add extra space around the page. Make the Width and Height 0.25 below the New Size selection to add bleed in Photoshop. Click the drop-down menu and select Inches to change the unit of measurement.
Step8
Click OK, and the page should now have an additional 0.125 inches on all sides.
How To Add Crop Marks in Photoshop
If you want to add crop marks to your Photoshop file, here are the steps to do it manually since Photoshop does not have a built-in feature to add them.
Step1
Add a new layer to your document.
Step2
Click the Marquee tool symbol, then select Single Row Marquee Tool on the left-side navigation menu.
Step3
Next, choose one guideline. Then click Edit on the upper navigation panel, and select Stroke. Repeat this on all sides of the document.
Step4
Click the Marquee tool symbol, then select Rectangular Marquee Tool on the left-side navigation pane.
Step5
Choose the desired area, then click Delete to erase it, leaving just minor corner trimming marks.
Part 3. Wondershare PDFelement – Versatile PDF Editor to Add Bleed Marks from PDF
While Photoshop is a powerful image editing software, it cannot work with PDF documents. Also, adding bleed in Photoshop can be time-consuming because you have to do it manually. The print marks might not be as accurate as those produced by a PDF editor.
That is why you need a PDF editor to make your layout print-ready when submitting it to printing companies. One that is specifically designed for working with PDF documents and has features optimized for this purpose, including quick tools for adding bleed and crop marks.
Wondershare PDFelement is a PDF editor that makes it easy to find the tools to add bleed and crop marks on your files. It will help you work more efficiently and effectively.


 G2 Rating: 4.5/5 |
 100% Secure
By following this guide, you can be confident that the files look their best in print and create materials that truly stand out. Learn here how to prepare your layout files for commercial printing.
Step1
Download Wondershare PDFelement to your device, then launch it.
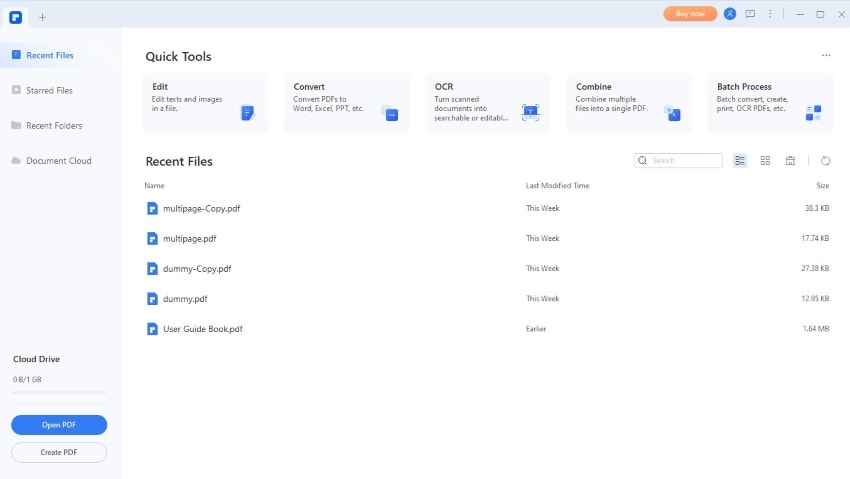
Step2
Click Open PDF on the lower left panel to import your document.
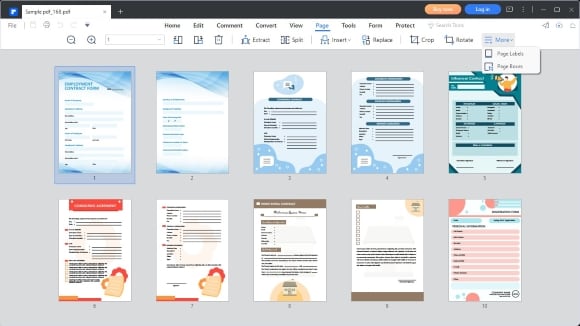
Step3
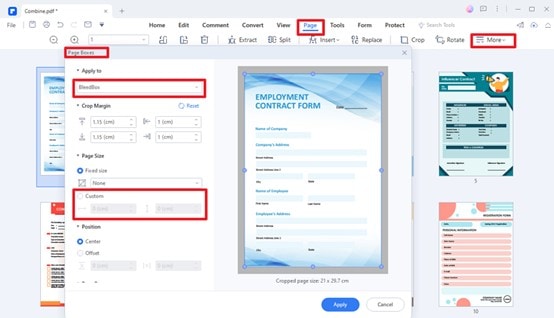
Click Page at the upper navigation menu. Next, from the More drop-down menu, select Page Boxes.
G2 Rating: 4.5/5 |100% Secure
Step4
On the Apply to drop-down menu, in the Page Boxes dialogue box, you can select CropBox, BleedBox, TrimBox, or ArtBox. Select BleedBox to add bleed to your file.
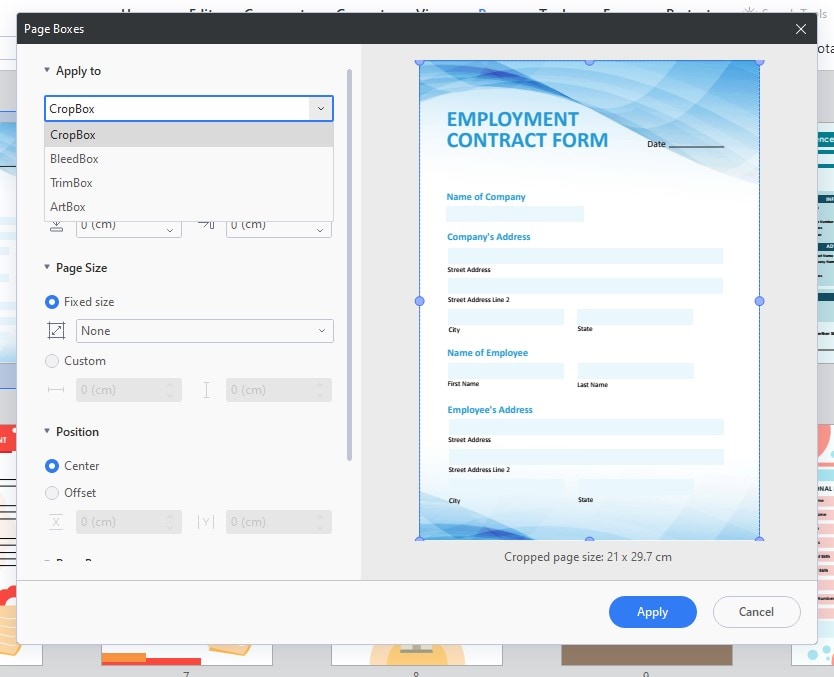
Step5
After all the necessary changes, click Apply.
G2 Rating: 4.5/5 |100% Secure
Part 4. Reasons To Use Wondershare PDFelement To Add Bleed Marks in Files.
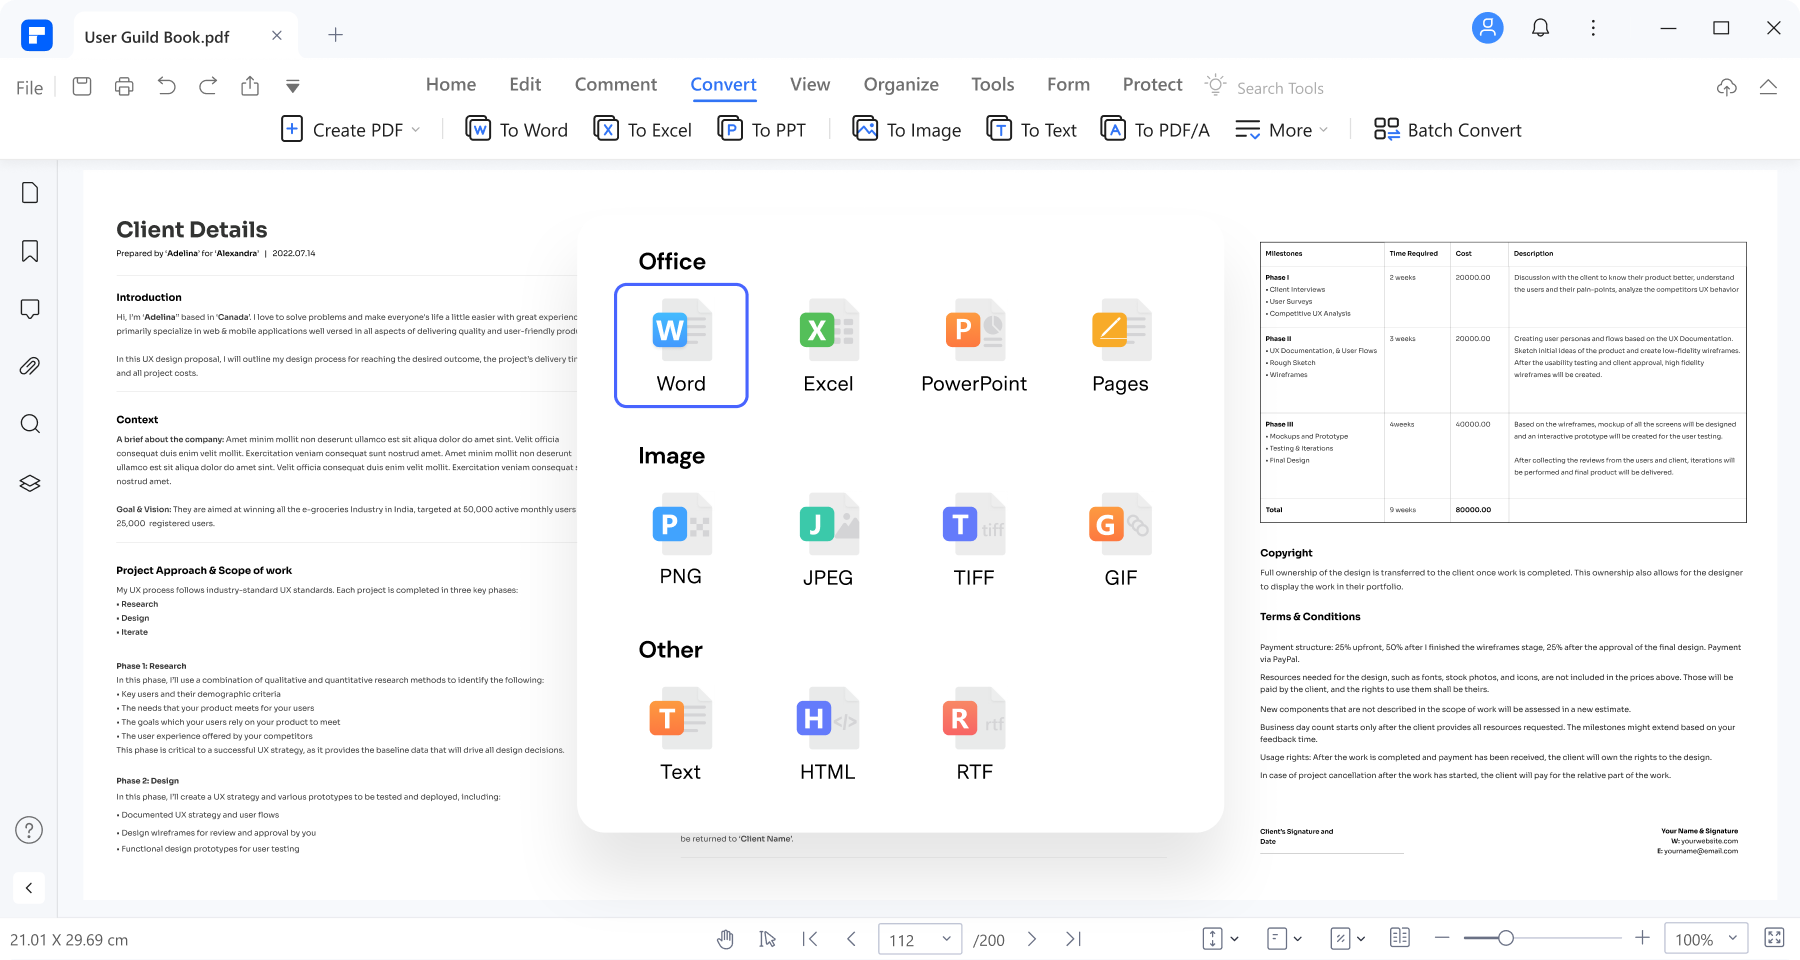
Here, you will find more about how the key features of PDFelement can help you create print-ready PDF documents quickly and easily. From converting files to adding bleed and crop marks, PDFelement offers a range of features and benefits that make preparing your documents for printing as smooth as possible.
- User-friendly interface. PDFelement has a user-friendly and straightforward design. It is helpful if you want to add bleed and crop marks to your document within a few seconds.
- Platform independent. This PDF editor can function on any device you own, a desktop (Windows and MacOS) and a smartphone (Android and iOS). It means that you can still create a print-ready document anywhere, anytime.
G2 Rating: 4.5/5 |100% Secure
- Broad features. PDFelement can add text or images to them your PDFs. You can also convert file formats like PNG and JPG to and from PDF without losing their quality. It also lets you add a password to your files to prevent unwanted access when sharing them.
The Benefits of PDF Editors Like PDFelement
PDF editors like PDFelement and Adobe Photoshop are powerful tools for editing files. But if you want to bleed and crop marks, PDFelement has advantages over Adobe Photoshop.
First, PDFelement has built-in features for adding bleed and crop marks. Adobe Photoshop is primarily designed for image editing, so while you can add bleed in Photoshop, it's not as straightforward.
Next, since PDF editors like PDFelement can edit PDF files, applying bleed and crop marks is simpler and more natural. On the other hand, Adobe Photoshop is essentially a photo editing program, so for beginners, its user interface might be overwhelming. With PDFelement, you can streamline your process, save time, and ensure that your print projects are of the best quality.
G2 Rating: 4.5/5 |100% Secure
Conclusion
Adding bleed to design files is essential in print design projects to ensure the printed product looks professional and cohesive. While it is possible to add bleed in Photoshop, the procedure might be time-consuming. And if you are a beginner in using the software, this might be overwhelming.
As such, you should consider using a PDF editor that offers an easy and efficient way to add bleed to your print design projects. PDFelement has an intuitive interface, robust feature set, and affordability, making it a must-have tool to streamline your workflow. Consider this wonderful tool if you're searching for a solution to add bleed to your print projects without doing it manually.


