
Table of Contents
- Before You Start: Choose the Right Word Signature Method
- How to Draw Signature in Word with the Draw Tab
- How to Insert a Handwritten Signature Image in Word
- How to Add and Save a Reusable Signature Block in Word
- After Signing in Word: Save, Share, or Finish the Document as a PDF
- Troubleshooting: Why Your Word Signature Does Not Look Right
Adding a signature to a Word document can be as simple as drawing with your mouse or inserting a photo of your handwritten signature. The best method depends on what you need: a quick approval note, a polished business letter, a reusable signature block, or a final signed document you plan to send as a PDF.
This guide explains how to draw signature in Word using several practical methods. You will learn how to draw directly inside Microsoft Word, insert a handwritten signature image, save your signature for later use, add a signature line, and finish the document properly if it needs to be shared as a PDF.


 G2 Rating: 4.5/5 |
 100% Secure
Before You Start: Choose the Right Word Signature Method
Microsoft Word gives you more than one way to add a signature, but the methods are not identical. Before you start, decide what kind of signature you need.
If you want the fastest option, use the Draw tab and write your name directly on the page. This works best on a touchscreen laptop, tablet, or device with a stylus. You can still use a mouse or trackpad, but the result often looks less natural.
If you want a cleaner handwritten signature, sign on paper first, then scan or photograph it. This is usually the best choice for letters, contracts, forms, invoices, and documents where the signature should look like your normal handwriting.
If you need a document prepared for someone else to sign, use Word’s Signature Line feature. It creates a formal placeholder with the signer’s name, title, and instructions.
For documents you sign repeatedly, such as internal forms or standard letters, save your signature as a reusable building block with Quick Parts or AutoText. That way, you do not need to insert and resize the same signature image every time.
A simple way to choose:
- Use Draw if you want to write directly in the document.
- Use a signature image if you want a neat handwritten look.
- Use a signature line if the document needs a formal signing placeholder.
- Use Quick Parts if you want to reuse the same signature and contact details.
- Use PDF signing tools if the document is final and should not be casually edited.
Microsoft has its own help page for adding signature lines in Office documents if you want to compare Word’s built-in signing option with the methods below: Microsoft Support: Add or remove a digital signature in Office files.
How to Draw Signature in Word with the Draw Tab
The most direct answer to “how to draw signature in Word” is to use Word’s Draw tools. This method lets you handwrite on the page without creating a separate image file first.
Step 1: Open the document and enable the Draw tab
Open your Word document and look for the Draw tab in the ribbon. In recent versions of Microsoft Word, the Draw tab is usually visible by default. If you do not see it, you may need to enable it.
On Windows, go to File > Options > Customize Ribbon. In the list of main tabs, check Draw, then select OK. On Mac, go to Word > Preferences > Ribbon & Toolbar, then enable the Draw tab if it is available.
Word for the web may have more limited drawing features than the desktop app. If the Draw tools are missing or restricted, open the file in the desktop version of Word.
Step 2: Select a pen
Go to Draw and choose a pen style. A thin black pen usually works best for signatures because it resembles ink and prints cleanly. You can adjust the color and thickness before you start writing.
If you are using a stylus or touchscreen, write your signature naturally in the blank area where it should appear. If you are using a mouse or trackpad, move slowly and try to write larger than usual. You can resize the signature afterward.
Step 3: Draw your signature in Word
Place the cursor or pointer where you want the signature, then write your name. Do not worry if it is slightly too large at first. A larger drawn signature is often easier to control and can be scaled down.
If you make a mistake, use Undo or the Eraser tool in the Draw tab. It is usually better to redraw the signature than to spend too much time trying to repair a shaky line.
Step 4: Move and resize the signature
After drawing, click the signature object. Word should show selection handles around the ink. Drag the corners to resize it proportionally. If the signature does not move the way you expect, right-click it and adjust the wrapping option.
For most signatures, In Front of Text or Square wrapping gives you more control. If you want the signature to sit neatly above a typed name or signature line, place it first, then fine-tune the surrounding text.
When drawing directly in Word works best
Drawing directly in Word is useful for quick approvals, informal forms, class documents, and internal notes. It is not always the best choice for polished external documents unless you have a stylus or a steady touchscreen.
The biggest drawback is consistency. A signature drawn with a mouse can look uneven, and it may not match your usual handwritten signature. If appearance matters, the scanned-image method below usually gives better results.
How to Insert a Handwritten Signature Image in Word
For most users who want to draw your signature in Word and make it look professional, the best workflow starts outside Word: sign on paper, turn the signature into an image, then insert it into the document.
This method is simple, works in nearly every Word version, and gives you a reusable signature file.
Step 1: Write your signature on white paper
Use a dark pen and plain white paper. Black ink is usually best because it scans clearly and looks good in both printed and PDF documents. Leave enough white space around the signature so you can crop it later.
Write a few versions, then choose the one that looks the most natural. A signature often looks better if you write at normal speed rather than trying to make it perfect.
Step 2: Scan or photograph the signature
If you have a scanner, scan the page and save it as a PNG or JPG. PNG is often better when you plan to remove the background or preserve clean edges. JPG is fine for general use, but it may introduce slight compression artifacts around the handwriting.
If you use a phone camera, take the photo in bright, even light. Avoid shadows from your hand or phone. Hold the camera parallel to the paper so the signature does not look slanted or stretched.
Transfer the image to your computer before inserting it into Word.
Step 3: Insert the signature image into Word
Open your Word document and click where you want the signature to appear. Then go to Insert > Pictures and choose the file from your computer.
Once inserted, select the image. Use the corner handles to resize it. Avoid dragging the side handles because that can stretch the signature unnaturally.
Step 4: Crop and clean up the signature
Click the image and use Picture Format > Crop to remove extra white space. The tighter the crop, the easier it is to position the signature near a line or typed name.
If the signature image has a visible white rectangle around it, select the image and look for Picture Format > Color > Set Transparent Color. Then click the white background. This can work well for simple black-on-white signatures, though it may not be perfect if the photo has shadows or uneven lighting.
For a cleaner result, prepare the image before inserting it. Many image editors can remove white backgrounds more accurately than Word. If the document is important, spend a minute cleaning the image instead of fighting with layout issues later.
Step 5: Adjust text wrapping
Word may insert the image “In Line with Text,” which can make it behave like a large character in a sentence. That is not always ideal for signatures.
Select the image, click Layout Options, and choose In Front of Text, Square, or Tight. For signatures placed above a line, In Front of Text gives the most freedom. For signatures inside a paragraph or letter closing, Square may be easier to manage.
Move the signature into place, then save the document.
How to Add and Save a Reusable Signature Block in Word
If you sign documents often, do not repeat the whole insert-and-resize process every time. Word can save your signature and related text as a reusable signature block.
A signature block can include your handwritten signature image, typed name, job title, company, phone number, email address, or any standard details you normally place under your signature.
Step 1: Build the signature block
Insert your signature image using the steps above. Under it, type the details you want to reuse. For example:
Jane R. Smith
Operations Manager
Example Company
jane.smith@example.com
Format the text the way you want it to appear in future documents. Keep it simple. A signature block with too many font sizes, colors, or spacing rules can become harder to reuse across different document templates.
Step 2: Select the signature image and text
Drag your cursor over the signature image and the typed details. Make sure the full block is selected. If the image is hard to select with the text, click the image first, adjust its wrapping to Square, and try again.
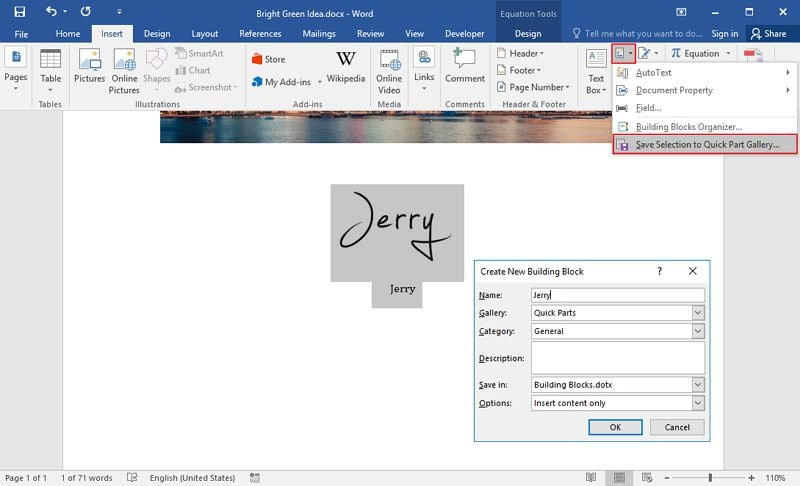
Step 3: Save it to Quick Parts or AutoText
Go to Insert > Quick Parts > Save Selection to Quick Part Gallery. In some Word versions, you may use AutoText instead.
Give it a clear name, such as “Signature - Jane Smith” or “Approval Signature.” Save it to the default building blocks location unless your organization uses a shared template.
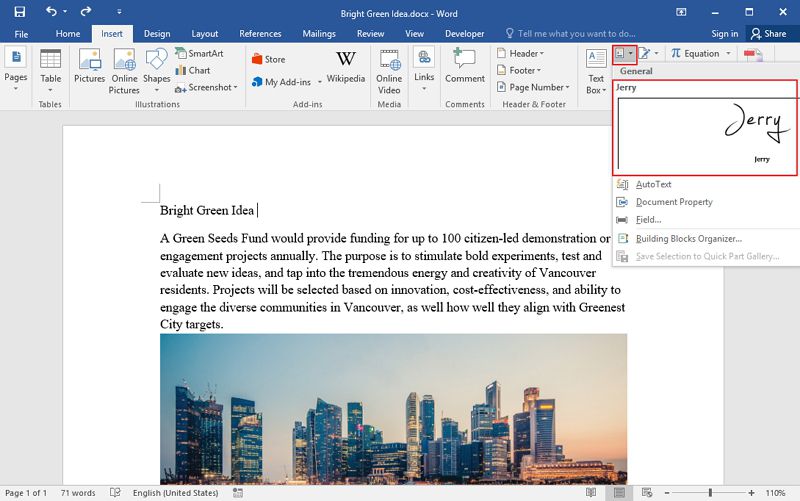
The next time you need it, go to Insert > Quick Parts and choose your saved signature block.
Step 4: Add a signature line if needed
A signature image and a signature line serve different purposes. The image shows a handwritten signature. The signature line creates a formal placeholder for signing.
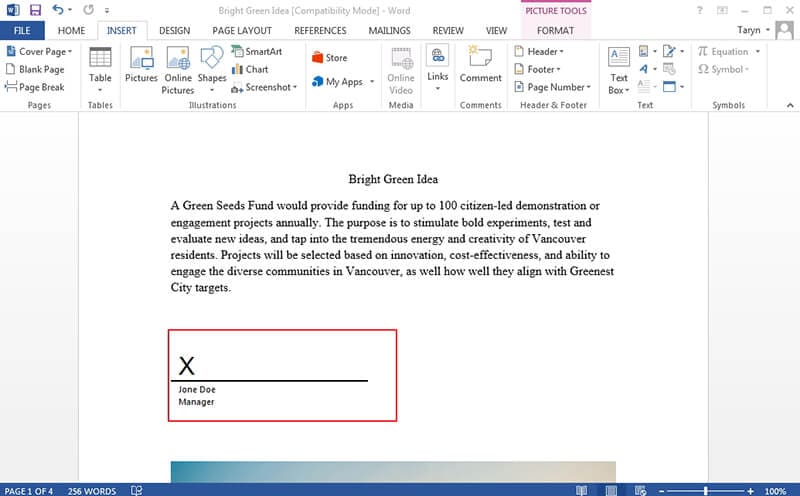
To add one, go to Insert > Signature Line. Fill in the signer’s name, title, email address, and instructions. Word will place a signature line in the document.
This feature is useful when you are preparing a document for someone else to sign, or when you want the signature area to look official. For a simple letter, though, a signature image above a typed name is usually enough.
After Signing in Word: Save, Share, or Finish the Document as a PDF
A signed Word document is still editable unless you protect it or convert it to a less flexible format. If you are sending a final version to a client, HR department, vendor, school, or government office, you will usually want to save it as a PDF.
Export the signed Word document to PDF
In Word, go to File > Save As or File > Export, then choose PDF as the output format. Review the exported PDF before sending it. Pay close attention to the signature area, page breaks, and any tables or form fields near the signature.
Word layout can shift slightly when exported, especially in documents with text boxes, floating images, or complex formatting. A quick review prevents embarrassing mistakes, such as a signature moving onto the wrong line.
Use PDFelement when the document workflow continues in PDF
Once the signed Word file becomes a PDF, editing it in Word is no longer the most practical option. This is where PDFelement fits naturally into the workflow. You can use it to open the exported PDF, check the layout, add comments, place stamps, insert additional signatures, fill forms, organize pages, compress the file, or protect it before sharing.
G2 Rating: 4.5/5 |100% Secure
For example, if you receive a contract as a PDF instead of a Word file, you do not need to convert it just to add a signature. Open the PDF in PDFelement, use the annotation or signing tools to place your signature, and save the finished copy. If the PDF came from a scanned document, OCR can help make the text searchable or editable before you finish the file.

PDFelement is especially useful when the signature is only one part of the job. Many document workflows also require redacting private information, combining pages, adding form fields, reducing file size for email, or converting the final PDF back to Word for revisions. Word is good for drafting; a PDF editor is better for controlling the final document package.
Add a signature to a PDF when Word is not the right tool
If the document has already been finalized as a PDF, avoid copying content back into Word just to sign it. That can damage formatting and create version-control problems.
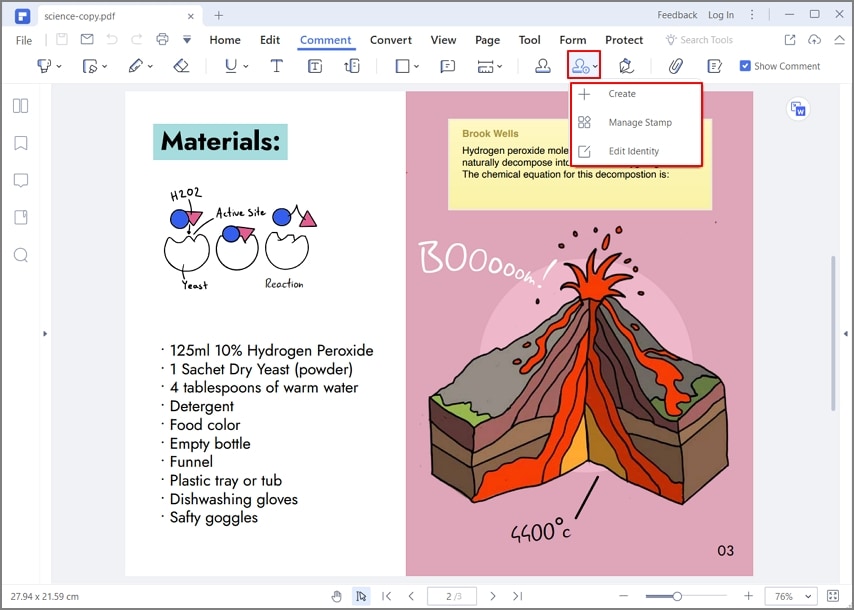
In PDFelement, open the PDF, go to the signing or commenting tools, and add your signature where needed. If you prefer using a handwritten signature image, you can import it and place it on the page. Resize it carefully so it fits the signature line.
G2 Rating: 4.5/5 |100% Secure
After placing the signature, save a new copy with a clear file name, such as Agreement-Signed-Jane-Smith.pdf. This keeps the original untouched and makes the signed version easy to find.
Troubleshooting: Why Your Word Signature Does Not Look Right
Even a simple Microsoft Word draw signature task can become frustrating if the image moves, prints poorly, or shows a strange background. Most problems come from image quality, wrapping settings, or the way Word handles floating objects.
The signature looks blurry
A blurry signature usually means the source image is too small or low quality. Start with a larger scan or photo, then scale it down in Word. Do not enlarge a tiny signature image because Word cannot recreate missing detail.
If you photographed the signature, retake the image in better light and keep the camera steady. A dark pen on clean white paper gives Word much better material to work with.
The signature is too large
Click the signature and drag from a corner handle. Holding Shift is not usually necessary in modern Word because corner resizing keeps proportions, but if the signature stretches, undo and resize again from the corner.
For consistent sizing, right-click the image, choose Size and Position, and set an exact width. Many signature images look natural between 1.5 and 2.5 inches wide, depending on the document design.
The signature keeps moving
This is a text wrapping issue. Select the signature image, click Layout Options, and change it from In Line with Text to Square or In Front of Text. If you want the signature to stay near a specific paragraph, check the position settings and anchor behavior.
For important templates, place the signature inside a table cell with invisible borders. This gives you more layout control and prevents the signature from drifting when text above it changes.
A white box appears around the signature
This happens when your signature image has a white background and the document background is not the same color, or when the image overlaps a signature line.
Try Picture Format > Color > Set Transparent Color and click the white background. If that does not work well, remove the background in an image editor and save the file as a PNG with transparency.
Avoid using photos with shadows or gray paper texture. They are harder to clean up inside Word.
The Draw tab is missing
If you cannot find the Draw tab, enable it under Word’s ribbon settings. If you are using Word in a browser, switch to the desktop app. Some drawing features depend on your version of Word, your device, and whether touch input is available.
You can still draw my signature Microsoft Word style without the Draw tab by using the signature image method. In many cases, that method produces a better result anyway.
The signature does not print where it appears on screen
Export the file to PDF first, then check the PDF before printing. PDF output gives you a more reliable preview of page layout than Word’s editing view.
If the signature shifts during export, simplify the layout. Use a table, adjust image wrapping, or place the signature closer to the relevant text. Documents with many floating objects are more likely to move during conversion.
People Also Ask
-
Can I draw my signature directly in Microsoft Word?
Yes. Open the document, go to the Draw tab, choose a pen, and write your signature with a stylus, touchscreen, mouse, or trackpad. A stylus gives the most natural result. If you are using a mouse, your signature may look shaky, so inserting a scanned handwritten signature image may be better. -
How do I draw my signature in Microsoft Word without a touchscreen?
You can use a mouse or trackpad in the Draw tab, but it may be hard to control. A cleaner option is to sign on paper, scan or photograph the signature, and insert it through Insert > Pictures. After inserting it, crop the image and adjust text wrapping so it sits correctly on the page. -
Is a drawn signature in Word legally binding?
A drawn or inserted signature may be accepted for many everyday documents, but legal validity depends on the document type, jurisdiction, consent, authentication, and the signing process. For high-value contracts, regulated forms, or documents requiring verified identity, use an approved eSignature platform or ask the receiving organization what they accept. -
How do I make my Word signature transparent?
Insert the signature image, select it, then go to Picture Format > Color > Set Transparent Color and click the white background. This works best with a clean black signature on a pure white background. For better results, remove the background in an image editor and save the signature as a transparent PNG before inserting it into Word. -
Can I reuse the same signature in multiple Word documents?
Yes. Insert and format the signature once, add any typed details you want, select the full signature block, and save it through Insert > Quick Parts > Save Selection to Quick Part Gallery. You can then insert it into future Word documents without rebuilding it. -
Should I sign in Word or PDF?
Use Word if the document is still being drafted or edited. Use PDF if the document is final, needs to preserve formatting, or will be sent to someone else for records. If you already have a PDF, it is usually better to sign it with a PDF editor such as PDFelement rather than converting it back to Word.

