
Table of Contents
Rotating a page in Microsoft Word sounds simple until you need only one page turned sideways. Changing the whole document from portrait to landscape takes a few clicks. Rotating a single page for a wide table, chart, spreadsheet screenshot, diagram, or form is where most people run into trouble.
The key is knowing what Word is actually rotating. In Word, you usually do not “spin” a page the way you might rotate a PDF page. You change the page orientation between Portrait and Landscape. If you want one page to face a different direction from the rest of the document, Word has to treat that page as its own section.
This guide explains how to rotate page in Word for the entire document, how to rotate only one Word page, how to handle objects such as images and text boxes, and what to do if you need the final document in PDF format.


 G2 Rating: 4.5/5 |
 100% Secure
How Page Rotation Works in Microsoft Word
Before changing anything, it helps to separate three tasks that often get mixed together:
Rotating a Word page means changing page orientation from portrait to landscape, or landscape to portrait.
Rotating content means turning an image, shape, text box, or WordArt object.
Rotating a PDF page means changing the page view or page direction after the Word document has already been exported.
Microsoft Word’s page rotation feature is called Orientation. You can find it under the Layout tab. According to Microsoft’s page orientation guidance, Word supports portrait and landscape orientation, and you can apply the setting to an entire document or to selected parts of a document.
In most documents, portrait is the default. Landscape is useful when the content is wider than a normal page, such as:
- A table with many columns
- A project timeline
- A financial report
- A large image or diagram
- A sign-in sheet or form
- A comparison chart
If the whole file should be horizontal, use the full-document method. If only one page needs to be horizontal, use the one-page method instead.
How to Rotate All Pages in Word
If you want to rotate Word document pages all at once, use the Orientation option from the Layout tab. This is the easiest method and works well for flyers, calendars, forms, labels, worksheets, and documents designed to be read horizontally.
Steps to rotate all pages in Word
Open your document in Microsoft Word. If you are starting a new file, you can apply the setting before adding content. If the document already exists, it is usually safer to save a copy first, especially if it includes tables, images, headers, or carefully placed page breaks.
Go to the Layout tab in the ribbon. In some older versions of Word, the tab may be called Page Layout, but the setting is in the same general area.
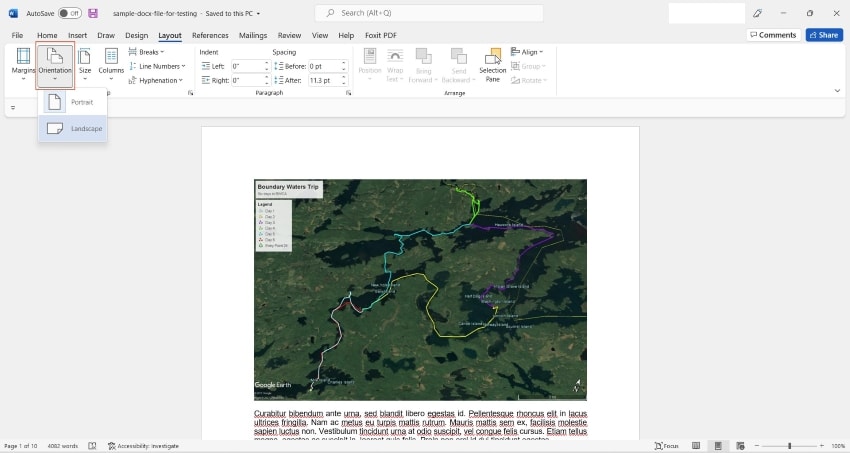
In the Page Setup group, select Orientation. Choose Landscape to rotate the Word page sideways. Choose Portrait if you want to switch it back.
Word applies the orientation to the entire document unless the file already contains section breaks. If your document unexpectedly changes only part of the file, section breaks are probably controlling the layout. You can check this by turning on formatting marks with Home > ¶ Show/Hide.
What changes when you rotate the whole document?
Rotating a full document changes how text flows on each page. It does not rotate the letters themselves. A paragraph that was at the top of a portrait page will still read normally from left to right; the page just becomes wider and shorter.
After rotating the full document, quickly review these areas:
Wide tables may fit better, but long paragraphs may create more pages.
Headers and footers may need spacing adjustments.
Page numbers may move depending on your footer layout.
Images anchored to paragraphs may shift.
Manual page breaks may no longer fall in the right place.
For simple files, the change is usually clean. For reports, proposals, contracts, or manuals, expect to spend a few minutes checking the layout afterward.
How to Rotate Only One Page in Word
The most common question is not just how to rotate in Word, but how to rotate one page without changing the entire document. Word can do this, but it needs a boundary around that page. You can create that boundary automatically by applying orientation to selected text, or manually by inserting section breaks.
Method 1: Rotate one page using selected text
This method is best when the page already has the content you want to rotate, such as a wide table or chart. Word will insert the needed section breaks for you.
First, select the content that should appear on the rotated page. If you are rotating a table, select the full table. If you are rotating a page with several paragraphs and images, select all content that belongs on that page.

Go to Layout. In the Page Setup group, click the small diagonal arrow in the bottom-right corner. This opens the full Page Setup dialog box.
In the Margins tab, choose Landscape under Orientation. Then find the Apply to dropdown and select Selected text. Click OK.
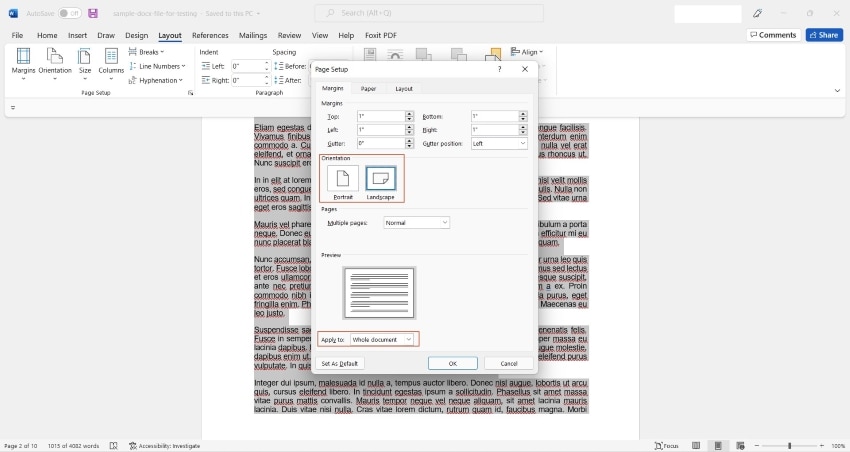
Word places the selected content on a landscape page while keeping the surrounding pages in their original orientation. This is the quickest answer for how to rotate Word page content when only one page needs a different layout.
If the selected content is too long to fit on one landscape page, Word may create multiple landscape pages. That is normal. Reduce spacing, adjust table width, or move some content if you need it to stay on a single page.
Method 2: Rotate one page using section breaks
Section breaks give you more control than the selected-text method. Use this approach when you want to rotate a blank page first, then add content later, or when Word’s automatic section breaks do not land where you want them.
Place your cursor at the end of the page before the one you want to rotate. Go to Layout > Breaks > Next Page. This creates a new section starting on the next page.
Now place your cursor at the end of the page you want to rotate. Again, choose Layout > Breaks > Next Page. You now have one section isolated between two section breaks.
Click anywhere inside that middle section. Go to Layout > Orientation > Landscape. Word should rotate only that section.
This method is especially useful for formal documents because you can control exactly where the landscape page begins and ends. It also makes troubleshooting easier. If a later page rotates by mistake, the issue is usually a missing or misplaced section break.
How to rotate multiple specific pages in Word
If several pages need landscape orientation, decide whether they are continuous.
For consecutive pages, place one section break before the first page and another after the last page. Click inside that section and choose Landscape.
For non-consecutive pages, each landscape page or group of pages needs its own section. For example, if pages 3 and 8 need landscape orientation but pages 4–7 should remain portrait, page 3 and page 8 must be separated into different sections.
This can feel tedious in a long report, but it is the correct Word workflow. Page orientation is a section-level setting, not a single visual page setting.
How to Rotate Content in Word Instead of the Page
Sometimes you do not need to rotate page in Word at all. You may only need to rotate an object inside the page. This is common with images, scanned signatures, icons, arrows, labels, and text boxes.
Rotate an image, shape, or text box
Click the image, shape, or text box. Word displays a rotation handle above the object. Drag that handle left or right to rotate freely.
For exact rotation, select the object and go to Shape Format or Picture Format, depending on the object type. Choose Rotate, then select an option such as Rotate Right 90°, Rotate Left 90°, Flip Vertical, or Flip Horizontal.
This is the better method if the page itself should stay portrait but one element needs to be turned. For example, you might keep a resume page vertical while rotating a small logo or signature image.
Rotate text in Word
Word does not rotate normal body paragraphs directly. To rotate text, insert it into a text box or table cell.
For a text box, go to Insert > Text Box, type or paste the text, then rotate the box using the rotation handle. You can remove the border by selecting the text box and choosing Shape Format > Shape Outline > No Outline.
For table text, click inside the cell and use Table Layout > Text Direction. This is useful for narrow column headings, labels, or forms where vertical text saves space.
What about wide tables?
Wide tables are one of the biggest reasons people search for how to rotate Microsoft Word pages. If your table is too wide for portrait orientation, try rotating only that page to landscape first. Then use Table Layout > AutoFit > AutoFit Window to make the table fit the page width.
If the table still looks cramped, reduce left and right margins for that section only. Open Page Setup, adjust margins, and make sure the change applies only to the current section. Avoid shrinking the font too much. A table that technically fits but cannot be read is not a good fix.
Common Problems When Rotating a Word Page
Rotating a Word page is simple in a clean document. Existing formatting can make it look unpredictable. Most problems come from section breaks, headers, footers, page numbers, margins, or manually placed content.
The whole document rotated instead of one page
This usually happens because the orientation was applied to the whole document. Undo the change with Ctrl + Z or Command + Z, then use the selected-text method or section-break method.
If you are using the Page Setup dialog box, pay close attention to Apply to. Choose Selected text or This section, not Whole document.
More than one page rotated
Your selected content may be too long, or the section may include more pages than you expected. Turn on formatting marks with Home > ¶ Show/Hide and look for section breaks. Move the section breaks so they surround only the page or pages you want to rotate.
Headers and footers look wrong on the landscape page
Headers and footers belong to sections. When you create a new landscape section, Word may link its header and footer to the previous section. If you need different spacing or page number placement, double-click the header or footer and check whether Link to Previous is turned on.
Landscape pages in portrait documents often need custom page number placement. Some organizations require the number to appear in the same physical location when printed and bound. In that case, you may need to use a text box in the footer or adjust the footer layout manually.
Page numbers restart after rotating one page
This is another section issue. Click into the page number, choose Page Number > Format Page Numbers, and set numbering to Continue from previous section.
The printed page does not match what Word shows
Check both Word’s page setup and your printer settings. A document can be landscape in Word, but the printer dialog may still have settings that scale, rotate, or fit pages automatically. Use File > Print and preview the pages before printing. If your document mixes portrait and landscape pages, print a small page range first as a test.
Word for the web does not show all layout controls
Word for the web supports many common editing tasks, but advanced layout controls can be limited compared with the desktop version. If you cannot access the section break or Page Setup options you need, open the file in the desktop version of Microsoft Word.
Convert or Save the Rotated Word Document as a PDF
After you rotate Word document pages and finish checking the layout, you may need to share the file as a PDF. PDF is often better for sending final documents because it preserves page size, orientation, fonts, and spacing more reliably across devices.
In Word, use File > Save As or File > Export, then choose PDF. Before sending the PDF, open it and check the pages that were rotated. Pay close attention to tables, charts, page numbers, and signatures.
Why PDFelement is useful after rotating pages in Word
Word is the right place to edit the document’s text and layout. But once the file becomes a PDF, it is often easier to manage final-page tasks in a PDF editor. This is where PDFelement fits naturally into the workflow.
G2 Rating: 4.5/5 |100% Secure
For example, if you exported your Word file and noticed that one PDF page is still facing the wrong direction, PDFelement lets you rotate PDF pages without going back through the Word layout process. You can open the PDF, go to the page tools, select the page or page range, rotate left or right, and save the corrected file.

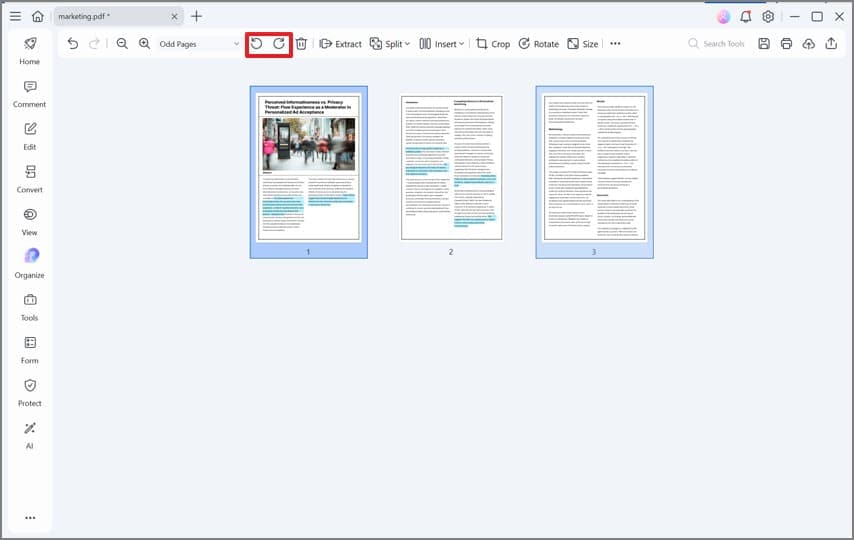
This is especially helpful when the Word document is already approved, signed, or converted from a scan. PDFelement can also support related finishing tasks such as organizing pages, compressing the PDF for email, adding comments, using OCR on scanned pages, and preparing a cleaner file for sharing. It should not replace Word for writing and formatting the original document, but it is a practical follow-up tool when the final deliverable is a PDF.
People Also Ask
-
How do I rotate page in Word from portrait to landscape?
Go to Layout > Orientation > Landscape. This rotates the page orientation from portrait to landscape. If your document has no section breaks, Word applies the change to the whole document. -
How do I rotate only one page in Word?
Select the content you want on the rotated page. Go to Layout, open the Page Setup dialog box, choose Landscape, then set Apply to as Selected text. Word will create section breaks around that content and rotate only that part of the document. -
Why does Word rotate the entire document instead of one page?
Word applies orientation changes to the whole document unless you tell it otherwise. Use Selected text or This section in the Page Setup dialog box. If needed, insert section breaks before and after the page you want to rotate. -
Can I rotate one page in Word without section breaks?
Not really. Word needs sections to apply different page orientations within one document. The selected-text method may hide this step from you, but Word still creates section breaks in the background. -
How do I rotate a Word document on Mac?
The steps are similar. Open the document, go to Layout, choose Orientation, and select Portrait or Landscape. To rotate only part of the document, use Page Setup and apply the change to selected text or the current section. -
Can I rotate a page in Word online?
Word for the web may support basic orientation changes, but it does not always provide the same section-level controls as the desktop app. For rotating only one page, the desktop version of Word is usually more reliable. -
How do I rotate text in Word?
Put the text inside a text box or table cell. For a text box, use the rotation handle. For a table cell, use Table Layout > Text Direction. Normal body text cannot be freely rotated like an image. -
How do I rotate an image in Word?
Select the image and drag the rotation handle above it. For a precise turn, go to Picture Format > Rotate and choose a 90-degree rotation or flip option. -
Will rotating a page in Word affect page numbers?
It can. Page numbers are controlled by sections, so adding landscape pages may affect numbering or footer placement. If numbering restarts, choose Format Page Numbers and set it to continue from the previous section. -
How do I rotate a Word page after saving it as a PDF?
Open the PDF in a PDF editor such as PDFelement, select the page or page range, rotate the pages left or right, and save the file. This is often faster than reopening Word if the PDF is already finalized.

