How to Make Clipping Mask in InDesign - 2026
Wondering how to make a clipping mask in InDesign? This post focuses on the step-by-step guide on making clipping mask in InDesign.
 100% Secure |
 Home
>
Indesign Tips and Tricks
> How to Make Clipping Mask in InDesign - 2026
Home
>
Indesign Tips and Tricks
> How to Make Clipping Mask in InDesign - 2026
Clipping mask is an object whose shape masks other artworks. That way, only areas that lie within the shape are visible. The result is clipping the artwork to the shape of the mask. This feature can be quite handy when you want to create posters, and other graphical designs. The Clipping mask in InDesign and the objects that are masked are called clipping set. Today, we will learn how to make a clipping mask in InDesign, since it is rather different than making it in any other Adobe application.
How to Edit Clipping Mask in InDesign Files
While making a clipping mask in InDesign is fairly simple, not all people have the application. In some cases, you might need to make additional changes and edits, after exporting the InDesign file into a PDF document. Instead of converting back to InDesign file, editing, and then again to PDF, you can speed up the process by creating a clipping mask in a PDF software tool that can read InDesign files. For that purpose, you need a robust software, one like Wondershare PDFelement - PDF Editor Wondershare PDFelement Wondershare PDFelement.
It is one of the most popular PDF tools on the market, one that offers wide variety of features that can help you edit and organize PDF documents. Here is a quick breakdown of all the features:
- Edit text in PDF documents using single line or paragraph mode.
- Edit images by rotating, cropping, copying, removing, and more.
- Add annotation tools in the PDF document like sticky comments to make it look professional.
- Use OCR technology to make scanned PDF documents editable and searchable.
- Insert page numbers and page elements.
- Create interactive form fields and fill them.
- Convert PDF documents into World, HTML, image files, and more.
- Protect PDF documents with password restrictions.
With that in mind, here is a guide how you can edit pictures.
Step 1. Open the InDesign PDF
InDesign file usually exported as PDF format so it is very easy to open an InDesign file with PDFelement. You can either drag and drop the file, or go "Open Files…" and locate the file.

Step 2. Crop Images and Objects
To crop a picture or object, go to the top-left corner, and click on "Edit". Select the image you want to crop. In the right side, you will notice a "Clip" button. Click the button, and crop the image as you want.
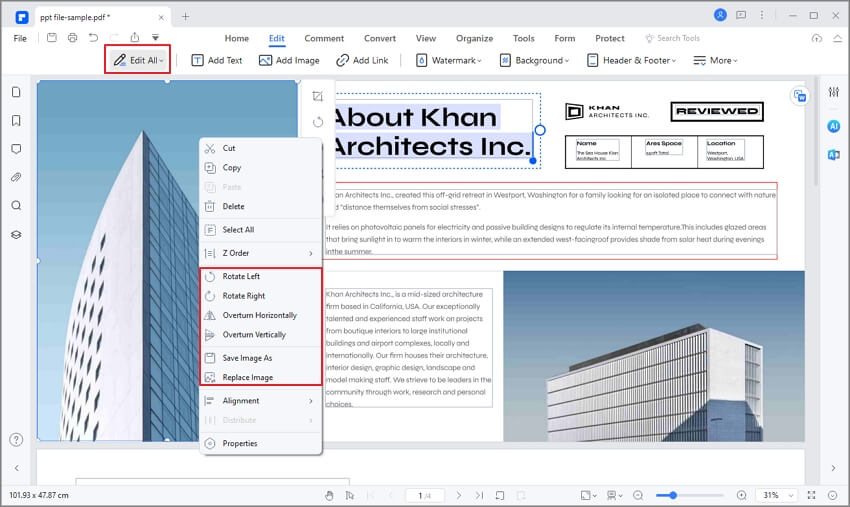
Step 3. Edit Images and Objects
You can edit images in more ways. Click the "Edit" button, select the image, and then drag it to move it. You can also move it using the arrow keys in your keyboard. Place the mouse cursor on the edge of the blue box, right click to choose rotate left, rotate right, overturn vertical, replace image, and more options. If you want to add image to the document, go to "Edit" > "Add Image" and select the image you want to add.
Once you are done with editing, click Save document to save the changes you made.

How to Make a Clipping Mask in InDesign
As mentioned previously, creating a clipping mask in InDesign is different from how you do it in other Adobe tools. If you work in different Adobe tools, you might get messed up. For example, making a clipping mask in Photoshop is different. In order to make sure you do not forget any steps, we can show you how do to clipping mask in InDesign.
Make sure you start from a shape, or a container, and an image, or filling. Here are the steps.
- 1. Create the shape of your choice, it can be basically anything.
- 2. If you haven't placed the image in InDesign yet, you can select a shape you drew and place the image inside of the shape, using the command "File" > "Place" > select the image.
- 3. Alternatively, you can cut the image you already placed. Then, select the shape you drew, and right click the "Select Paste into" option.
As you can see, making clipping masks in InDesign is rather simple, but it works differently from Adobe's other graphic design tools, including Photoshop and Illustrator.
If you have text that you want to use as a container, transform it into a shape, and then create InDesign gradient mask. Last, but not least, make sure that the shape and the image are in the same layer. That is all you need to know.
Free Download or Buy PDFelement right now!
Free Download or Buy PDFelement right now!
Try for Free right now!
Try for Free right now!


Elise Williams
chief Editor