
Table of Contents
- Why InDesign PDFs Become Too Large
- How to Compress PDF in InDesign During Export
- Best InDesign PDF Compression Settings by Use Case
- How to Compress an Already Exported InDesign PDF with PDFelement
- What to Do When Your InDesign PDF File Size Is Still Too Large
- Quality Checklist Before You Send the Compressed PDF
A large PDF exported from InDesign can stop an otherwise finished project at the worst moment. The layout is approved, the images look good, and then the final PDF is too big for email, a client portal, a print submission form, or your website’s upload limit. The fix is not always “choose the smallest file size.” That can work for a quick proof, but it can also make photos soft, flatten details, or create a file that is unsuitable for print.
The better approach is to compress the PDF at the right point in the workflow. InDesign gives you export controls for image resolution, compression type, marks, bleeds, layers, color conversion, and more. After export, a PDF tool such as PDFelement can help reduce file size further, especially when you need to send a review copy, optimize a document for web sharing, or manage the PDF without reopening the InDesign package.
This guide explains how to compress PDF in InDesign, what each important setting does, and what to check when an InDesign PDF file size is too large even after using the usual export preset.


 G2 Rating: 4.5/5 |
 100% Secure
Why InDesign PDFs Become Too Large
InDesign files often become large because they are built from many high-resolution assets. A brochure might contain 300–600 ppi product photos, layered Photoshop files, vector illustrations, transparent overlays, embedded fonts, and print marks. Those elements are normal in design work, but they can make an exported PDF much heavier than expected.
The biggest contributor is usually image data. If your layout contains a full-resolution image from a camera or stock library, InDesign may export more image information than your final PDF needs. A 6000-pixel-wide photo placed into a small frame does not need to remain at its original resolution for an email proof. During export, InDesign can downsample that image and apply JPEG or ZIP compression.
Another common reason is that the PDF contains print-production extras. Crop marks, bleed marks, registration marks, slug areas, ICC profiles, layers, and high-resolution transparency data can all add weight. They may be required for a commercial printer, but they are usually unnecessary for a file meant only for review.
There is also a difference between reducing the InDesign document size and compressing the exported PDF. If you are asking how to reduce InDesign file size for PDF, the real goal is usually one of two things: optimize the source document before exporting, or choose export settings that produce a smaller PDF. You do not always need to make the .indd file itself smaller to create a lighter PDF.
For official details on Adobe’s export options, Adobe’s own documentation on exporting InDesign files to Adobe PDF is a useful reference alongside the practical workflow below.
How to Compress PDF in InDesign During Export
The cleanest way to compress an InDesign PDF is to control the file size while exporting. This keeps you close to the source layout and gives you more control than compressing the PDF after it has already been created.
Step 1: Open the Export Dialog
Open your InDesign document and go to File > Export. Choose a destination folder, name the file, and set the format to Adobe PDF (Print) for most static documents. If you are creating an interactive PDF with buttons, forms, or media, choose Adobe PDF (Interactive) instead, but remember that interactive elements can increase file size.
After clicking Save, InDesign opens the Adobe PDF export settings window. This is where most compression decisions happen.
Step 2: Choose a PDF Preset That Matches the Job
At the top of the export window, InDesign offers Adobe PDF presets. These presets are starting points, not permanent rules.
For a small review file, Smallest File Size is the obvious option. It aggressively reduces image resolution and applies compression for screen viewing. It is useful when you need to email a proof or upload a draft quickly, but it is usually not appropriate for commercial printing.
For professional output, Press Quality or High Quality Print preserves more image detail. These presets make larger PDFs, but they are safer for print. If the file is too big, start with one of these presets and adjust compression settings manually instead of jumping straight to the smallest option.
If your printer supplies a preset, use it. Many printers provide a .joboptions file for InDesign, Illustrator, Acrobat, and other Adobe apps. That preset may include the exact color, bleed, resolution, and compatibility settings they expect.
Step 3: Adjust Image Compression Settings
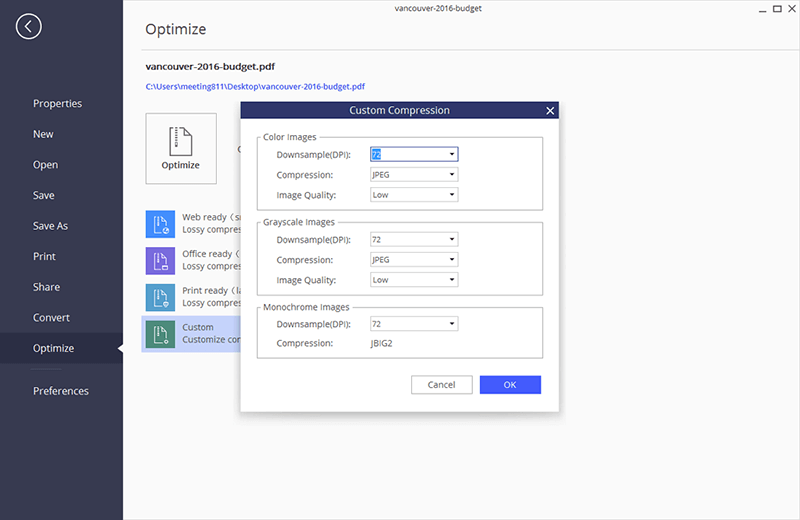
The Compression panel is the most important area when you want to compress InDesign PDF output. It controls how InDesign handles color images, grayscale images, and monochrome images.
For color and grayscale images, you will typically see options for downsampling and compression. Downsampling lowers image resolution when the image is above a chosen threshold. For example, you might downsample images to 150 ppi when they are above 225 ppi for a review PDF. For office printing, 200–300 ppi is often more suitable. For high-quality print, many workflows keep images around 300 ppi, though printer requirements vary.
JPEG compression is usually best for photographs because it reduces file size efficiently. The trade-off is that JPEG is lossy, meaning it discards some image information. A medium or high quality setting is often a good balance for review copies. Low quality can create visible artifacts, especially around sharp edges or text inside images.
ZIP compression is lossless and better for flat-color graphics, screenshots, line art, and images with sharp edges. It may not reduce photographic content as much as JPEG, but it avoids the blocky artifacts that JPEG can create in diagrams and logos.
Monochrome images are handled separately because they are usually line art or black-and-white scans. If the document includes scanned forms, technical drawings, or bitmap art, avoid over-compressing them until you have checked the final output carefully.
Step 4: Remove Unnecessary Marks, Bleeds, and Slug Areas
Open the Marks and Bleeds section. If the PDF is only for review, online viewing, or internal approval, you usually do not need printer’s marks. Crop marks and bleed marks add some file size, but more importantly, they increase page dimensions and can confuse non-print recipients.
For commercial print, do not remove bleeds unless your printer tells you to. Bleed is not decorative; it prevents white edges after trimming. A print-ready compressed PDF should still include the required bleed area, even if that makes the file slightly larger.
The slug area can often be removed from client-facing PDFs. It may contain production notes, job names, version details, or internal comments that are not needed outside the design workflow.
Step 5: Check Output and Color Conversion
The Output section affects color handling and profiles. Converting colors or including ICC profiles can change both print behavior and file size. For a simple review PDF, you may not need to include every profile. For print, color settings should follow the printer’s requirements.
Be careful with spot colors. If a document uses spot colors that are not needed, they can complicate output. InDesign’s Ink Manager can convert spot colors to process colors, but this is a production decision, not only a compression trick. If the job uses brand colors, metallic inks, varnishes, or special print treatments, confirm before converting.
Step 6: Export and Compare File Size
After changing the settings, click Export. Compare the new PDF size with the original and open the file before sending it. Do not judge only by megabytes. Zoom in on photos, logos, small text, charts, and transparent effects. A 2 MB PDF that damages the presentation is not a successful export.
A useful habit is to export two versions: one labeled “review” and another labeled “print” or “press.” This avoids the common mistake of sending a heavily compressed proof to a printer.
Best InDesign PDF Compression Settings by Use Case
There is no single best setting for every InDesign compress PDF workflow. A product catalog, resume, magazine ad, pitch deck, and print brochure all have different quality requirements. The goal is to make the PDF as small as possible without removing the quality needed for its purpose.
For Email Proofs and Client Review
If the PDF only needs to be viewed on screen, start with Smallest File Size and then adjust if the result looks too rough. Downsampling color and grayscale images to around 100–150 ppi is often enough for screen review. JPEG compression at medium quality can make a major difference for image-heavy files.
Turn off printer’s marks unless the reviewer specifically needs to see them. Keep hyperlinks if the PDF includes clickable references, but remove interactive media if it is not needed.
This type of file should be clearly named so it is not mistaken for final artwork. For example: brochure-review-compressed.pdf.
For Website Downloads
A downloadable PDF on a website needs to load quickly but still look polished. Use stronger compression than you would for print, but avoid the lowest image quality if the PDF represents your brand, portfolio, or product.
Images around 150 ppi are usually reasonable for web PDFs. Use JPEG compression for photos and avoid embedding unnecessary layers. If your InDesign document includes alternate layouts, hidden objects, or unused pasted content outside the page area, clean those up before exporting.
Accessibility can also matter for website PDFs. If the document will be public, preserve text as real text rather than flattening everything into images. Tagged PDFs can be slightly larger, but they are better for accessibility and search. The W3C’s guidance on PDF accessibility is helpful if the file will be distributed broadly.
For Office Printing
For internal office printing, you can usually compress more than a professional print job but less than an email proof. Downsampling images to 200–300 ppi is a practical range. Use medium or high JPEG quality for photos, especially if charts, product images, or screenshots need to remain clear.
Leave bleeds and crop marks off unless someone is trimming the document manually. Office printers do not need the same production data as a commercial press.
For Professional Print
For print, file size should not be the only goal. A printer may prefer a larger PDF if it preserves image quality, fonts, color data, and bleed. Start with Press Quality, PDF/X, or the printer’s own preset. Then compress only within acceptable limits.
Avoid low-quality JPEG compression. Keep required bleeds. Do not convert spot colors unless the print provider or production manager approves it. If you are unsure, ask the printer for a preferred PDF preset before spending time guessing.
PDF/X standards are commonly used in print workflows because they define production-safe PDF requirements. The Ghent Workgroup offers practical resources about PDF standards for print production if you work with print files often.
How to Compress an Already Exported InDesign PDF with PDFelement
Sometimes you no longer have the InDesign package, or you need to reduce a PDF quickly without changing the source layout. In that case, compressing the exported PDF directly is often faster. This is where PDFelement fits naturally into the workflow.
PDFelement is useful after the InDesign export stage because it lets you open a finished PDF, reduce its file size, and continue handling common PDF tasks such as editing text, organizing pages, adding comments, applying OCR to scanned content, converting to Office formats, and preparing a file for sharing. It does not replace InDesign for page layout, but it can save time when the PDF itself is what you need to deliver.
G2 Rating: 4.5/5 |100% Secure
Step 1: Open the InDesign PDF
Launch PDFelement and open the PDF exported from InDesign. You can use the Open File option or drag the PDF into the workspace.

This workflow is especially helpful for designers, marketers, and office teams who receive a PDF from someone else but do not have the linked images, fonts, or packaged InDesign folder.
Step 2: Use the Optimize or Compress Option
Open the file optimization feature. Depending on the version you use, the command may appear as Optimize PDF, Compress PDF, or a similar file-size reduction option.
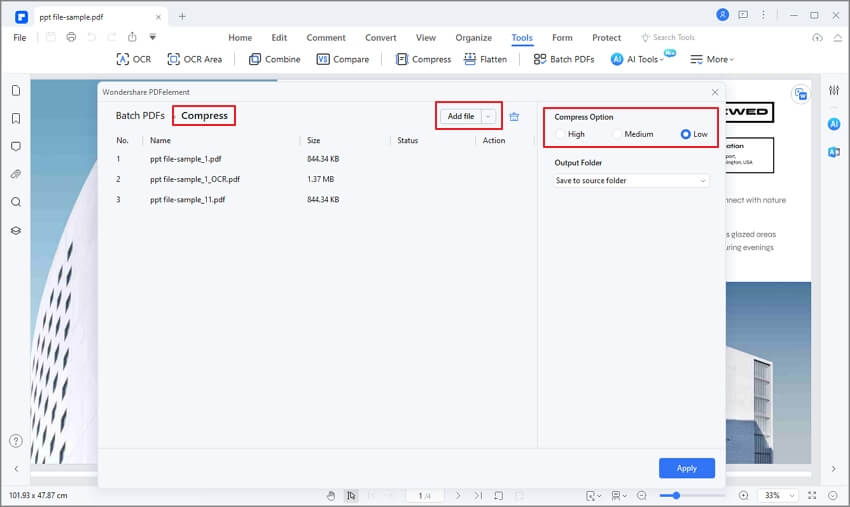
PDFelement typically offers preset compression levels so you can choose between a smaller file and better visual quality. For a client proof, a stronger compression level may be fine. For a sales proposal or portfolio PDF, choose a setting that preserves image sharpness.
Step 3: Choose a Compression Level and Save a Copy
Select the compression level, preview or check the estimated file size if available, and save the compressed PDF as a new file. Avoid overwriting the original unless you are certain the compressed version is acceptable.
After saving, open the compressed copy and inspect the pages that matter most: cover images, product photos, small captions, logos, tables, and any page with transparency effects. If the result looks too soft, return to the original PDF and choose a higher-quality compression setting.
PDFelement is also practical when compression is only one part of the delivery task. For example, after shrinking a PDF, you may need to delete blank pages, add page numbers, sign an approval copy, convert the PDF to Word for last-minute text extraction, or run OCR on scanned pages. Those follow-up tasks are difficult to manage inside InDesign once the document has already become a PDF.
G2 Rating: 4.5/5 |100% Secure
What to Do When Your InDesign PDF File Size Is Still Too Large
If your InDesign PDF file size is too large even after using compression settings, the source document may need cleanup. This is common with long catalogs, image-heavy reports, portfolios, and files built from multiple designers’ assets.
Resize Oversized Images Before Export
InDesign can downsample during export, but it is not always the best place to solve every image problem. If a placed image is extremely large, consider resizing it in Photoshop or another image editor before placing it. A 50 MB image used as a small thumbnail is inefficient, even if InDesign can technically export it.
Check the Links panel in InDesign. It shows linked image information, including effective resolution. Effective resolution matters more than the original image resolution because it reflects how large the image appears in your layout. If an image has an effective resolution far above what the final PDF needs, it is a good candidate for resizing or stronger downsampling.
Avoid Pasting Heavy Graphics Directly into InDesign
Pasted graphics can make files harder to manage and may increase export size. Whenever possible, place linked files instead of copying and pasting complex artwork. Linked files are easier to update, inspect, relink, and optimize.
If you inherited an InDesign file, look for objects on the pasteboard, hidden layers, old design versions, and unused graphics. Designers sometimes keep alternate covers or rejected layouts outside the page area. Those objects may still affect the document workflow and can accidentally appear in exports depending on settings.
Simplify Transparency, Shadows, and Effects
Drop shadows, glows, blending modes, and transparent overlays are common in polished layouts. They are not automatically bad, but complex transparency can make PDFs heavier, especially when flattened for certain compatibility settings.
If a page with many effects causes the file size to spike, consider simplifying the design or exporting with settings that preserve live transparency when appropriate. For print, ask the printer what PDF compatibility or PDF/X setting they prefer before flattening transparency manually.
Review Fonts, Layers, and Interactive Elements
Embedded fonts usually do not create the largest part of the file, but they can still add weight. Use only the fonts needed for the document, and avoid leaving unused type experiments in hidden layers.
Layers are useful while designing, but not every exported PDF needs them. If the recipient does not need to toggle layers, export without Acrobat layers.
Interactive features can also inflate PDFs. Buttons, videos, audio, animations, and embedded files should be included only when the PDF’s purpose requires them. If you are sending a static proof, remove media and export a standard print PDF instead of an interactive PDF.
Use “Save As” and Package Cleanup Wisely
For the InDesign document itself, File > Save As can sometimes reduce the .indd file size by rewriting the file. Packaging the project can also help you identify linked assets and fonts. This does not automatically compress the PDF, but it gives you a cleaner source folder and makes it easier to find what is making the export heavy.
If you are preparing multiple PDF versions, keep your naming clear:
project-name-review-small.pdfproject-name-web.pdfproject-name-print.pdfproject-name-original-export.pdf
That small habit prevents confusion when compressed and print-ready versions sit in the same folder.
Quality Checklist Before You Send the Compressed PDF
A compressed PDF should still do its job. Before emailing, uploading, or sending it to print, open the final file and check it like a recipient would.
Start with the cover or first page. If the main image looks blurry there, the compression is probably too aggressive. Then inspect pages with small text, charts, icons, QR codes, barcodes, and logos. These elements reveal compression problems quickly.
Zoom to 100% for normal screen review, then zoom in further on detailed pages. Do not rely only on thumbnail previews. If the PDF is for print, print one page on a local printer if possible, even if it is not a perfect match for the final press. This can catch obvious issues with image softness, missing marks, or font substitution.
Also confirm the basics: page count, page order, bleed, hyperlinks, bookmarks, and file name. If the file must meet a size limit, check the final file size after saving—not before. Some tools show estimates that differ from the actual saved PDF.
For print jobs, send the compressed file only if it still meets the printer’s specifications. If the printer asked for 300 ppi images, bleed, embedded fonts, and a specific PDF/X setting, do not sacrifice those requirements just to make the file easier to email. Use a file transfer service instead if needed.
People Also Ask
-
Can you compress a PDF directly in InDesign?
Yes. InDesign compresses PDFs during export through the Adobe PDF export settings, especially in the Compression panel. You can downsample images, choose JPEG or ZIP compression, adjust image quality, remove unnecessary marks, and choose presets such as Smallest File Size, High Quality Print, or Press Quality. -
What is the best preset to compress an InDesign PDF?
For email or online review, Smallest File Size is usually the fastest starting point. For professional printing, use Press Quality, PDF/X, or a preset supplied by your printer. If you need both small size and decent quality, start with a higher-quality preset and manually adjust image downsampling instead of using the most aggressive preset. -
Why is my InDesign PDF file size too large?
The most common causes are high-resolution images, many placed graphics, transparency effects, embedded profiles, printer’s marks, layers, interactive media, and unused objects in the document. Image data is usually the biggest factor, so check effective resolution in the Links panel and adjust export compression settings. -
How do I reduce InDesign file size for PDF without making images blurry?
Use moderate downsampling rather than the lowest-quality preset. For screen review, around 150 ppi may be enough. For office printing, 200–300 ppi is safer. For professional print, follow the printer’s requirements. Use JPEG medium or high quality for photos, and use ZIP compression for graphics with sharp edges or flat colors. -
Should I compress the PDF in InDesign or after export?
Compress in InDesign first if you have the source file, because export settings give you better control over images, marks, bleeds, color, and layers. Compress after export with a tool like PDFelement when you do not have the InDesign file, need a quick smaller copy, or want to handle PDF tasks such as page organization, comments, signing, OCR, or conversion. -
Is “Smallest File Size” okay for printing?
Usually no. It is meant for small screen-viewing files and may reduce image quality too much for print. For print, use a print-focused preset and adjust compression carefully. If file transfer is the problem, it is better to send a larger print-ready PDF through a cloud link or upload portal than to damage the file with excessive compression. -
Does compressing an InDesign PDF reduce text quality?
Normal PDF compression usually affects images more than live text. Text should remain sharp if it stays as vector text with embedded fonts. Problems can occur if pages are flattened into images, scanned, rasterized, or exported with settings that turn text-heavy content into low-resolution image data. -
Can PDFelement compress an InDesign PDF?
Yes. Once the InDesign document has been exported as a PDF, PDFelement can open and compress that PDF. It is useful for creating smaller sharing copies and for follow-up PDF work such as editing, annotating, organizing pages, applying OCR, converting files, or signing documents.

