
In this article
- What is Alignment in MS Word?
- How to Align in Word: Text and Paragraphs
- How to Make Vertical Alignment in a Word Document
- How to Align Tables in Word
- Aligning Objects, Shapes, and Images
- Troubleshooting Common Alignment Issues in MS Word
- Word Document Alignment Online Free (Google Docs Method)
- How to Adjust Alignment in PDF Documents
- Frequently Asked Questions (FAQ)
Microsoft Word is a powerhouse for document creation, but simply typing out your thoughts is only half the battle. To create a document that looks professional, polished, and easy to read, you need to master alignment in MS Word.
Whether you are centering a title, justifying a formal report, perfectly positioning a data table, or trying to figure out how to center text vertically on a cover page, understanding how alignment works will save you hours of formatting frustration.
In this comprehensive guide, we will answer exactly what is alignment in MS Word, provide step-by-step instructions on how to align in Word across different elements (text, tables, and objects), and share time-saving keyboard shortcuts.


 G2 Rating: 4.5/5 |
 100% Secure
What is Alignment in MS Word?
If you are wondering what is alignment in MS Word, it is simply the way text, images, tables, or other objects are positioned between the margins of a document page. Alignment determines the visual structure of your document.
By default, Word aligns text to the left margin, leaving the right edge of the text ragged (uneven). However, you have complete control over this positioning. Proper Microsoft Word alignment is crucial for guiding the reader's eye, establishing a visual hierarchy (like making headings stand out), and adhering to specific formatting styles like APA or MLA.
Horizontal vs. Vertical Alignment
When we talk about alignment, we are usually referring to two different directions:
- Horizontal Alignment: This controls how your text or objects sit left-to-right between the side margins. The options are Left, Center, Right, and Justified. This is also known as word paragraph alignment.
- Vertical Alignment: This controls how your text sits top-to-bottom between the top and bottom margins of the page. This is incredibly useful for title pages, flyers, or cover letters where you want the content perfectly centered in the middle of the physical paper.
How to Align in Word: Text and Paragraphs
Adjusting your basic word paragraph alignment is the most common formatting task you will perform. There are two primary ways to align word documents: using the Ribbon menu or using quick keyboard shortcuts.
Method 1: Using the Ribbon Menu for Word Paragraph Alignment
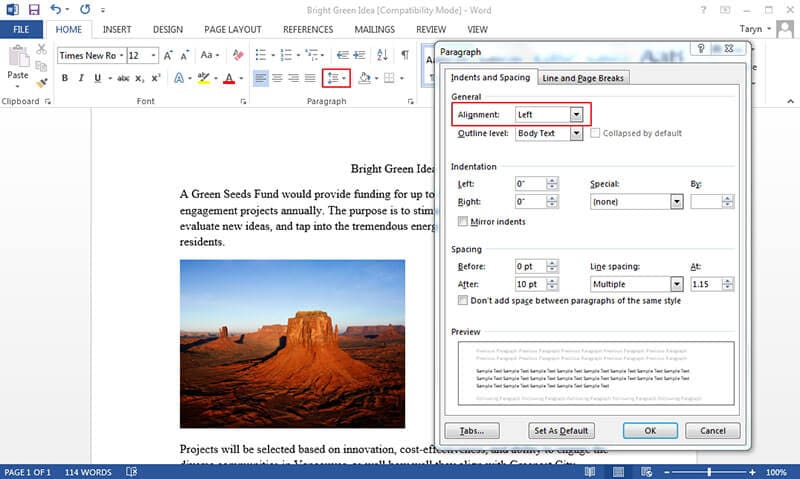
The visual way to change your alignment is by using the Paragraph group on the Home tab.
- Open your Word document and highlight the text or paragraph you want to align. (If you only want to align a single paragraph, you simply need to click anywhere inside that paragraph; you do not need to highlight the whole thing).
- Navigate to the Home tab on the top Ribbon.
- Look for the Paragraph section. Here, you will see four horizontal line icons representing the different alignment options.
- Click the icon that matches your desired alignment:
- Align Left: Flushes text to the left margin.
- Center: Centers text horizontally.
- Align Right: Flushes text to the right margin.
- Justify: Distributes text evenly between both the left and right margins.
Method 2: Essential Keyboard Shortcuts to Align Word Documents
If you want to speed up your workflow, learning the keyboard shortcuts for horizontal alignment is highly recommended. Simply place your cursor in the target paragraph and press:
- Left Align: Ctrl + L (Windows) / Cmd + L (Mac)
- Center Align: Ctrl + E (Windows) / Cmd + E (Mac)
- Right Align: Ctrl + R (Windows) / Cmd + R (Mac)
- Justify: Ctrl + J (Windows) / Cmd + J (Mac)
Understanding Justified Text (And When to Use It)
While Left, Center, and Right are straightforward, Justified alignment can sometimes be tricky. Justified alignment adds extra space between words so that both the left and right edges of the paragraph are perfectly straight and flush with the margins.
This creates a very clean, block-like look often seen in newspapers, textbooks, and formal legal documents. However, if your column width is too narrow or your words are too long, justification can create awkward "rivers of white space" running down your paragraph. If this happens, it is usually better to revert to Left alignment for readability.
How to Make Vertical Alignment in a Word Document
Most people know how to center a title horizontally, but what if you are creating a cover page and want that title perfectly centered in the middle of the page from top to bottom? Pressing the "Enter" key repeatedly is a messy way to do it and will break your formatting later. Instead, use vertical alignment.
Step-by-Step Vertical Page Alignment
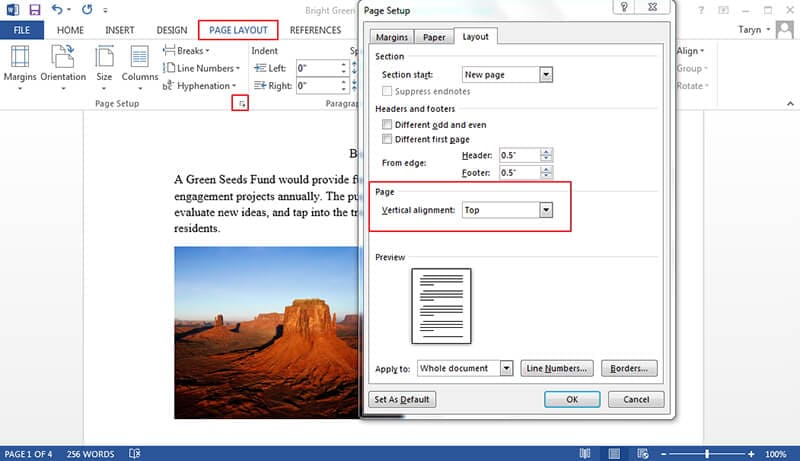
Here is how to apply vertical alignment in MS Word:
- Select the text you want to align vertically.
- Click the Layout tab (or Page Layout in older versions of Word) on the main ribbon.
- In the Page Setup group, click the small expansion arrow (the dialogue box launcher) in the bottom right corner of the section.
- When the Page Setup dialogue box opens, click on the Layout tab at the top.
- Look for the Page section in the middle of the window. You will see a dropdown menu labeled Vertical alignment.
- Click the dropdown and choose Center (or Top, Justified, or Bottom, depending on your needs).
- At the bottom of the box, next to Apply to, make sure you select "Selected text" or "Whole document" based on what you want to achieve.
- Click OK.
How to Align Tables in Word
Knowing how to align tables in word is slightly different than aligning plain text. When dealing with tables, you actually have two separate alignment tasks to think about: aligning the table structure itself on the page, and aligning the data inside the cells.
Aligning the Entire Table on the Page
If your table does not stretch all the way across the page, you might want to center the entire grid.
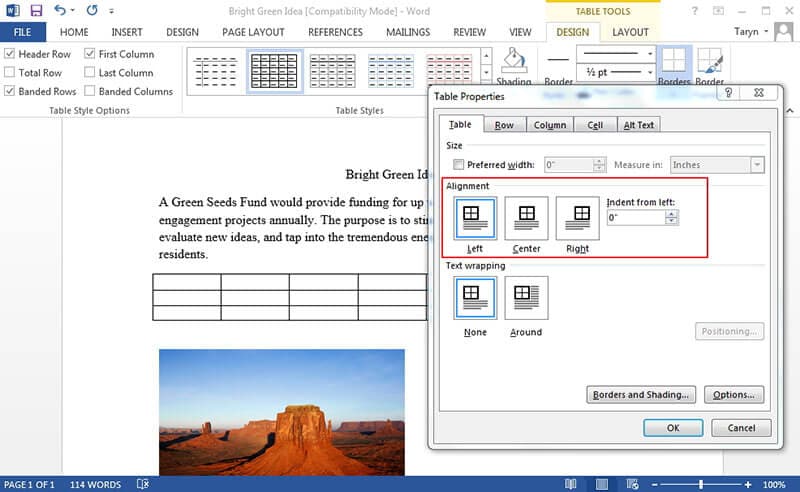
- Create a table under the Insert tab of MS Word.
- Hover your mouse over the table until a small four-way arrow icon (the table handle) appears in the upper-left corner.
- Click that upper-left corner icon to select the entire table.
- Right-click anywhere on the selected table and choose Table Properties from the context menu.
- In the Table Properties dialogue box, under the Table tab, you will see an Alignment section.
- Choose Left, Center, or Right to align the table itself.
- Once done, click OK.
Aligning Text and Data Within Table Cells
To make your data look neat, you often need to adjust where the text sits inside the little boxes (cells).
- Highlight the cells, rows, or columns you want to adjust.
- When a table is selected, two new tabs appear on the ribbon: Table Design and Layout.
- Click on the Layout tab (the one on the far right, specific to table tools).
- In the Alignment group, you will see a grid of nine icons. These allow you to align the text both horizontally and vertically simultaneously (e.g., Top-Left, Center-Center, Bottom-Right).
- Click the icon that suits your data presentation best.
Aligning Objects, Shapes, and Images
Adding visual flair to your document means you will need to know how to align pictures, shapes, and text boxes. Simply dragging and dropping them can lead to slightly misaligned, unprofessional results.
Using the Align Tool for Multiple Objects
If you have multiple shapes or images that you want to line up perfectly:
- Hold down the Ctrl key (or Cmd on Mac) and click on each object you want to align so they are all selected at once.
- Go to the Picture Format or Shape Format tab that appears on the ribbon.
- In the Arrange group, click the Align button.
- A drop-down menu will appear. You can choose to Align Left, Align Center, Align Right, Align Top, Align Middle, or Align Bottom.
- You can also choose Distribute Horizontally or Distribute Vertically to ensure equal spacing between multiple objects.
Troubleshooting Common Alignment Issues in MS Word
Sometimes, you click the "Center" button, but the text still looks off-center. If your word paragraph alignment isn't behaving as expected, check these common culprits:
Hidden Characters and Stray Spaces
If you accidentally typed several spaces before a word, centering the text will factor in those invisible spaces, pushing your text off to the side. To fix this, go to the Home tab and click the Show/Hide ¶ button (the paragraph symbol). This reveals hidden formatting marks. Delete any unnecessary dots (spaces) or arrows (tabs) leading up to your text.
Conflicting Paragraph Indents
If your text won't align all the way to the left margin, you might have an indent set.
- Select the stubborn text.
- Right-click and choose Paragraph.
- Under the Indentation section, ensure both Left and Right are set to "0" and the Special dropdown is set to "(none)".
Word Document Alignment Online Free (Google Docs Method)
If you do not have access to the desktop version of Microsoft Word, you can still achieve basic alignment online for free. To align in Word online, you can upload the Word document (.docx) to Google Drive and edit it seamlessly with Google Docs.
Here is how to adjust alignment in a Word document by using Google Docs:
- Upload your Word document to Google Drive.
- Select the Word document and choose Open with > Google Docs.
- Select the text you wish to modify.
- Click the Align buttons in the top toolbar (they look very similar to Word's paragraph icons) and select Left, Center, Right, or Justify.

How to Adjust Alignment in PDF Documents
PDF is an incredibly popular format used to share finalized documents securely, ensuring that the layout looks exactly the same on any device. The readability is great, and PDF readers are generally free. However, the major downside of the PDF format is that it is notoriously difficult to edit. If you receive a PDF and notice the alignment is off, converting it back to Word to fix it will often destroy the complex formatting, fonts, and layout.
G2 Rating: 4.5/5 |100% Secure
Step 1Load the PDF File
Once PDFelement has been downloaded and installed on your computer, launch the program. Click on "Open File" to load the PDF document you need to adjust.

Step 2Alignment in PDF File
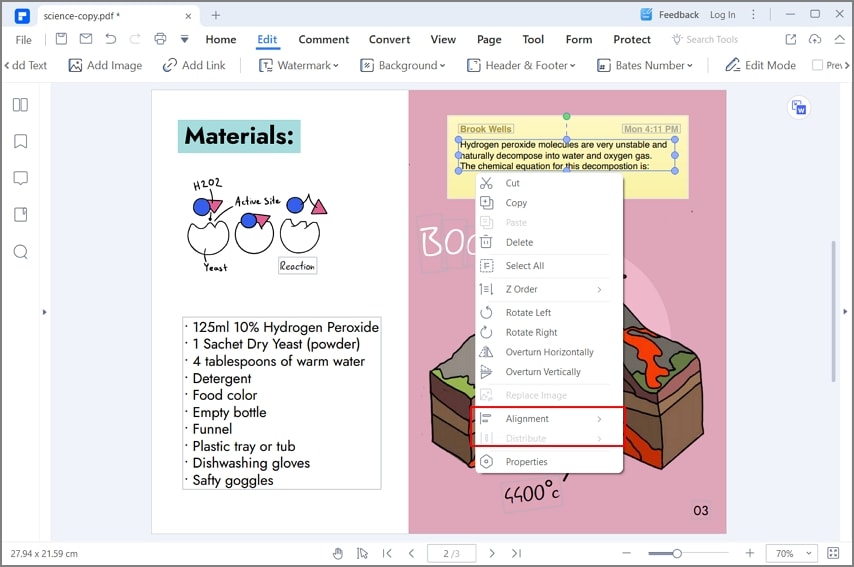
Click the "Edit" button at the top left corner of the interface. This switches the document into editing mode.
- For Text: Click inside any text box. A formatting panel will appear (usually on the right side), allowing you to choose Left, Center, Right, or Justify alignment.
- For Objects: You can click on images, frames, and other objects to drag and reposition them. You can also align multiple objects perfectly by holding the CTRL key, selecting them, and using the alignment tools provided in the right-hand properties panel.
Step 3Save Changes
Once your text and objects are perfectly aligned, it is advised to save the PDF file to preserve the new layout. Navigate to "File > Save As > Browse" to save the updated file to your desired folder, finishing the process.

Frequently Asked Questions (FAQ)
-
What is the default alignment in MS Word?
The default alignment for a new, blank document in Microsoft Word is Left Alignment. This means all text starts flush against the left margin and leaves a ragged right edge. -
How do I align text in Word without spaces?
Never use the spacebar to manually push text to the middle or right side of the page. This causes massive formatting issues. Instead, use the alignment buttons in the Home Ribbon (Center or Right Align), or use the "Tab" key to set specific tab stops for precise horizontal positioning. -
Why is justify alignment leaving big gaps between words?
Justified alignment forces text to touch both the left and right margins. If a line only has a few words on it, Word must stretch the spaces between those words to make them fit the width of the page. You can fix this by enabling hyphenation (Layout > Hyphenation), rewriting the sentence to add more words, or simply changing the paragraph back to Left Alignment. -
How do I align shapes in Word quickly?
Select the first shape, hold down the Ctrl key, and click the other shapes. Go to the Shape Format tab, click the Align button in the Arrange group, and choose how you want them aligned (e.g., Align Top, Align Center).

