
In today’s digital world, scanning a document is crucial as it enables you to convert your documents into digital ones, making them easy to share. As technology evolves, everything is changing, and if you are a Chromebook user, it's your luck. You can scan your essential documents with its built-in camera, reducing the need to use external scanners.
Still, if you are figuring out how to scan to a Chromebook, then this article will cover you with all the details. In this guide, we will provide 3 efficient yet intuitive ways to scan your essential documents in Chromebook with ease.


 G2 Rating: 4.5/5 |
 100% Secure
Part 1. Method 1: The Instant Scan (Using the Chromebook's Built-in Camera)
As a Chromebook user, if you are seeking simple-to-capture whiteboard notes in a meeting or desire to save your kid’s first drawing, a built-in scanning option is available. This is the ideal option for quickly digitizing physical content using your Chromebook’s camera without needing a third-party app. To know how you can effortlessly scan with Chromebook's built-in camera, review the following stepwise guide:
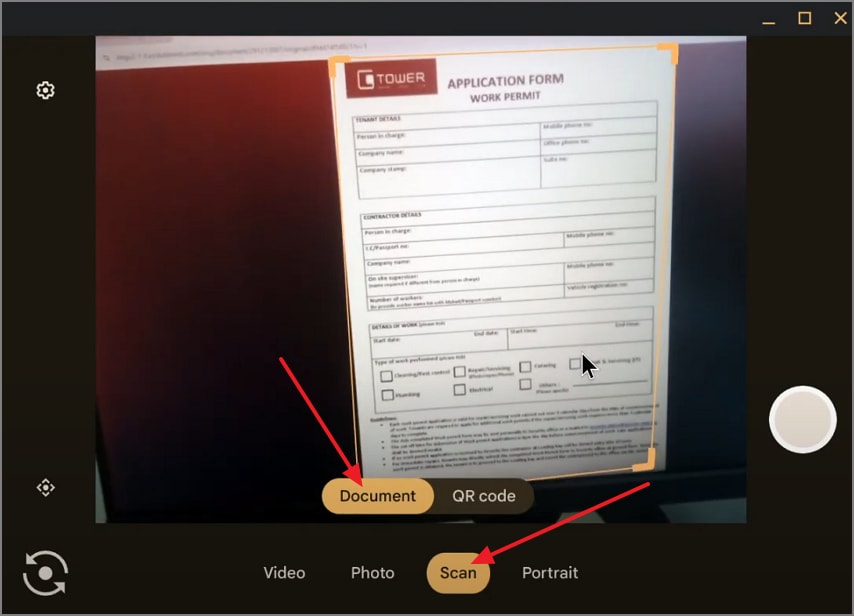
Step 1. After opening the “Camera” app, click on the “Scan” button and select the “Document” option to scan your required file.
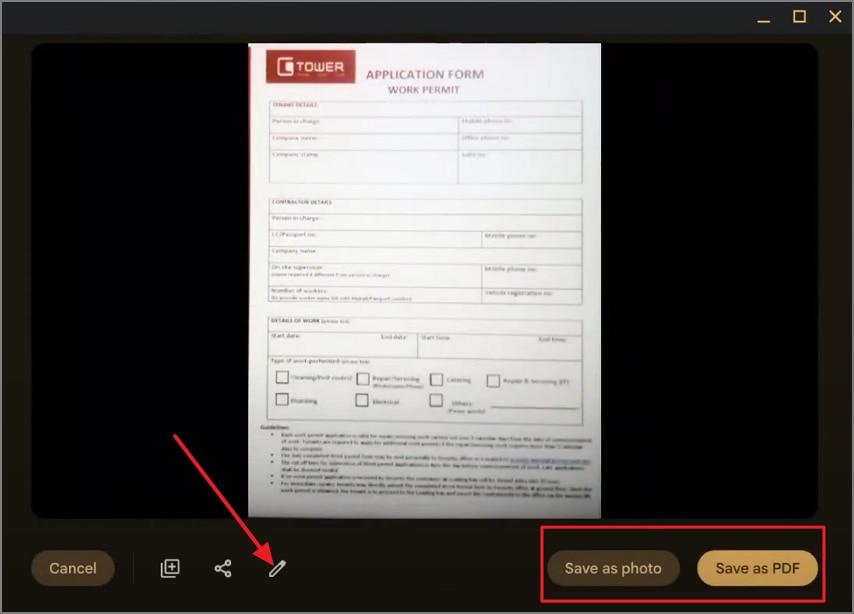
Step 2. As the document is scanned, you can either save it by clicking “Save as Photo” or tapping the “Save as PDF” option. At this point, you can also select the “Edit” icon to further crop and rotate the file according to need.
Although it's a convenient method, the webcam's quality falls short, as it's primarily designed for video calls. When it scans a document, the generated outcome may have low resolution or be pixelated, especially on its older models. Plus, it lacks an OCR feature, which means you cannot edit it. So you'll need dedicated software like PDFelement, which provides high-quality OCR to extract text without ruining its layout.
Part 2. Method 2: The Traditional Scan (Using a Wi-Fi Printer)
In the process of learning how to scan a Chromebook, if you need high-quality and distortion-free scans of important documents or photos, use flatbed scanner. This solution allows you to capture detailed, accurate images with minimal effort and maximum clarity, as mentioned below:
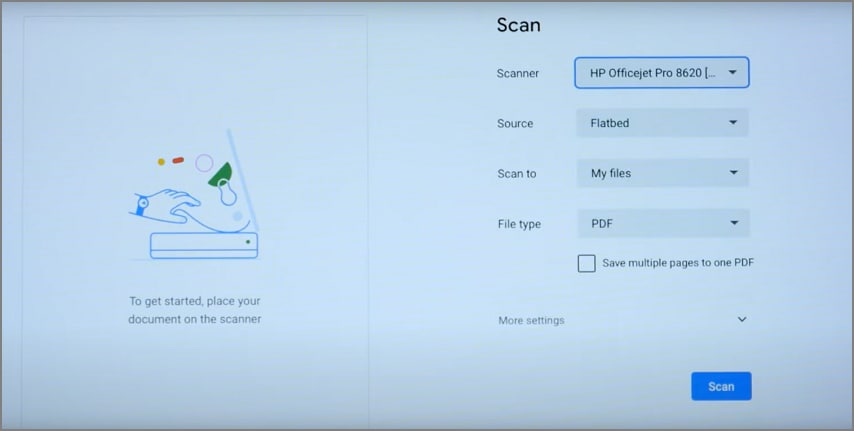
Instructions. Add the file in the printer and search for the “Scan” option on your Chromebook. Once the device detects one, choose the desired settings and hit the “Scan” button to initiate the process.
Part 3. Method 3: The Professional Scan (Using Your Smartphone)
For scanning, your mobile phone camera is far more advanced than the Chromebook, offering better autofocus and built-in OCR features through apps. One such option is PDFelement (iOS|Android) that offers you a built-in scanning option while making your text editable and searchable through OCR. On Android, users can make use of features like rotate, crop, filters, and comments after scanning the files.
However, iPhone users get the opportunity to choose from 2 different OCR options while scanning their files. Within these choices, they can pick from 3 OCR languages to make their text editable or searchable. Additionally, users can make a .txt file of their scanned PDFs, which they can seamlessly share across platforms. So, rather than scanning Chromebook's built-in camera, consider the PDFelement app version as a simple on-the-go solution.
G2 Rating: 4.5/5 |100% Secure
Detailed Step-by-Step Guide to Use PDFelement on iPhone
Step 1. Access the PDFelement and Start Scanning
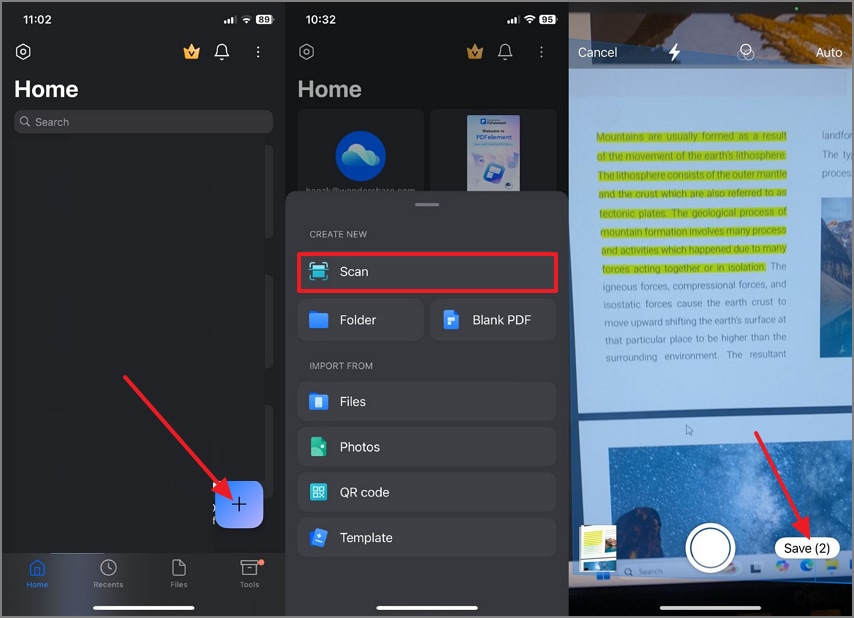
Upon launching the tool, tap the “+” button and then select the “Scan” option to capture the file you seek to make editable. Once it's captured, press the “Save” button to initiate the OCR process.
Step 2. Initiate the Optical Character Recognition Process
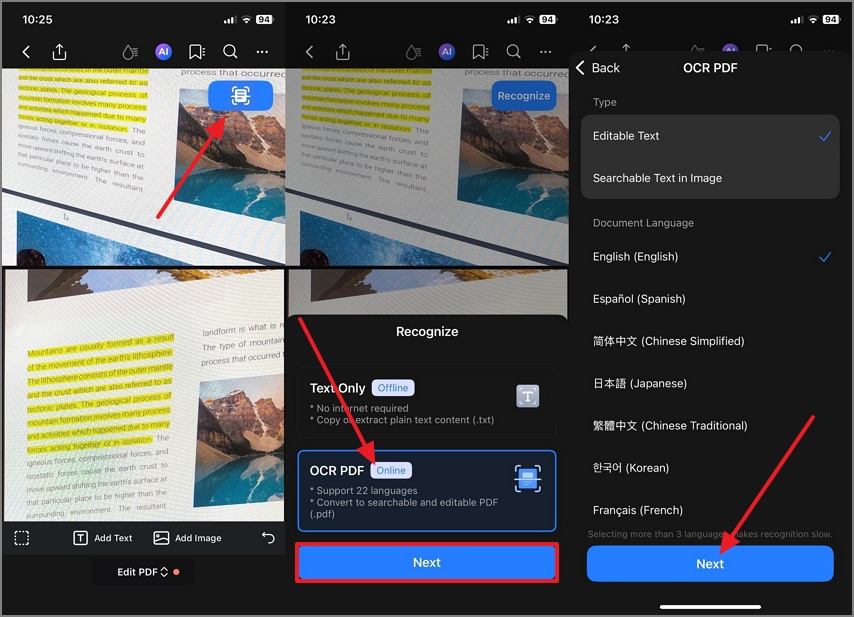
Here, tap on the “Recognize” button, select the “OCR PDF” option, and hit the “Next” button. Afterwards, choose the Text Type, Document Language, and click on the “Next” button to make text edit or searchable as per your Text type.
G2 Rating: 4.5/5 |100% Secure
Step 3. Export the Text to the Chromebook
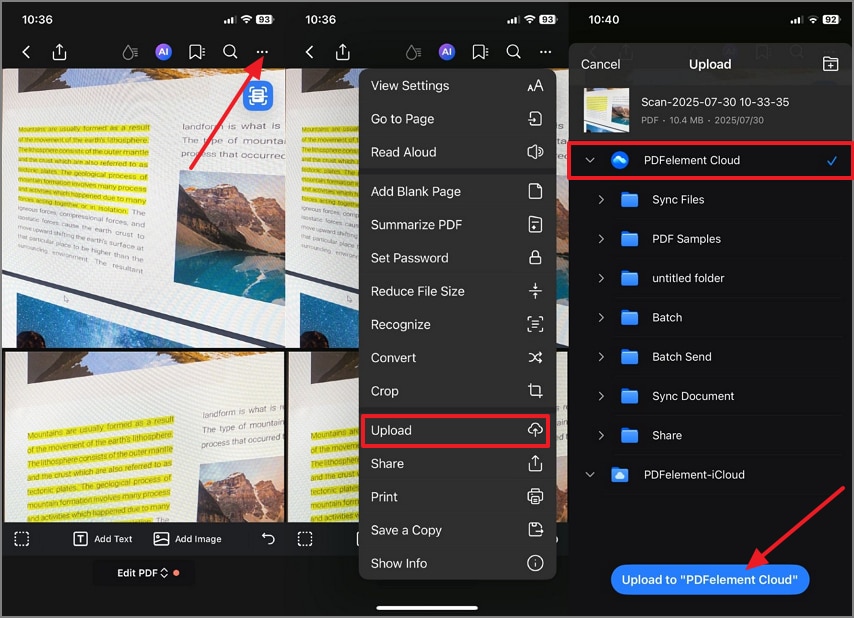
After the process is completed, click on the “3 Dots” icon available at the top right and select the “Upload” option from the menu that appears. After that, select the “PDFelement Cloud” option and tap on “Upload to PDFelement Cloud” to save it on cloud and later access it on Chromebook.
Part 4. Comparison: Camera vs. Printer vs. Phone App
While knowing how to scan to a Chromebook, let's have a detailed breakdown of 3 methods, making it easy for you to choose the best one:
| Features | Chromebook Camera | Printer | PDFelement |
| Primary Function | Capture images | Scan (and print) documents/images | PDF editing, creation, annotation, OCR |
| Scanning Quality | Fair (camera quality varies) Fair | Moderate to High (depends on device) | Excellent (when processing HQ files; not hardware) |
| File Format Support | Images only (JPEG and PNG) | PDF, JPG, TIFF (depends on model) | PDF, DOCX, XLSX, PNG, JPG, TXT, etc. (Windows/macOS/Android) |
| Convenience | Excellent (instant, always available) | Good (setup required) | Very Good (if on compatible system) |
| Editing Ability | Minimal (crop, rotate, maybe basic markup) | Minimal or None; edits done post-scan | Advanced (annotate, compress, merge, convert, OCR, etc.) |
| Portability | Excellent (built-in device) | Poor (not portable) | Excellent (software portable if device is supported) |
| OCR | None | Only if hardware/software supports OCR | High-quality OCR (fully on Win/Mac/Android) |
| Best Use Case | Quick photo capture for simple needs | Bulk/multipage document scanning | Pro document workflows, editing, searchable/PDF tasks |
| Advanced Features | None | Basic (scanning, file type select) | Pro OCR, annotation, password, forms, compression. |
G2 Rating: 4.5/5 |100% Secure
Conclusion
Summing up, scanning an essential document to digitize it requires the importance of easily sharing and editing it. If you are wondering how to scan a Chromebook, then we have provided the 3 most efficient methods in this article. However, if you want to generate high-quality outcomes, then we recommend using PDFelement, which offers both desktop software and a mobile application for users' ease.
Frequently Asked Questions (FAQs)
-
1. Why Does My Camera Scan Look Blurry or Dark?
It can occur due to the document being placed in a poor lighting environment or having blurry text. So while scanning documents, ensure your document is placed in a well-lit area and the camera has fixed focus on the file. -
2. Can I Scan Directly to Google Drive?
If you are using a printer, then the scanned file will be saved to your downloads, and then you have to transfer it to Google Drive. Whereas, if you are scanning with PDFelement, then it can directly save your scanned document to Google Drive. -
3. What If I Don't Have a Wi-Fi Printer?
In case you don't have a Wi-Fi printer, then you can scan with Chromebook's built-in camera for scanning, but it will generate low-quality images. Nonetheless, to get quality output, you may want to use mobile applications such as PDFelement that has up to 22 languages in its OCR option.

