 Home
>
PowerPoint Tips
> How to Insert Picture in PowerPoint
Microsoft PowerPoint is one of the most powerful and popular software that is used to create highly customized and advanced presentations. PowerPoint comes with various pre-built templates but when you need to insert pictures in PowerPoint slides, it may be a hectic task. So, if you are looking for an easy tutorial on how to insert pictures in PowerPoint, this post is for you.
How to Insert Picture in PowerPoint
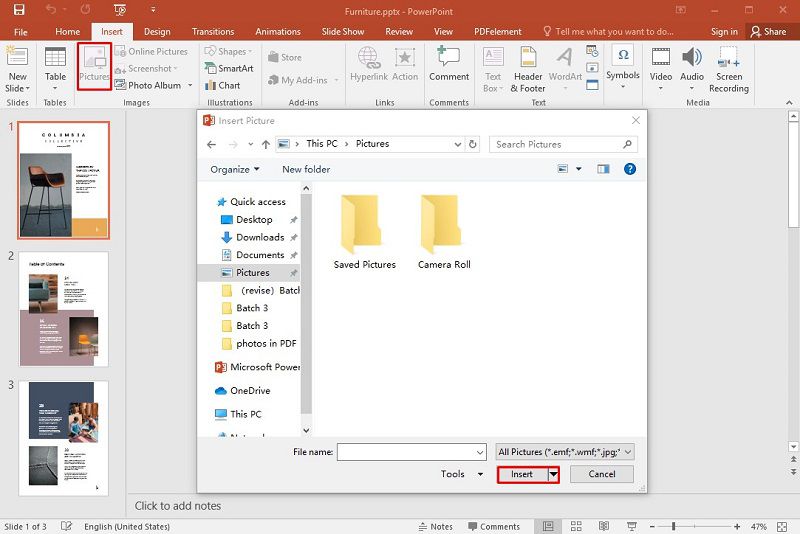
- Step 1. Open the PowerPoint presentation and on the Title Bar, click on “Insert”> “Pictures”.
- Step 2. After clicking on “Pictures”, a dialogue box will open asking to locate the picture in your PC, and then you can choose the picture from your PC. If you are using PowerPoint 2003, you can select the “From File” option to choose the picture.
- Step 3. After you locate the image, click on “Insert” and the picture will be added to the current slide.
- Step 4. Now resize and align the picture accordingly according to your requirements. Either you want to use this image as a background or apply it as an object for your presentation slide. And there you are done with it.

A Powerful Software for You
Now, inserting images to various versions of PowerPoint is not a big deal but you may face problems while adding an image to a PDF file as well. So, we have also provided the easiest method to add an image to PDF by using Wondershare PDFelement - PDF Editor Wondershare PDFelement Wondershare PDFelement, a powerful PDF program. PDFelement is the best PDF editor that is loaded with lots of useful functions, and here are some of its popular features.
- PDF creation – You can easily create a new PDF file using PDFelement. All you have to do is just import the DOC, TXT, or any other file and it will be converted into PDF within a blink of an eye.
- PDF editing – Editing a PDF document was never so easy. PDFelement enables you to edit your PDF files as easy as editing a notepad file.
- PDF styling – You can add images, different fonts, colors, backgrounds, comments, and much more into your PDF documents.
- Annotate – You can easily annotate or highlight the content of your PDF file.
- PDF conversion – Its powerful conversion tool allows you to convert your PDF documents into over 300 file formats and vice versa.
- Data collection– By creating forms and sending them to your clients or students, you can also collect data.
- Protect – You can protect and secure important and sensitive files.
- Sign documents – It enables you to add a digital signature into your PDF documents, as well as, hand-drawn and typed signatures.
- Form creation – You can easily create highly-customized forms by using drag-and-drop just within minutes. Not only this, you can edit and fill the forms you receive.
- OCR (Optical Character Recognition) – This powerful tool enables you to convert scanned documents into editable form and save it into any other format.
How to Add Image to PDF
- Step 1. Launch PDFelement and open the PDF file to add the image.
- Step 2. Now, below the Menu Bar, click on “Edit”> “Add Image”.
- Step 3. After clicking on “Add Image”, a dialogue box will open and you can start to locate and select the image from your PC, and finally click “Open”. Alternatively, you can right-click on the image, click “Copy”, and then directly paste it to the PDF.
- Step 4. Once the image is added into the PDF, you can resize, align, rotate, or overturn the image as needed.

Free Download or Buy PDFelement right now!
Free Download or Buy PDFelement right now!
Try for Free right now!
Try for Free right now!
 100% Secure |
 G2 Rating: 4.5/5 |
  100% Secure


Audrey Goodwin
chief Editor