Do you know how to save files to OneDrive and why it’s one of the best ways to keep your PC running fast? Most PCs collect so many files over time that the resources get stretched with temp and junk files vying for space with your legitimate files. If you leave how to save to OneDrive and also learn how to save OneDrive files to the computer, you’ll be able to move a lot of unwanted stuff to the cloud and keep your PC running like new. Of course, there are other considerations for speeding up your PC as well, but this is a major one. Let’s look at the process to save to OneDrive using the desktop app and the online version.
How to Save Files to OneDrive
If you have the OneDrive client for PC set up on your computer, the process to save a file to OneDrive is as simple as copy-paste or drag-and-drop. Just follow these steps:
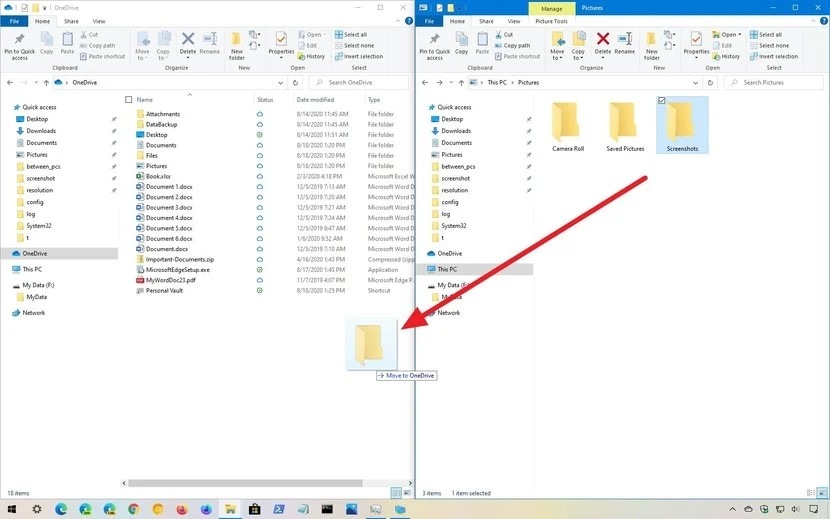
1. Open two instances of File Explorer and have them side by side or on toggle (Alt+Tab).
2. On the first window, select OneDrive from the list of drives you see on the left pane.
3. On the second window, choose the folder where your files are stored that you want to save to OneDrive.
4. Now, either drag-and-drop the file from the second to the first window or copy from the second window and paste it to the first. That’s about it!
If you don’t want to install the OneDrive client, then you can access the OneDrive portal on the web and log in using your Microsoft account. Once you’re signed in, follow these steps:
1. The default view is My Files, and at the top of the browser window, you’ll see an Upload button. Click it.
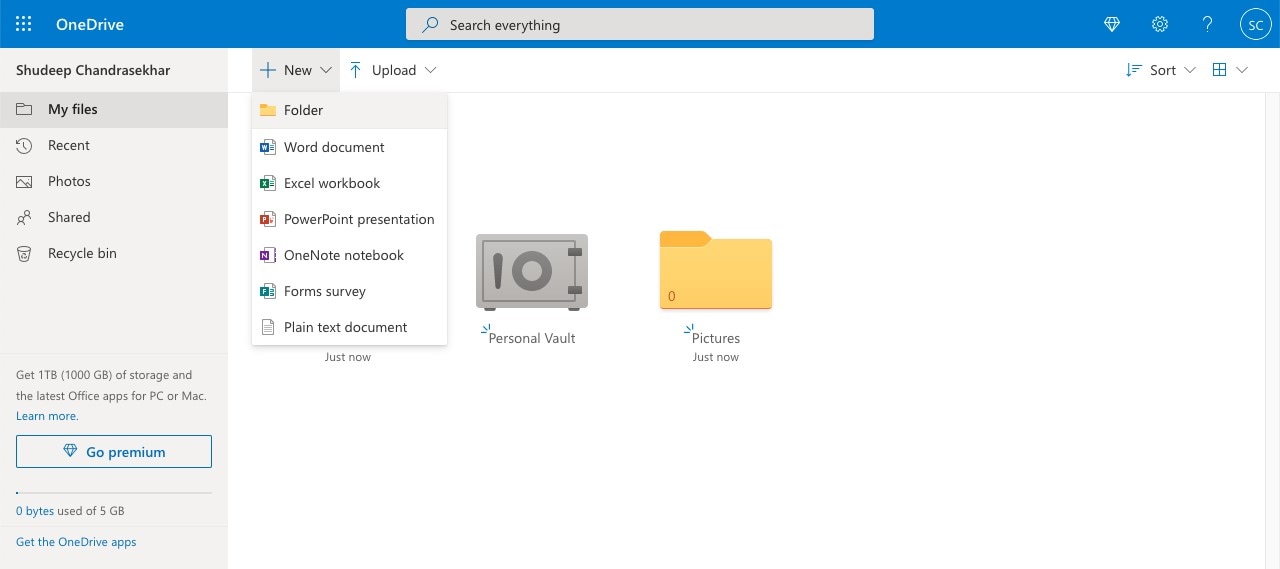
2. Choose from the two available options - Files and Folder.

3. When the File Explorer dialog box launches, select your files or folder and click OK. That’s how to save a file in OneDrive.
If you need to learn how to save OneDrive files to your computer, read this next section.
What Can You Do After You Save Files to OneDrive?
Since your OneDrive files are now available on the cloud and accessible through any connected device with a supported browser (Edge, Chrome, Firefox, Safari, etc.), you can fetch them from anywhere and download them to your local drive. Here are some of the other actions you can perform on OneDrive files and folders:
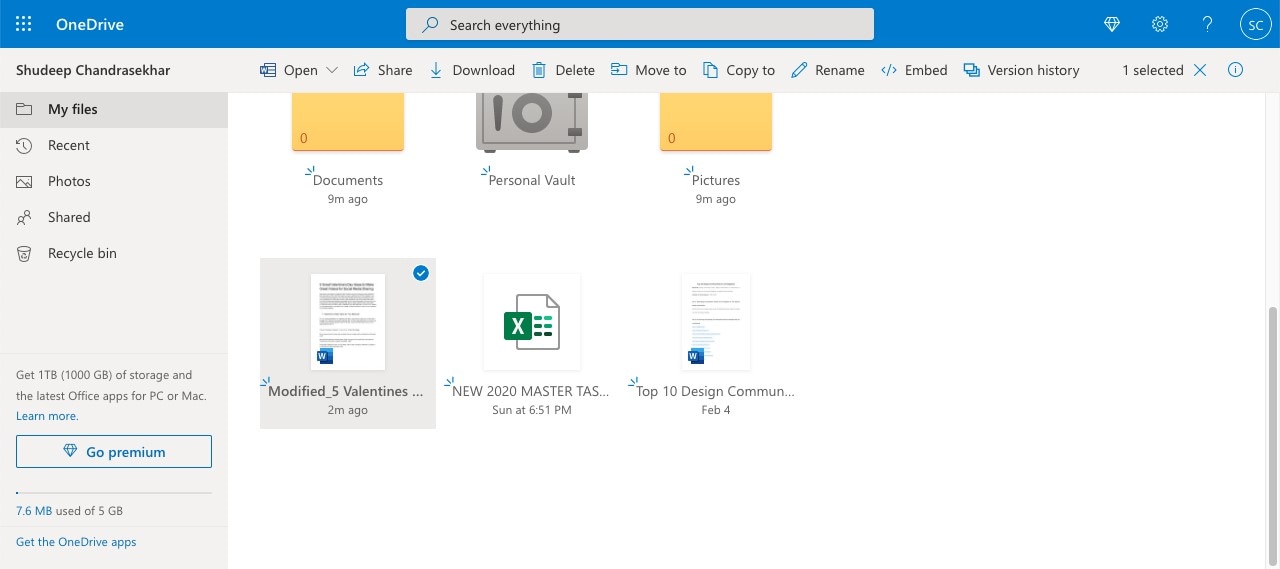
● Open and Edit - The Open menu item in the top toolbar of OneDrive online offers two options - open a file in a natively installed application like Word, Excel, etc., or open in the online version of that tool.
● Share Online - You can generate a secure link (permission-based) and send it to someone via email, or you can simply copy the link and share it on other platforms like chat.
● Save to Local Drive - The Download option is how you save OneDrive files to your computer.
● Delete - This action will remove the file or folder from your cloud account. ● Move To or Copy To - With these two functions, you can virtually move or copy files and folders to other OneDrive folders.
● Rename - This allows you to assign a new name for a file or folder.
● Embed - The embed feature is intended to allow you to upload a document to a website as embedded content. It will generate an HTML code that you can paste into the HTML of any page on that website.
● Version - With this control, you can see and restore older versions, or delete them.
The biggest advantage of OneDrive is its multi-terminal capabilities. That means you can use it anywhere regardless of your operating system and other factors. As long as you have an Internet connection and a modern browser supported by OneDrive, you’re good to go.
Introducing An Alternative to OneDrive - Wondershare PDFelement Cloud
Wondershare PDFelement Cloud is a dedicated cloud storage service for PDF workflows that comes with an electronic signature feature built into it. Similar to OneDrive, you can save documents and access them from any connected device with a modern browser. However, it is designed especially to handle PDF signature workflows because this is what most businesses need but don’t have access to. Most online signature service providers do not offer secure cloud storage, and Wondershare PDFelement Cloud fills that vital space.
How To Save Files to the Cloud using Wondershare PDFelement Cloud

1. Sign up to the Wondershare PDFelement Cloud portal to generate a Wondershare ID. If you already use one of Wondershare’s other products, such as RecoverIt, Dr. Fone, Filmora, FamiSafe, or PDFelement, you can use this unified Wondershare ID.
2. You will now find yourself in the Home tab by default. Here, look for a button labeled Upload Files. Click on it.
3. When the File Explorer or Finder dialog window launches, choose the PDF file to be uploaded. Click Open or OK depending on what platform you’re using.
4. Back in Wondershare PDFelement Cloud, your file will now be listed under the Recent Document Activity section.
You can now perform several other actions once your file is safely stored in the cloud.
What Can I Do After Uploading to Wondershare PDFelement Cloud?
Here’s a list of possible operations that can be performed on your uploaded files inside PDFelement Cloud. To access these menu options, you can click the ‘…’ symbol to expand the menu, then do one of the following:
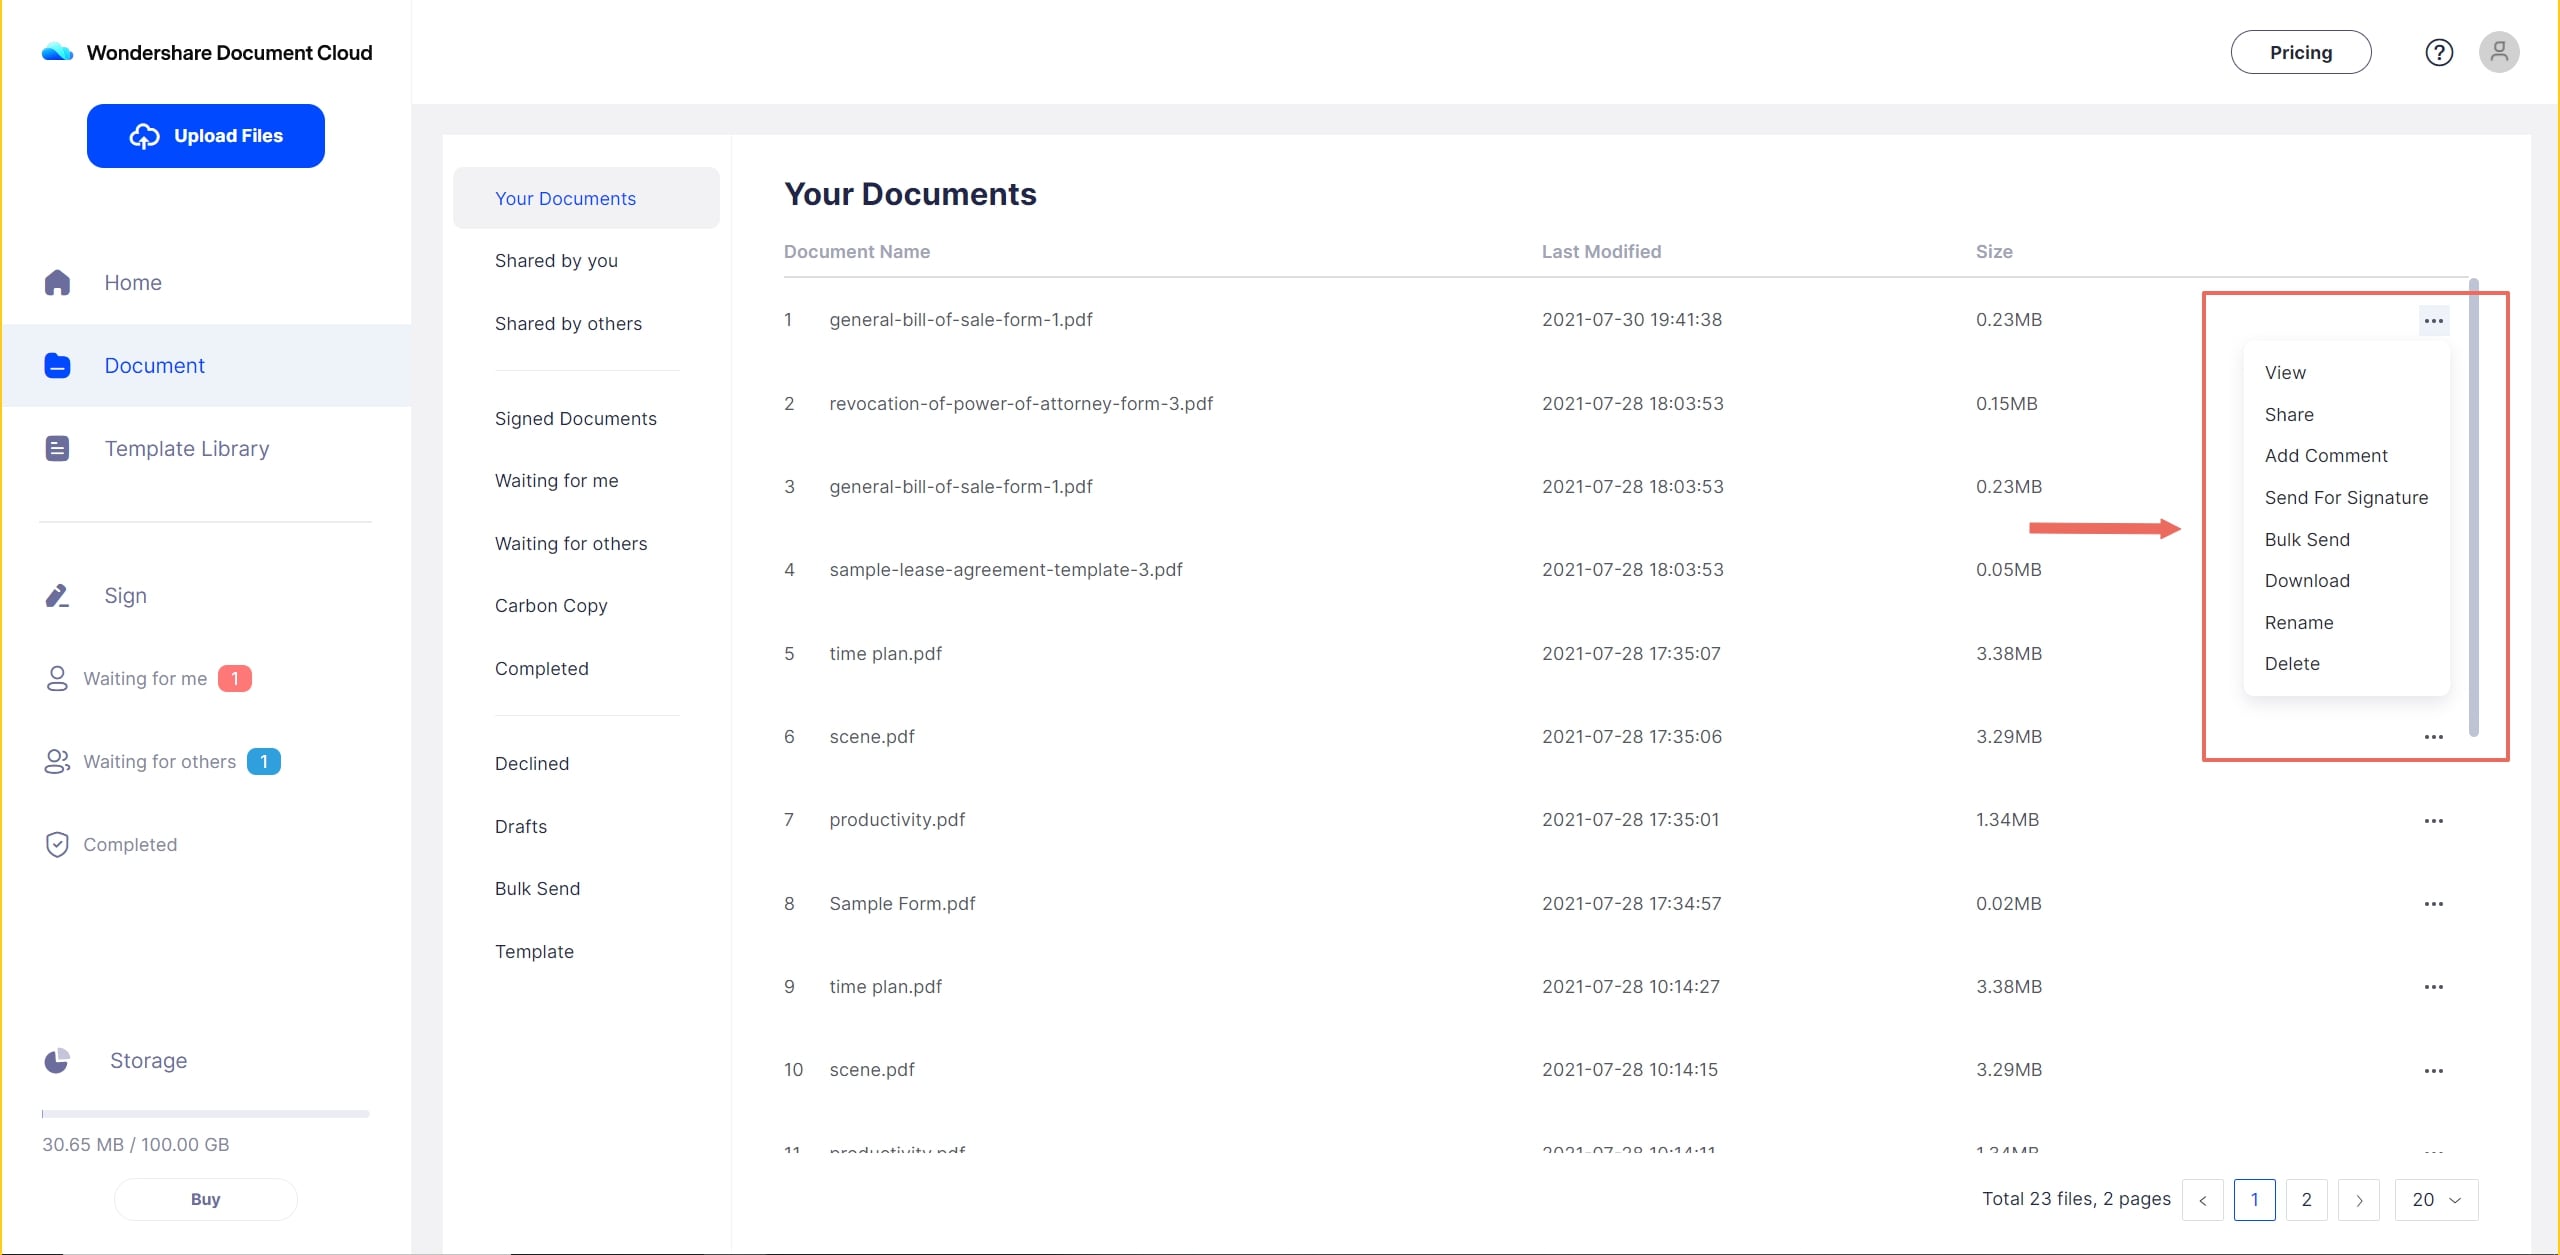
● Open for viewing - Choosing this allows you to open the file and preview the contents online without having to download the file.
● Download and edit - If you need to edit the contents, use this option to download the file to your local drive and then use a PDF editor to modify the file.
● Rename or Delete - Directly assign a different name for the file or remove it from your cloud account.
● E-Sign 1 - The first e-signature option is Send for Signature, which sends a single copy of a document to several signers to sign.
● E-Sign 2 - The second e-signature option is Bulk Send, which sends individual copies to multiple signers for separate signature capture.
● Dashboard Tracker - See the signing status of all files in the signing queue.
PDFelement Pro DC with Wondershare PDFelement Cloud Integration
Wondershare PDFelement Pro DC
Simplify your Workflow with the PDFelement Cloud.

Wondershare PDFelement Cloud is also integrated with one of Wondershare’s most popular products, PDFelement Pro DC for Windows. This is the latest iteration of PDFelement, which is a blockbuster PDF editor that rivals the functionality of Adobe Acrobat but at a fraction of the cost. Aside from integration with PDFelement Cloud, it features some powerful capabilities, as follows:

● Edit PDFs like Word documents in MS Word - Control every aspect of a PDF file and its contents, just as you can do with .docx files in Microsoft Word. ● Create PDF and Convert from PDF - Hundreds of file types can be converted to create PDF files, and you can also convert from PDF into a dozen other native formats for desktop, the web, publishing, image editing, etc. ● Professional Markup Tools - Tons of annotation tools to collaborate on PDF documents with other stakeholders in your company, your contract workers, your clients, etc. ● Manage Forms - Fill forms, create forms from scratch or from templates, convert non-editable forms to editable and fillable PDFs, etc., and even extract form field data to a more analysis-friendly format like Excel. ● PDF Security - Apply enterprise-grade encryption to protect confidential or sensitive files. ● Organize Files and Pages - Control files at the page level to add, remove, or reorder the contents of a PDF file. Merge or combine multiple files - even those of different formats - to form a single PDF file. ● Optimize - Reduce PDF file size by removing metadata and compressing images for easier sharing of large files. ● Text Recognition - Perform OCR in over 20 languages, accurately and quickly, and prepare them for editing or archiving. ● Batch Processes - Several actions can be performed in bulk to save time and money.
The cloud integration features in PDFelement Pro DC makes it even more powerful as a document management tool because it extends the functionality into the cloud. Here’s what you can do from inside PDFelement Pro DC:
Upload a Currently Open File to the Cloud
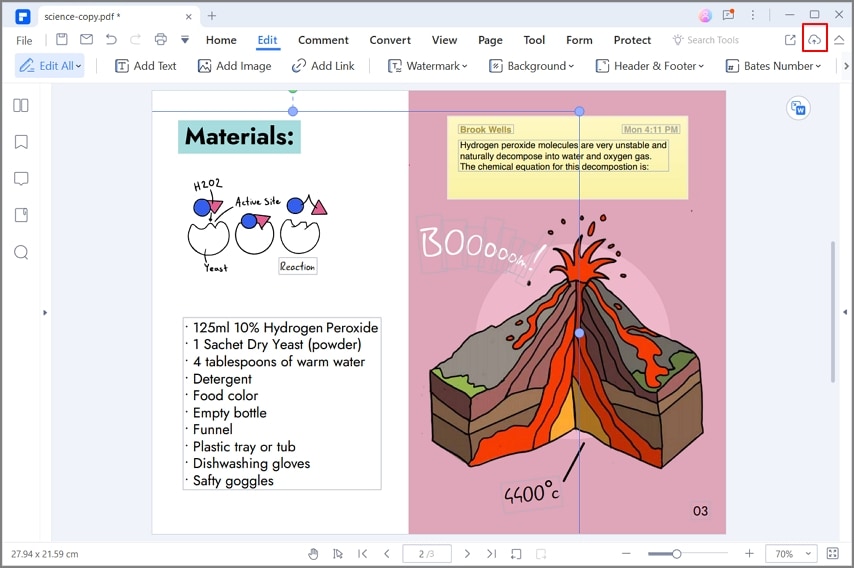
After working on a file, you can directly save it to your cloud account using the Share option. Click that and then choose Wondershare Cloud as your destination. In the browser window where you are logged into Wondershare PDFelement Cloud, you’ll be able to see it added to the Recent Document Activity section of the Home tab.
Download a File from the Cloud and Open it in PDFelement
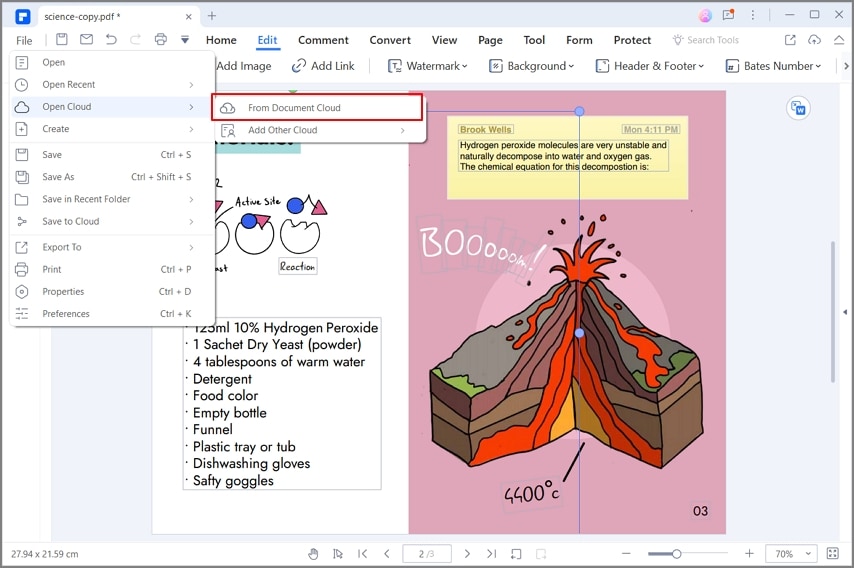
You can fetch a PDF from your cloud account using the File → Open → From Wondershare Cloud option. The action will trigger your browser and the downloaded file will automatically open in PDFelement Pro DC.
Send the Current Document for Signature Collection
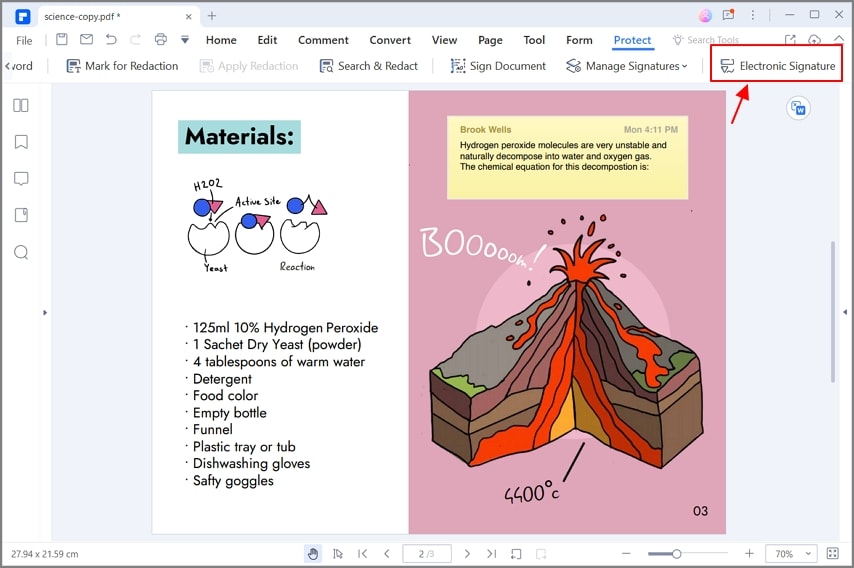
Once you have created a PDF file that requires other people to sign, you can simply hit the Electronic Signature button in the Protect tab of PDFelement to launch the Sign tab of Wondershare PDFelement Cloud in your browser. Here, click either one of the Initiate buttons under the two aforementioned e-signing options to begin the document preparation phase prior to sending.
To Summarize
Now that you know how to save files to OneDrive, you can easily manage your local memory by moving files to the cloud. If you need a service that’s more suited to PDF workflows, then Wondershare PDFelement Cloud with the electronic signature feature will be ideal for you. If you also need a robust PDF editor to manage your documents, then PDFelement Pro DC is best. The main consideration here is the multi-terminal leverage that these cloud platforms offer. As such, they’re ideal from the work-from-home culture that has become the norm around the world after the traditional in-office model was majorly disrupted by the global pandemic.


