When you save an excel file to PDF, the excel file will be converted to PDF in portrait by default. This post is going to show users how to convert Excel files to PDF in landscape.
In this article
Part 1: Convert Excel to PDF in Landscape (More Flexible)
Wondershare PDFelement - PDF Editor Wondershare PDFelement Wondershare PDFelement provides a more flexible way to convert excel to PDF. Compared to printing excel to PDF with Microsoft Excel, PDFelement gives you more options to adjust and edit your PDF files. For example, with PDFelement, you can adjust content if some columns are cut off after converting to PDF; you can edit the text in the worksheet after it is converted to PDF format; you can combine, split or delete PDF pages.
Here is how to convert Excel to PDF in landscape with PDFelement.
Step 1 Convert Excel Sheet to PDF
Free download PDFelement on your computer. After installing it, launch the program. On PDFelement, click Create PDF from File, select your excel file and PDFelement will create a PDF file from the selected excel file.

Step 2 Excel to PDF in Landscape
By default, PDFelement will create PDF in portrait mode. To change the page orientation to landscape, click the Print button. In the popup window, make sure Wondershare PDFelement is the printer, change orientation to landscape. Click the Print button.
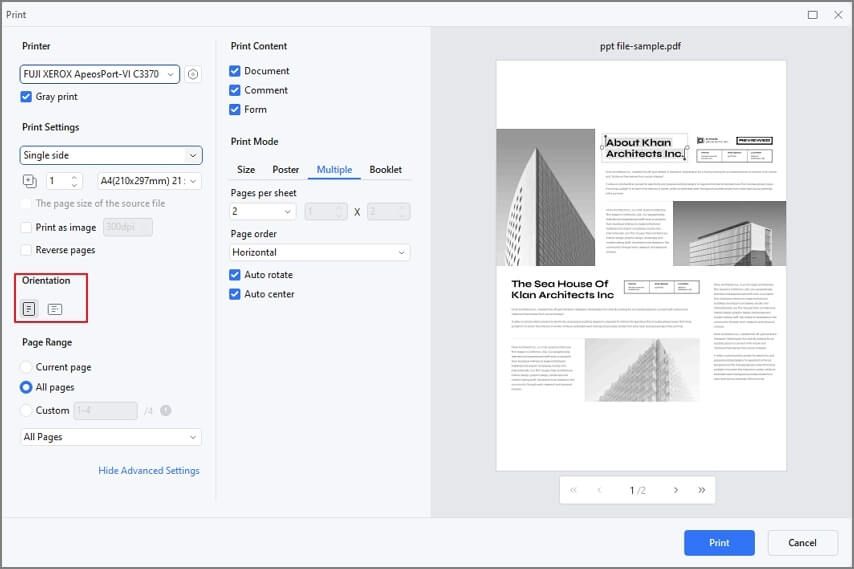
PDFelement will then create a new PDF copy in landscape mode. Save the PDF file in landscape.
Tip How to Fit excel sheet in one page
If an Excel worksheet has too many columns, it might not be able to fit in one page when converting to PDF with PDFelement. To turn your excel sheet into one landscape PDF page, here is a tip. In the Print window, unfold more settings and click Multiple in the Print mode and adjust the number under Pages per sheet to get all columns to fit in one page.
Don't miss out on one of the best ways to work with PDFs. Click the link below to know more.
More PDF Tools in PDFelement
-
PDFelement can convert Word, PPT, JPG, PNG, and more to PDF or vice versa
-
Edit text, image, and more in PDF file
-
Make comments in PDF: highlight, underline, strikethrough text, add comments, and more.
-
Combine, delete, split and insert PDF pages
-
Create fillable forms in PDF
Part 2: Convert Excel to PDF in Landscape Mode
Some files can be converted to other formats very easily but that is not true when it comes to Excel files. While you can embed Excel data somewhere else, it is not a format that can convert well to other formats.
This is mainly because excel files have a grid structure that is generally not visible in Excel. Since the PDF document format displays content across various pages, it is crucial to make sure that Excel data can be displayed without disrupting the layout. This is the reason you need to change the page layout before saving it as a PDF file.
Step 1 Change Excel Orientation to Landscape
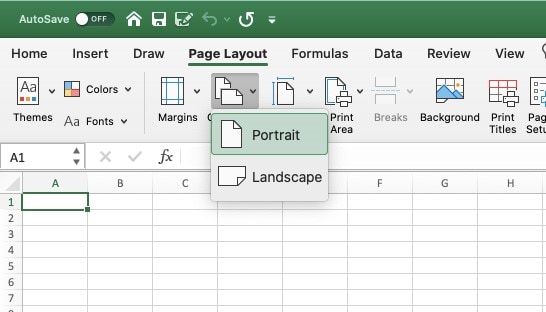
Excel is set to portrait by default. When you have too many columns, you can change it to Landscape. All you have to do is press on 'Page Layout' > 'Orientation' and choose one of the options that are available to you.
Then click Page Setup to open this setup window. Press the 'Margin' tab and click Landscape under Center on Page.
Step 3Convert Excel to PDF Landscape
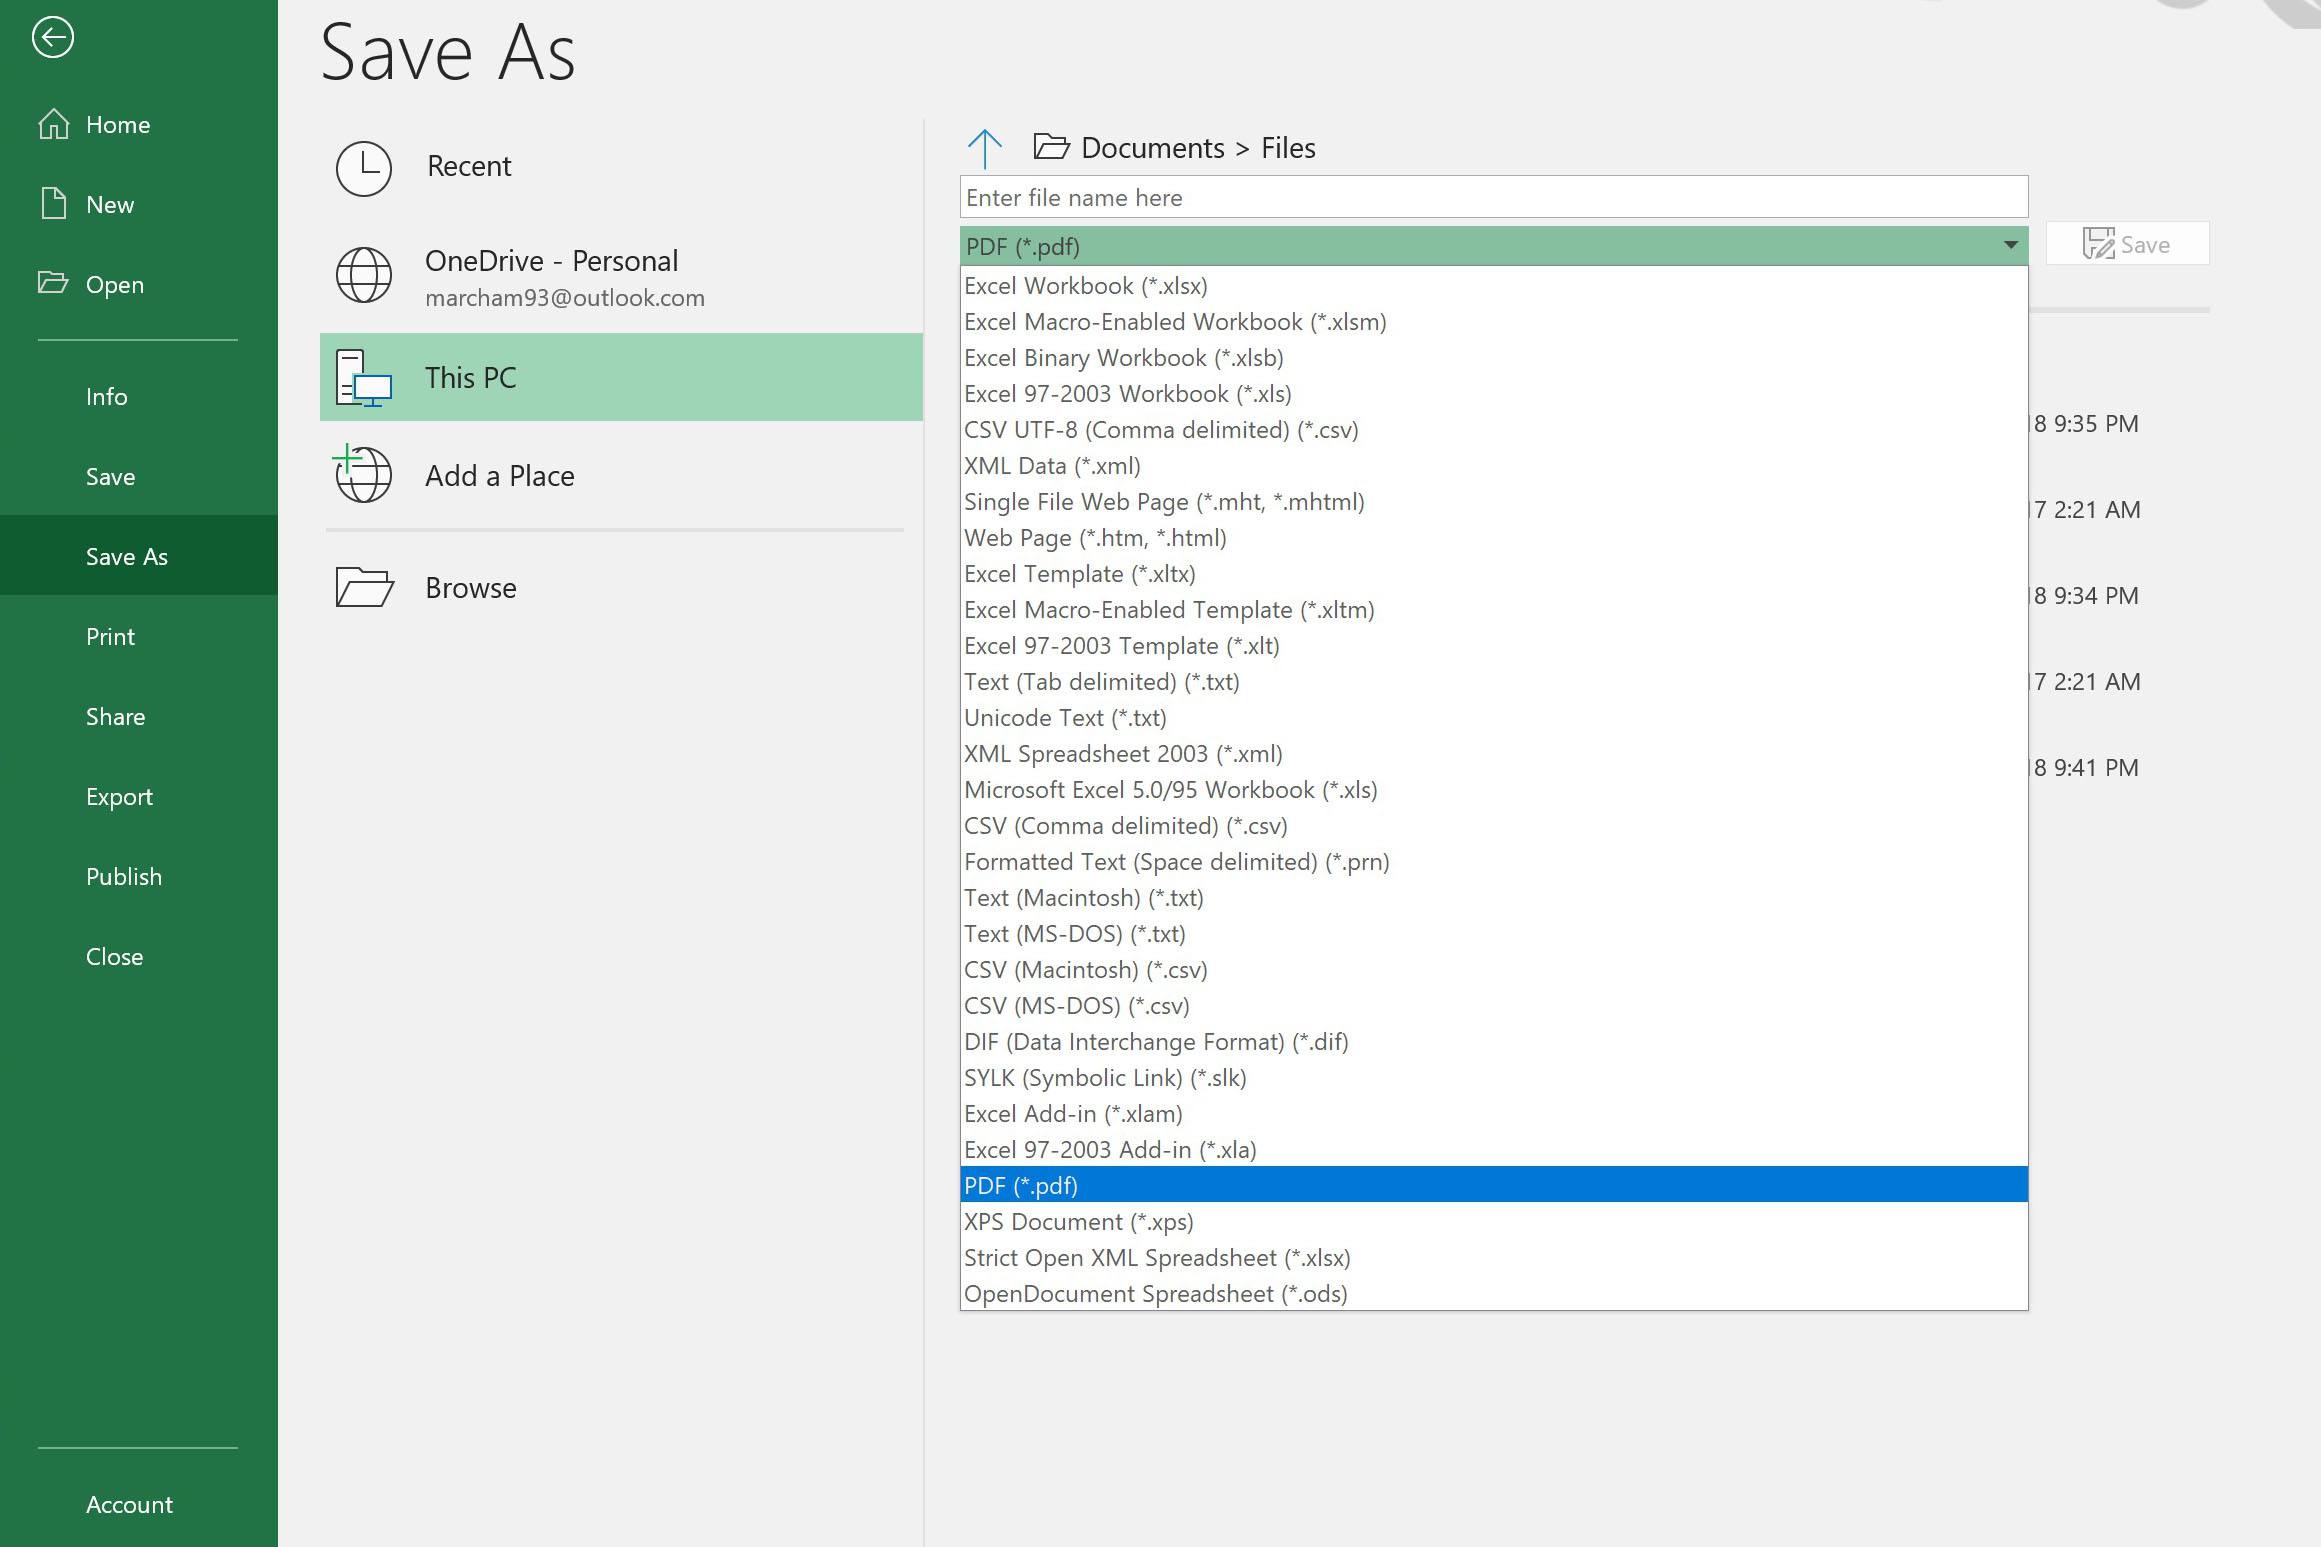
You can convert Excel to PDF in landscape mode through Microsoft Excel. The first is to save it as a PDF file directly. For doing this, you have to press on 'File' and then on 'Save As'. Make sure that you select PDF under the 'Save as type' drop-down menu. When you are ready, press on 'Save'.
Part 3: Convert Excel to PDF in Landscape Online
You can also change Excel to PDF in landscape online with the help of a conversion tool. Here's what you have to do to convert the Excel file to PDF in landscape mode. This online excel to PDF tool allows you to choose page layout orientation so that you can turn excel to PDF in landscape online.
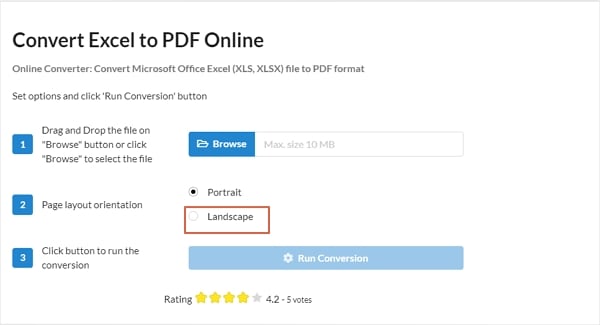
Drag and drop the file on the 'Browser' button and then click on 'Browse'. Choose the page layout orientation from the given options. Click on the 'Run Conversion' button to run the conversion process.
One of the primary drawbacks of using this tool is you will not be able to preview the file before you convert it to PDF. So, the ultimate file might not turn out as you want it to be. Moreover, you will not be able to edit the PDF if the PDF file doesn't look good when you are done converting.
Part 4: FAQs about Converting Excel to PDF Landscape
1. How do I convert a WordPad document to a Word document?
To convert Excel to PDF with all columns, you have to open the spreadsheet, highlight the cells that you would like to print, go to 'File', and then click on 'Print Area'. When you are done, click on 'Set Print Area'.
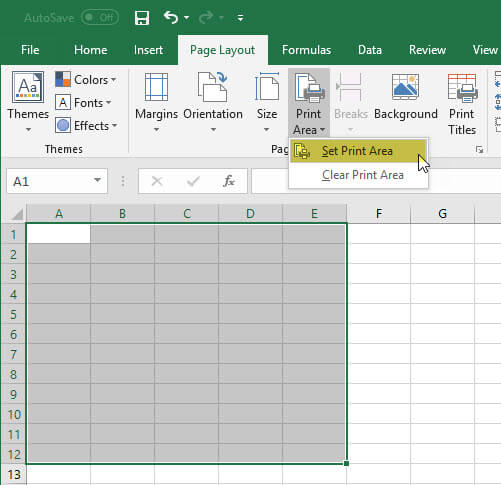
Then in Excel go to 'File', then 'Page Setup' and ultimately 'Scaling' to choose 'Fit to 1 page wide by 1 page tall', and then click on 'OK'. Next, go over to 'Sheet' and click on the option 'Paper Size' to go to 'Manage'. Customize the sizes and enter the page size you prefer. Click on 'OK' and then ultimately on the page click on 'OK' again. Thereafter, you can print the Excel with all columns.
2. How to Save Excel as PDF without Cutting it Off?
In case you are looking to save an Excel file without page cut-off, you have to set up the right printing options, such as fill page or scale to fit, choose the right print area, and choose the right paper size for printing. Here is an example.
Launch Microsoft Excel app for opening the document. After that, you open the Excel document, right-click on the document to select cells that you would like to print on a single page.
Now, you have to click on 'File/Print' for printing the pages, the options that will be available to you are. Choose the right paper size.
Select the right margins as your paper size margins. Use 'Scale to Fit' as it will help in avoiding cutting page head. Click on 'Print' for printing Excel to PDF.
 Home
Home
 G2 Rating: 4.5/5 |
  100% Secure


