There are five different methods that you can utilize in order to convert a JPG file into a PDF file on Linux. But do not worry, this article will show you the way to make the most of each method.
In this article
Method 1. JPG to PDF in Linux with PDFelement
Wondershare PDFelement is a PDF editor that works on Linux, Windows, macOS, iOS, and Android. This application provides an intuitive interface for you to convert JPG to PDF and edit PDF in a straightforward way. Here is how to convert JPG to PDF in Linux using PDFelement.
Step 1. Click the button below to download PDFelement.
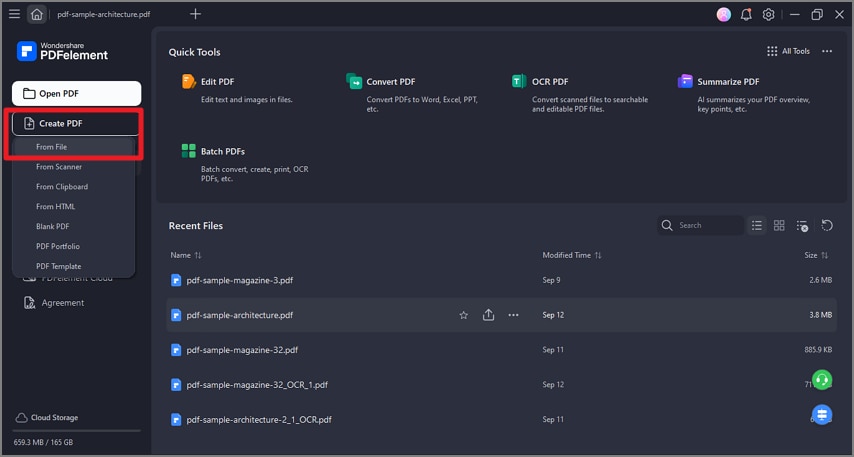
Step 2. After installing PDFelement on your computer, run the application and click Create a PDF > from File and select the JPG that you want to convert PDF. Then the file will be turned into PDF. Save the PDF file.

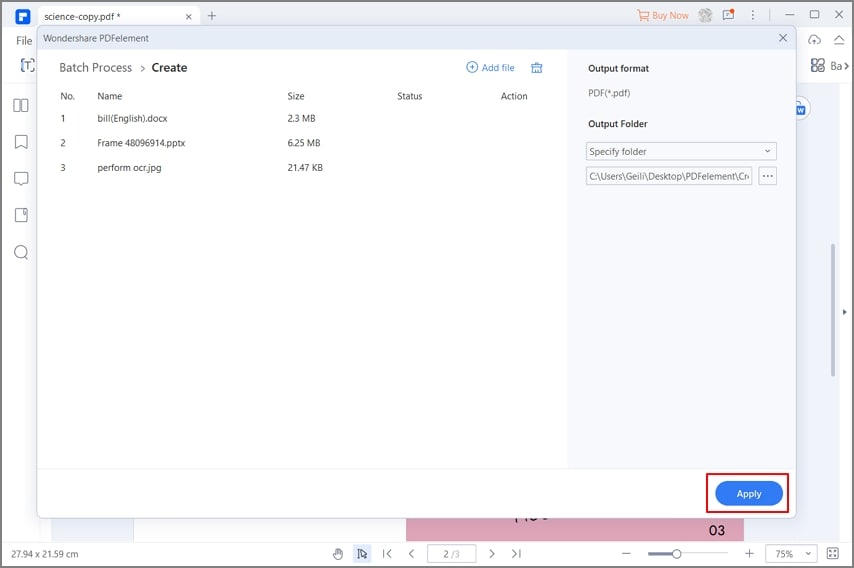
You can convert JPG to PDF in batch with Batch Create in PDFelement. Just add as many JPG files as you need and convert them to PDF in one click.

Method 1. JPG to PDF in Linux with ImageMagick
You will have to follow these steps if you want to convert JPG to PDF with ImageMagick (including multiple JPG to PDF).
Step 1. Make a right-click on your desktop and then pick the 'Open terminal here' option.

Step 2. To convert photos to PDF, just use the convert command:
$ sudo convert /path/to/image /path/to/pdf
$ sudo convert /home/ubuntu/flower.jpg to /home/files/flowers.pdf
$ sudo vi /etc/ImageMagick-6/policy.xml
Step 3. Use the mogrify command with the -format option to convert multiple photos. All JPG files in the /home/ubuntu directory will be converted to PDF files with this command:
$ mogrify -format pdf /home/ubuntu/*.jpg
$ mogrify -format pdf -path /home/data /home/ubuntu/*.jpg
Step 4. You can use the aforementioned command in a shell script to automate JPG to PDF conversion, as demonstrated below. Make a new shell script:
$ sudo vi jpg_to_pdf.sh
#!/bin/sh
$ mogrify -format pdf /home/ubuntu/*.jpg
Step 5. The document may then be saved and closed. To enable access, use the following formula:
$ sudo chmod +x jpg_to_pdf.sh
$ ./jpg_to_pdf.sh
Step 6. You can even set up a cronjob to run the aforementioned script at 10 a.m. every day. To enter crontab, merely run the following command.
$ crontab –e
0 10 * * * sudo ./jpg_to_pdf >/dev/null 2>&1
Step 7. Save and close your file.
You can use the video given below to see how to convert JPG to PDF on Linux.
Method 2. JPG to PDF in Linux with LibreOffice
If you want to convert JPG to PDF with LibreOffice, you must do the following:
Step 1. Go to LibreOffice and select 'LibreOffice Draw'.
Step 2. Paste your image there.
Step 3. Press on the 'File' tab, then select 'Export as' And then 'Export as PDF'.
Step 4. Press on the 'Export' icon.
Step 5. Press on the 'Save' button.

Method 3. JPG to PDF in Linux with Gscan2PDF
If you wish to convert JPG to PDF with Gscan2PDF, you must do the following:
Step 1. Open Gscan2PDF and press on the folder icon.
Step 2. Choose which photographs will be replaced.
Step 3. Pick the 'Save' alternative from the 'File' menu.
Step 4. Choose the 'PDF' option and then hit the 'Store' button to save it to your preferred location.

Method 4. JPG to PDF in Linux with PDF2Go (OCR)
You will have to follow these steps if you want to convert JPG to PDF with PDF2Go.
Step 1. Copy the URL of the picture to be converted to PDF2Go. You may also submit your photograph using the folder selector.
Step 2. You will see that a loading bar appears. When you're finished, your screen will be split. You can always see your picture on the hand side of the page, as well as the text you retrieved on the right.
Step 3. To adjust the language of your project, click on the button just beside the folder symbol.

 Home
Home
 G2 Rating: 4.5/5 |
  100% Secure


