When you share your worksheets with someone or when you send excel files outside the organization, you might want to keep other users from changing the cells that should not be changed. Also, you might want to prevent them from moving crucial data on your worksheet. This is the reason workplaces use password protection in Microsoft Excel. So, to unprotect the Excel sheet, you need to have a password. If you don't have the password, there are ways to unlock it.
If you have unprotected Excel workbooks and don't have the password, this article can help you out. Here are the different methods to do that.
In this article
Part 1: Unlock Excel Sheet with Password
If you have the password, you can unlock the Excel sheet without any hassle. But before that, you should know that passwords in Word for Mac and Excel for Mac come with a 15-character limit. You cannot open a document or workbook that is password protected in the Windows-based version of Word or Excel when the password is longer than 15 characters. So, if you have to open a file in Office for Mac, request the Window-based author to simply adjust the password.
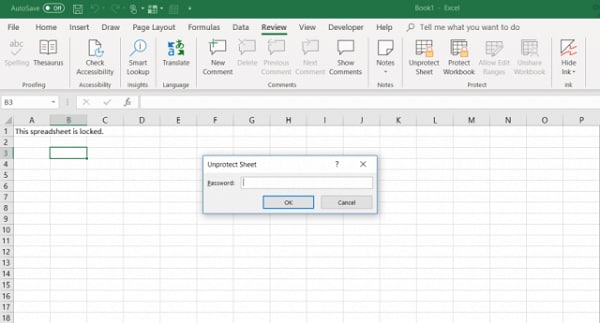
For the new version, you will have to follow the steps given below to unlock Excel sheet if you have a password.
Step 1 Open the workbook that you would like to remove or change the password for. On the Review tab, just click on Protect Workbook or Protect Sheet.
Step 2 Now, you have to click on Unprotect Sheet and then enter the password. For adding a new password, just click on Protect Workbook or Protect Sheet and thereafter, type and confirm the new password. When you are done, click on OK.
Step 3 For removing the password from the workbook, you have to click on Protect Workbook and click on 'Ok' without using the new password.
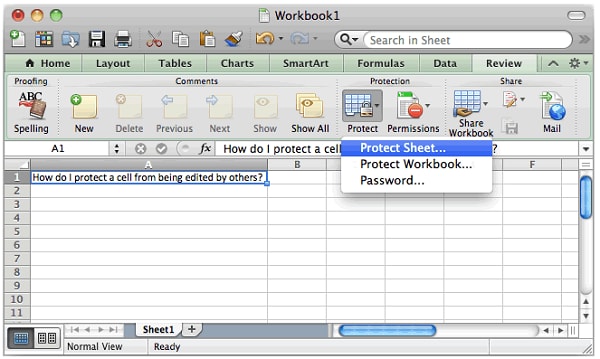
For Office 2011, to remove a workbook password, here are the steps you have to follow:
Step 1 Open the workbook that you would like to remove the password from. Check the Review tab to find the option Protection. Under this option, choose Password.
Step 2 Choose all contents in the box Password to modify or Password to open, and then press 'Delete'. When you are done, click on 'Save'.
Part 2: Unprotect Excel Workbook without Password Using PDFelement
To unprotect Excel Workbook without a password, you can use Wondershare PDFelement - PDF Editor Wondershare PDFelement Wondershare PDFelement. With this, you can use it to convert the Excel Workbook to PDF and then edit it. With PDFelement, you can easily convert the document to PDF.
To convert Excel to PDF using PDFelement, you have to follow the steps given below.
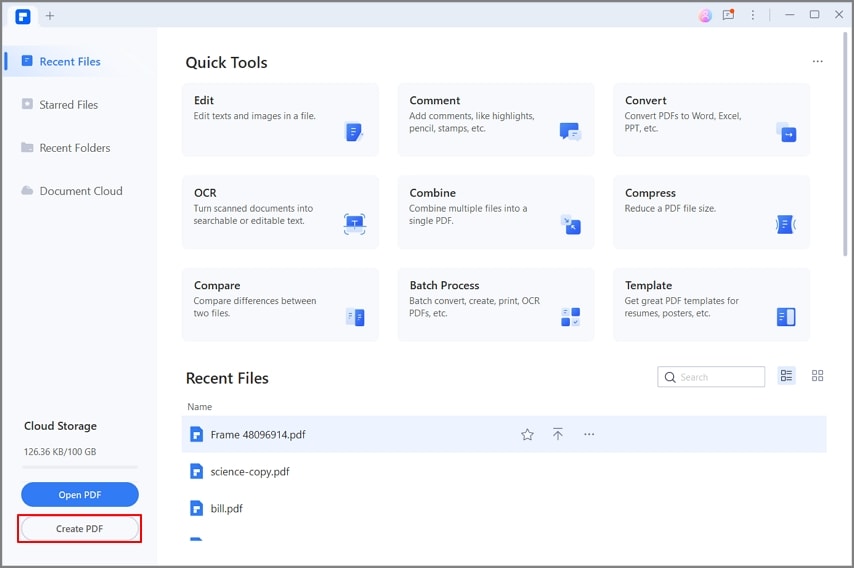
Step 1 Add the Locked Excel Workbook
Install the software on your device and launch it. On the main page, click on the 'Create PDF' button. You also have the option 'Home' tab and click on 'File' and 'Create'. This will show a window pop up and you just have to locate the protected Excel file and open it. The protected Excel will be opened without password
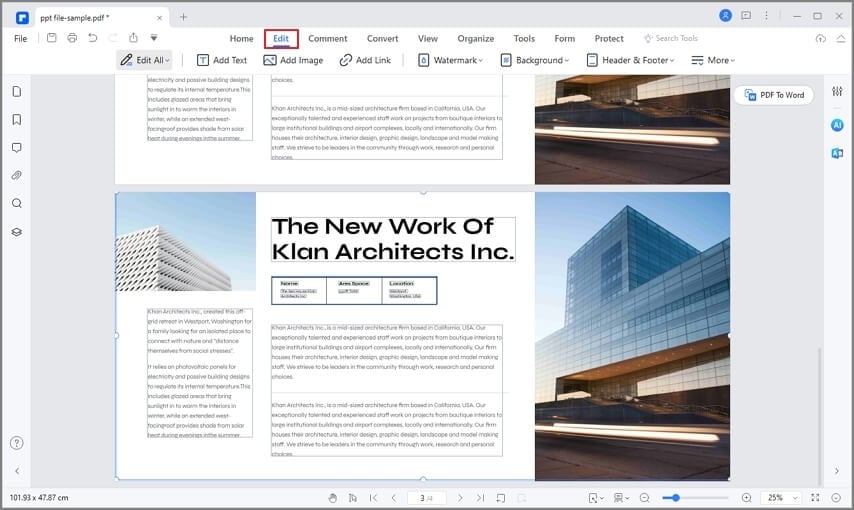
Step 2 Convert Excel Workbook to PDF
As soon as the process is complete, the locked PDF file opens in PDFelement, automatically without requiring your password. You can edit the file using different tools, such as adding images, editing text, adding a background, and a lot more. Thereafter, you can click on 'File' and select 'Save As' for saving the PDF file.<
PDFelement is an incredible PDF conversion tool that allows you to convert Excel to PDF. So, it is a good option for people who have to work with many PDF documents. These professionals can be educators, students, small business owners, and business writers. The tool provides great value for money as it is the most affordable option available in the market.
After converting the Excel sheet to a PDF file, you can copy the content to a new Excel workbook to edit.
Forget your Excel sheets password and can't open it? PDFelement gives you the best solution for all such PDF-related problems. Use the link below to learn more about the best way to deal with all PDFs.
Part 3: How to Unprotect Sheet without Password (For Excel 2010 and Lower)?
You might already be aware of the fact that it is easy to use a password for protecting a sheet in Excel. But unprotecting an Excel sheet is even easier, provided you have the password. But that doesn't mean unlocking an Excel sheet without a password is not easy.
You can unprotect an Excel sheet even without a password using the following method.
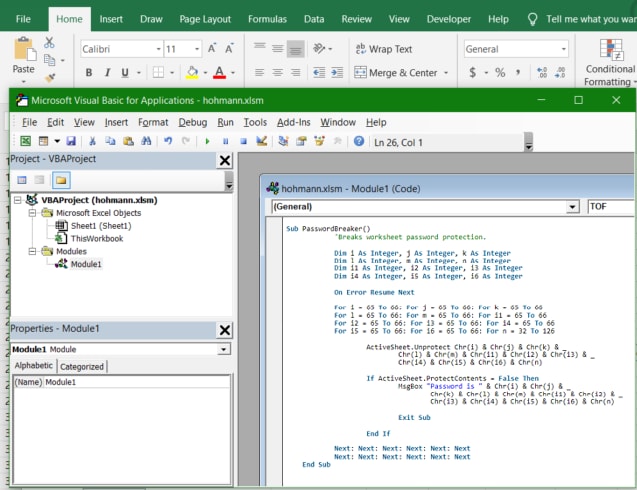
Step 1 Open the Excel sheet and shift to the password-protected sheet (make sure it is active when you are running the macro). Now, press Alt and F11 at the same time to open the Visual Basic editor.
Step 2 Next, right-click on the name of the Workbook given on the left panel and choose Insert and then Module from the context menu.
Step 3 In the window which appears, you will have to enter the code given below;
Sub PasswordBreaker()
'Breaks worksheet password protection.
Dim i As Integer, j As Integer, k As Integer
Dim l As Integer, m As Integer, n As Integer
Dim i1 As Integer, i2 As Integer, i3 As Integer
Dim i4 As Integer, i5 As Integer, i6 As Integer
On Error Resume Next
For i = 65 To 66: For j = 65 To 66: For k = 65 To 66
For l = 65 To 66: For m = 65 To 66: For i1 = 65 To 66
For i2 = 65 To 66: For i3 = 65 To 66: For i4 = 65 To 66
For i5 = 65 To 66: For i6 = 65 To 66: For n = 32 To 126
ActiveSheet.Unprotect Chr(i) & Chr(j) & Chr(k) & _
Chr(l) & Chr(m) & Chr(i1) & Chr(i2) & Chr(i3) & _
Chr(i4) & Chr(i5) & Chr(i6) & Chr(n)
If ActiveSheet.ProtectContents = False Then
MsgBox "Password is " & Chr(i) & Chr(j) & _
Chr(k) & Chr(l) & Chr(m) & Chr(i1) & Chr(i2) & _
Chr(i3) & Chr(i4) & Chr(i5) & Chr(i6) & Chr(n)
Exit Sub
End If
Next: Next: Next: Next: Next: Next
Next: Next: Next: Next: Next: Next
End Sub
Step 4 Now, press the F5 button and then press the Run button present on the toolbar and wait for a few minutes.
Step 5 The macro reports the cracked password that isn't the original one but it still works. There is no need to keep the fake password in mind or enter it somewhere else. Just click on 'OK' and the Excel sheet will be unprotected.
But to unprotect the Excel sheet, here are a few tips you need to keep in mind.
If the Excel file has more than one protected sheet, you will have to run the macro for every sheet individually for unprotecting it.
For unprotecting Excel sheets without passwords in the new versions, you can save the document as Excel 97-2003 workbook first. Thereafter, close Excel and then open it again. This way it will be opened in compatibility mode. Run the macro for unprotecting the worksheet and save the Excel sheet back in the .xlsx file. Another way is to use a free tool.
Part 4: FAQs
1. How to Lock and Unlock Cells in Excel?
To prevent any unauthorized changes, you can lock the cells in Excel. When you have a protected Worksheet, its content can't be changed. But before you lock the cells, you should also know how to unlock them.
By default, the cells get locked when a worksheet is protected. In case there are cells that users should be able to change after protecting the worksheet, unlock them before protecting the worksheet.
Step 1 Choose the cells that you would like to unlock. Then click on Format present on the 'Home' tab.
Step 2 Choose 'Format Cells'. Click on the 'Protection' tab. Clear out the Locked check box. You can also toggle the lock on and off just by clicking the Format button and choosing 'Lock Cell'. When you are done click on 'OK'.>
The chosen formulas are now going to stay unlocked and editable by others after the sheet has been protected.
2. How to Protect a Worksheet in Excel?
After you are done preparing the worksheet, you can protect it. You will have to follow a few easy steps to do that. Let's take a look at these steps.
Step 1 Click on the 'Review' tab. If needed, expand the 'Protect' group. Now, you have to click on the 'Protect Sheet' option.
Step 2 You can also protect a worksheet just by right-clicking on the sheet tab and choosing Protect Sheet from the contextual menu. Choose what you would like to protect. Remember, a password is not necessary to protect the sheet. But if you don't enter one, anyone will be able to unprotect it. Once you are done, click on 'OK'.
 Home
Home
 G2 Rating: 4.5/5 |
  100% Secure


